
First, a tearful confession: Remember this summer when we tore down the Babushka garage like it was the Berlin Wall? Remember how Scott and I were such big heroes for bravely destroying that ugly monument to Car Culture, reclaiming green space for Mother Earth and our children’s future, blah blah blah?
The Truth: If we had a spare $13,000 we would have just paid somebody to build us a new garage. Since we didn’t have $13,000, we simply tore the garage down and pretended like it was the original idea that it had nothing to do with being broke.
To our delight, we realized NOT having a garage was pretty amazing. I don’t normally advise living paycheck-to-paycheck, but we couldn’t have been happier with the results.
The thrill of that decision wore off quickly: We nearly doubled the size of our back yard, but we still couldn’t enjoy it due to clusters of poisonous weeds, rusty nails, rat burrows, concrete and miles of old pantyhose.* We also discovered the pit where Santa buries the presents of naughty boys and girls:
 We hired a crew to exfoliate the toxic layer of debris, and lay down some grass seed and mulch. Definitely an improvement, but with the garage missing, our back yard was still a fresh wound exposed to the alley. It now attracted litter like a magnet in a paper clip factory: Empty doughnut boxes, beer cans, chip bags. After discovering the third pile of unidentified feces (the evidence suggests an alcoholic dog), we got some quotes from “professionals” to build us a new fence.
The bad news? The lowest quote was $1,500 and we didn’t HAVE $1,500 to spend. The good news? We had just enough money to buy some wood and build the fence ourselves. “The real bad news,” replied Scott, the resident Home Improvement Realist, “is that we don’t know HOW to build a fence.”
We sat quietly for a minute and thought about that poopy, trespassing alcoholic dog. It was time to learn a new skill. It’s just a fence, we told ourselves, nobody will die if we screw it up.
«« WARNING! »» This is not a technical tutorial on fence-building; we completely made this up as we went along. If you want to build a fence, I’ve gone to the trouble of watching nearly half an hour of YouTube videos about fence-building, and this was the best. Tell me if you think this approachable yet ruggedly handsome everyman with the radio voice is an actual handy man or just an actor:
Another, less urgent, warning: Most of these videos are set on pristine suburban lawns with acres of virgin grass and soil. We were dealing with a Chicago city lot: Our east property line is a brick wall, our west line is a crumbling concrete parking pad. Our yard – even three feet down – is infested with concrete and debris (and subterranean pantyhose) dating back to the Harrison administration. Yes, this guy was president when our house was built. And no, I’ve never heard of him, either:
 SUGGESTED TOOLS: 4-foot level, string level, post level, power drill, impact driver, chop saw, nail gun, post-hole digger, two-person auger, shovel, iron rebar spike. Note that almost all these items were borrowed from friends and neighbors. If you don’t have friends and neighbors, then hopefully you have a lot more money than we do.
STEP ONE — MEASURE: Mark the area that needs a fence with a bright orange string, because bright orange is the Official Color of Construction and Safety. Determine where the posts will go based on the length of your panels (pre-made picket panels are usually 8 feet wide). Remember to factor the thickness of your posts into the equation. For example, our posts were 6 inches thick, so we measured from the center of the post, at 3 inches. You’ll also have to figure out where the gate will stand, and sort of work your way out from there. If you have access to one, I recommend getting a high school freshman to do the math, cause all that algebra and geometry is still fresh in his head.
 Either way, you will screw up the measurements at least once.
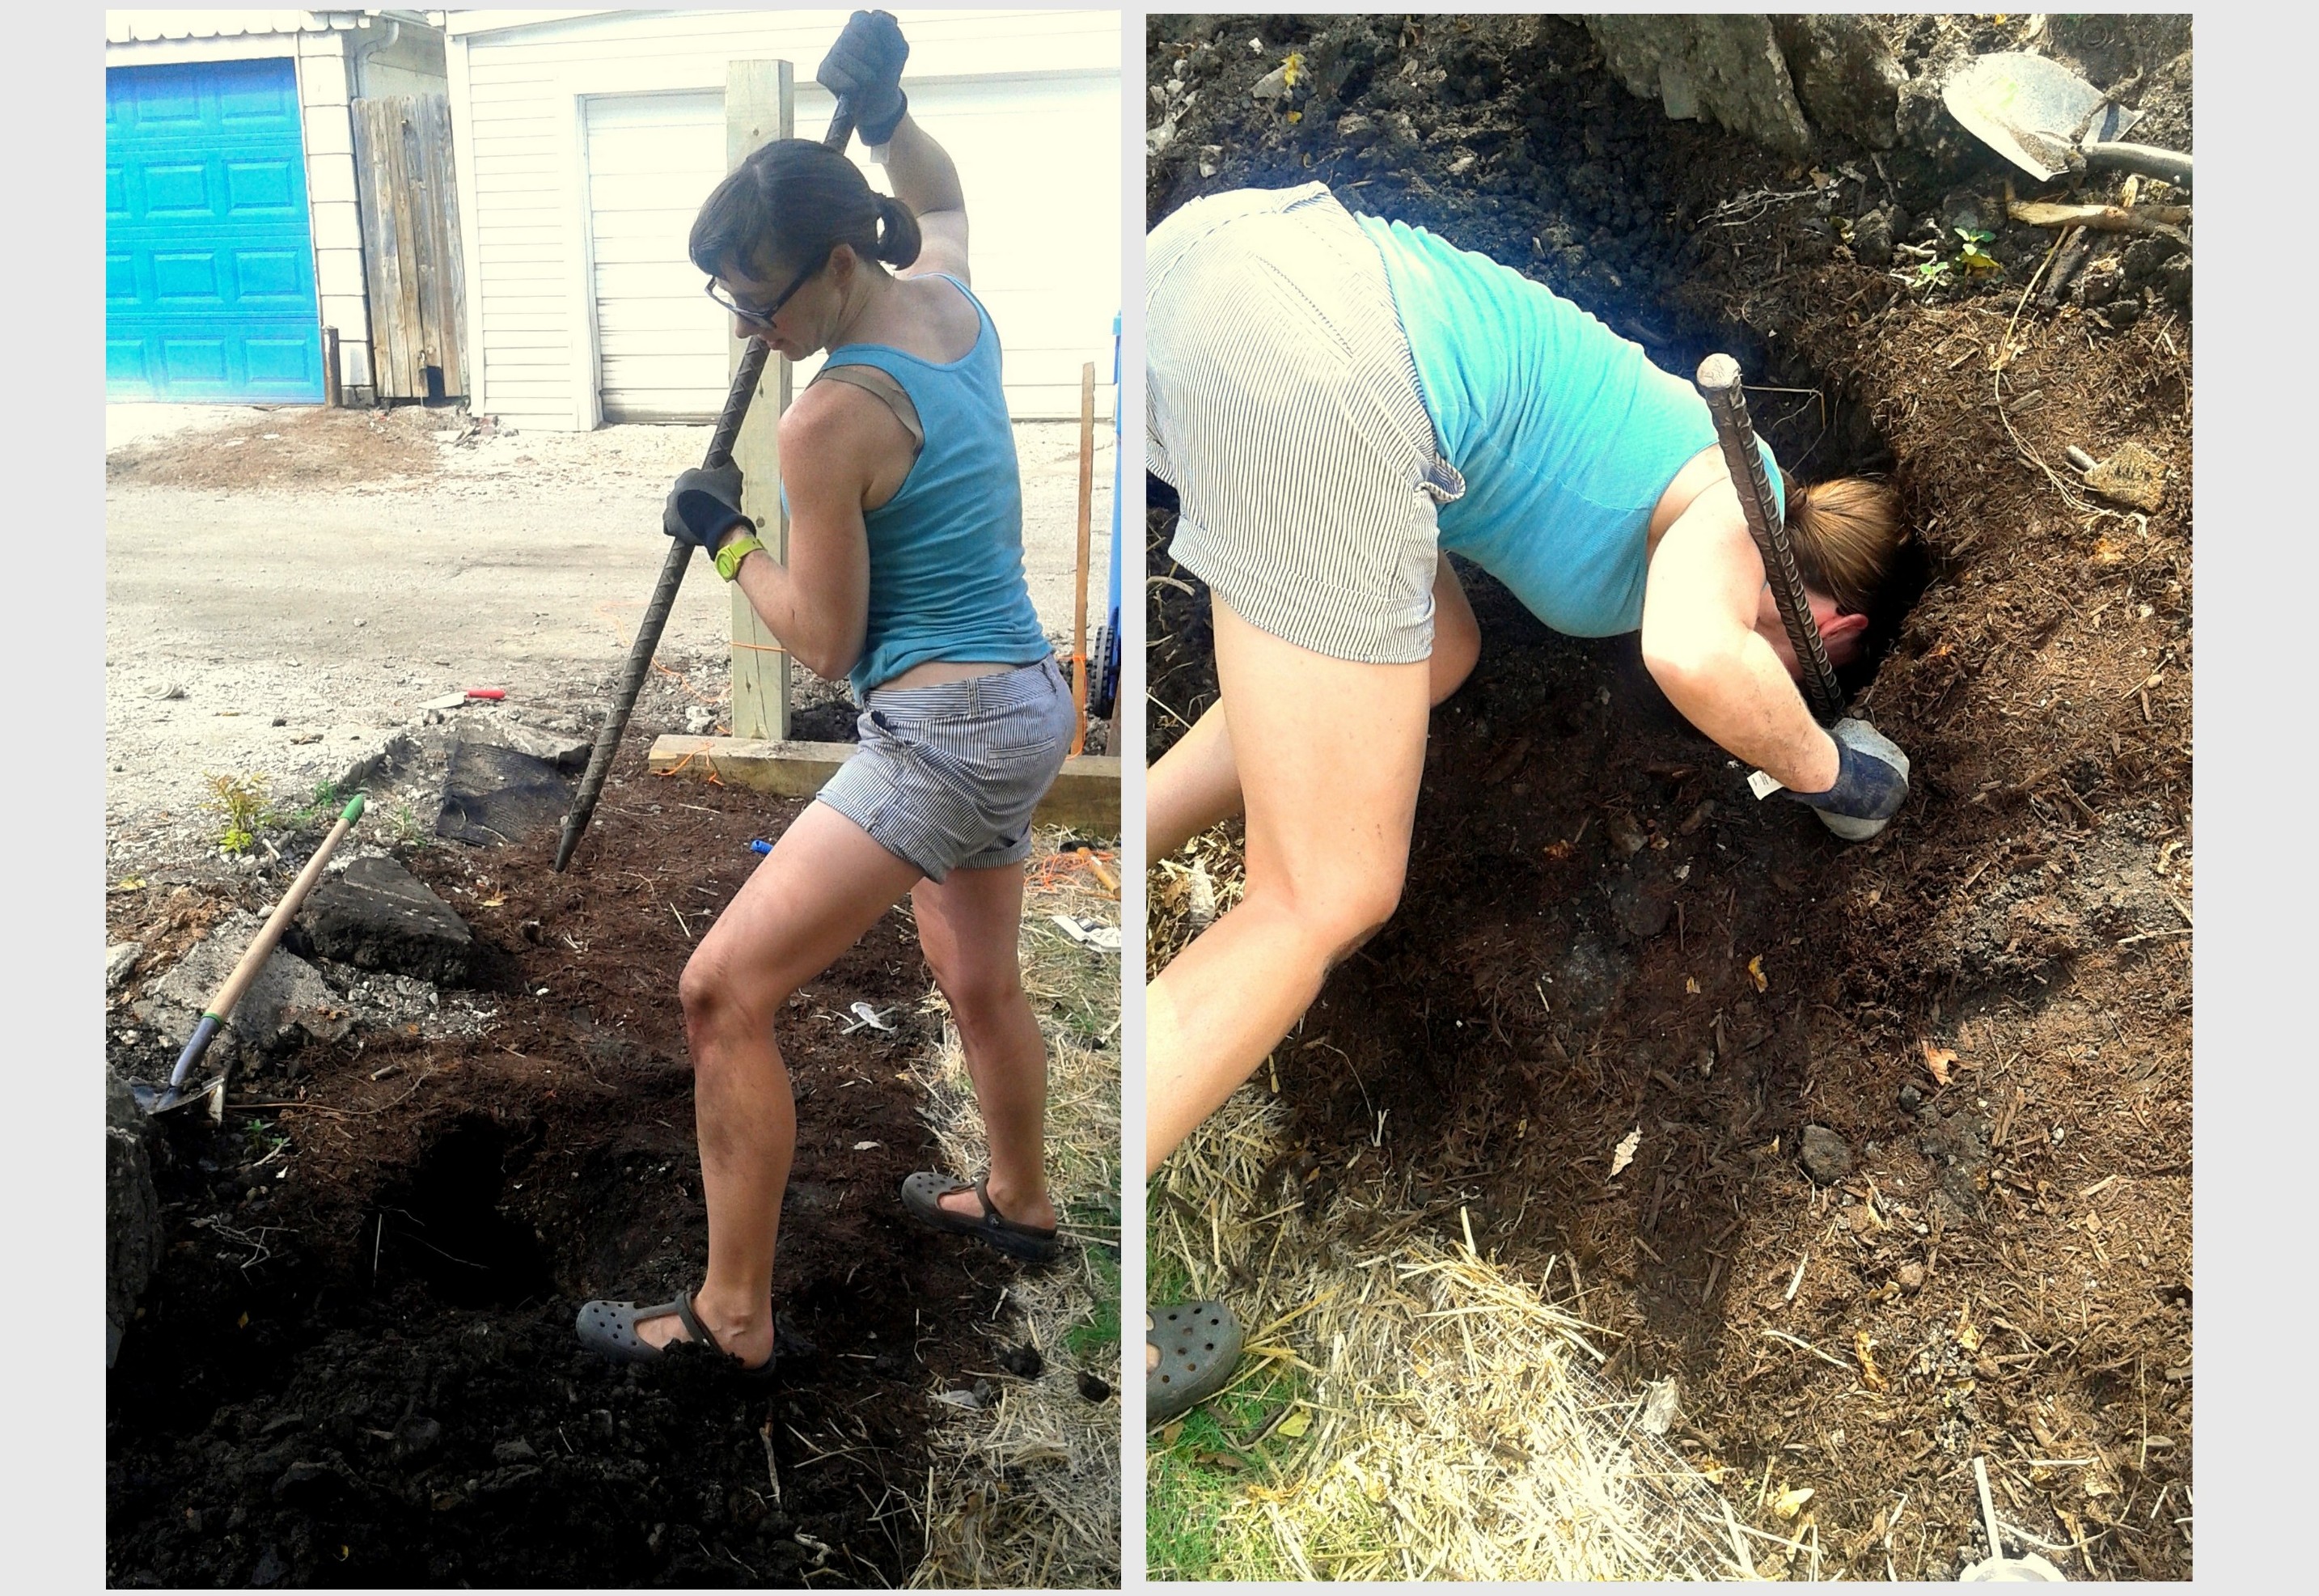
STEP TWO — ERECTING FENCE POSTS: This is the worst part of the entire project, or at least the dirtiest and back-breakingy-est. Dig the post hole three times wider than the the post – 18 inches for our monster 6-inch posts – and (I’m totally making this part up) 1/3 as deep as your fence posts (about 2 ½ feet for an 8-foot post). We started with a shovel, then moved on to a post-hole digger:
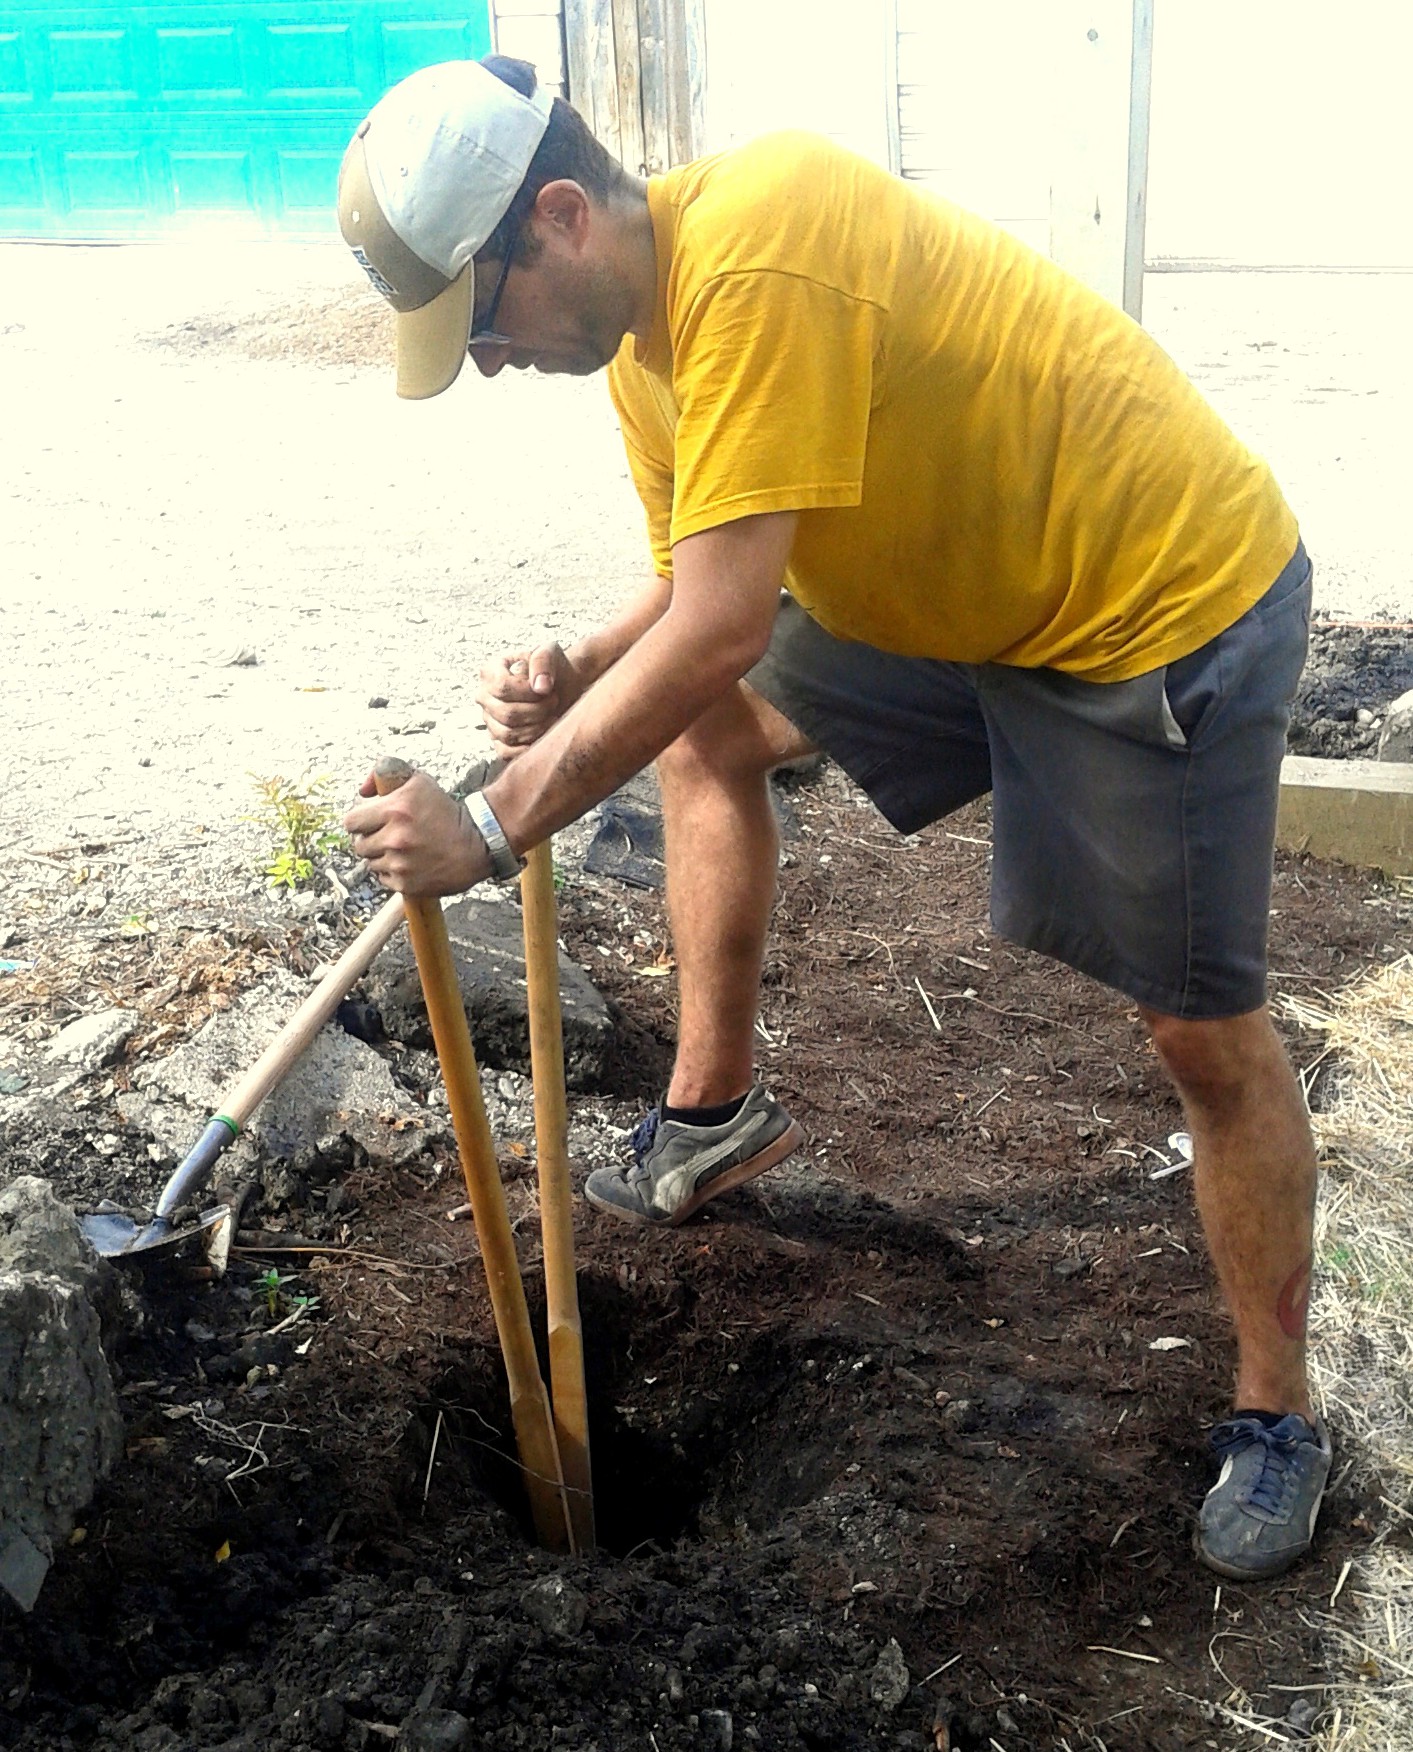 The post hole digger was giving up a teaspoonful of dirt at a time; its delicate petals helpless against solid debris. When it hit concrete, I just went crazy on that hole with an iron rebar spike. You have no idea how emotionally satisfying this was:
 You can leave the pantyhose intact; it won’t affect the stability of your fence.
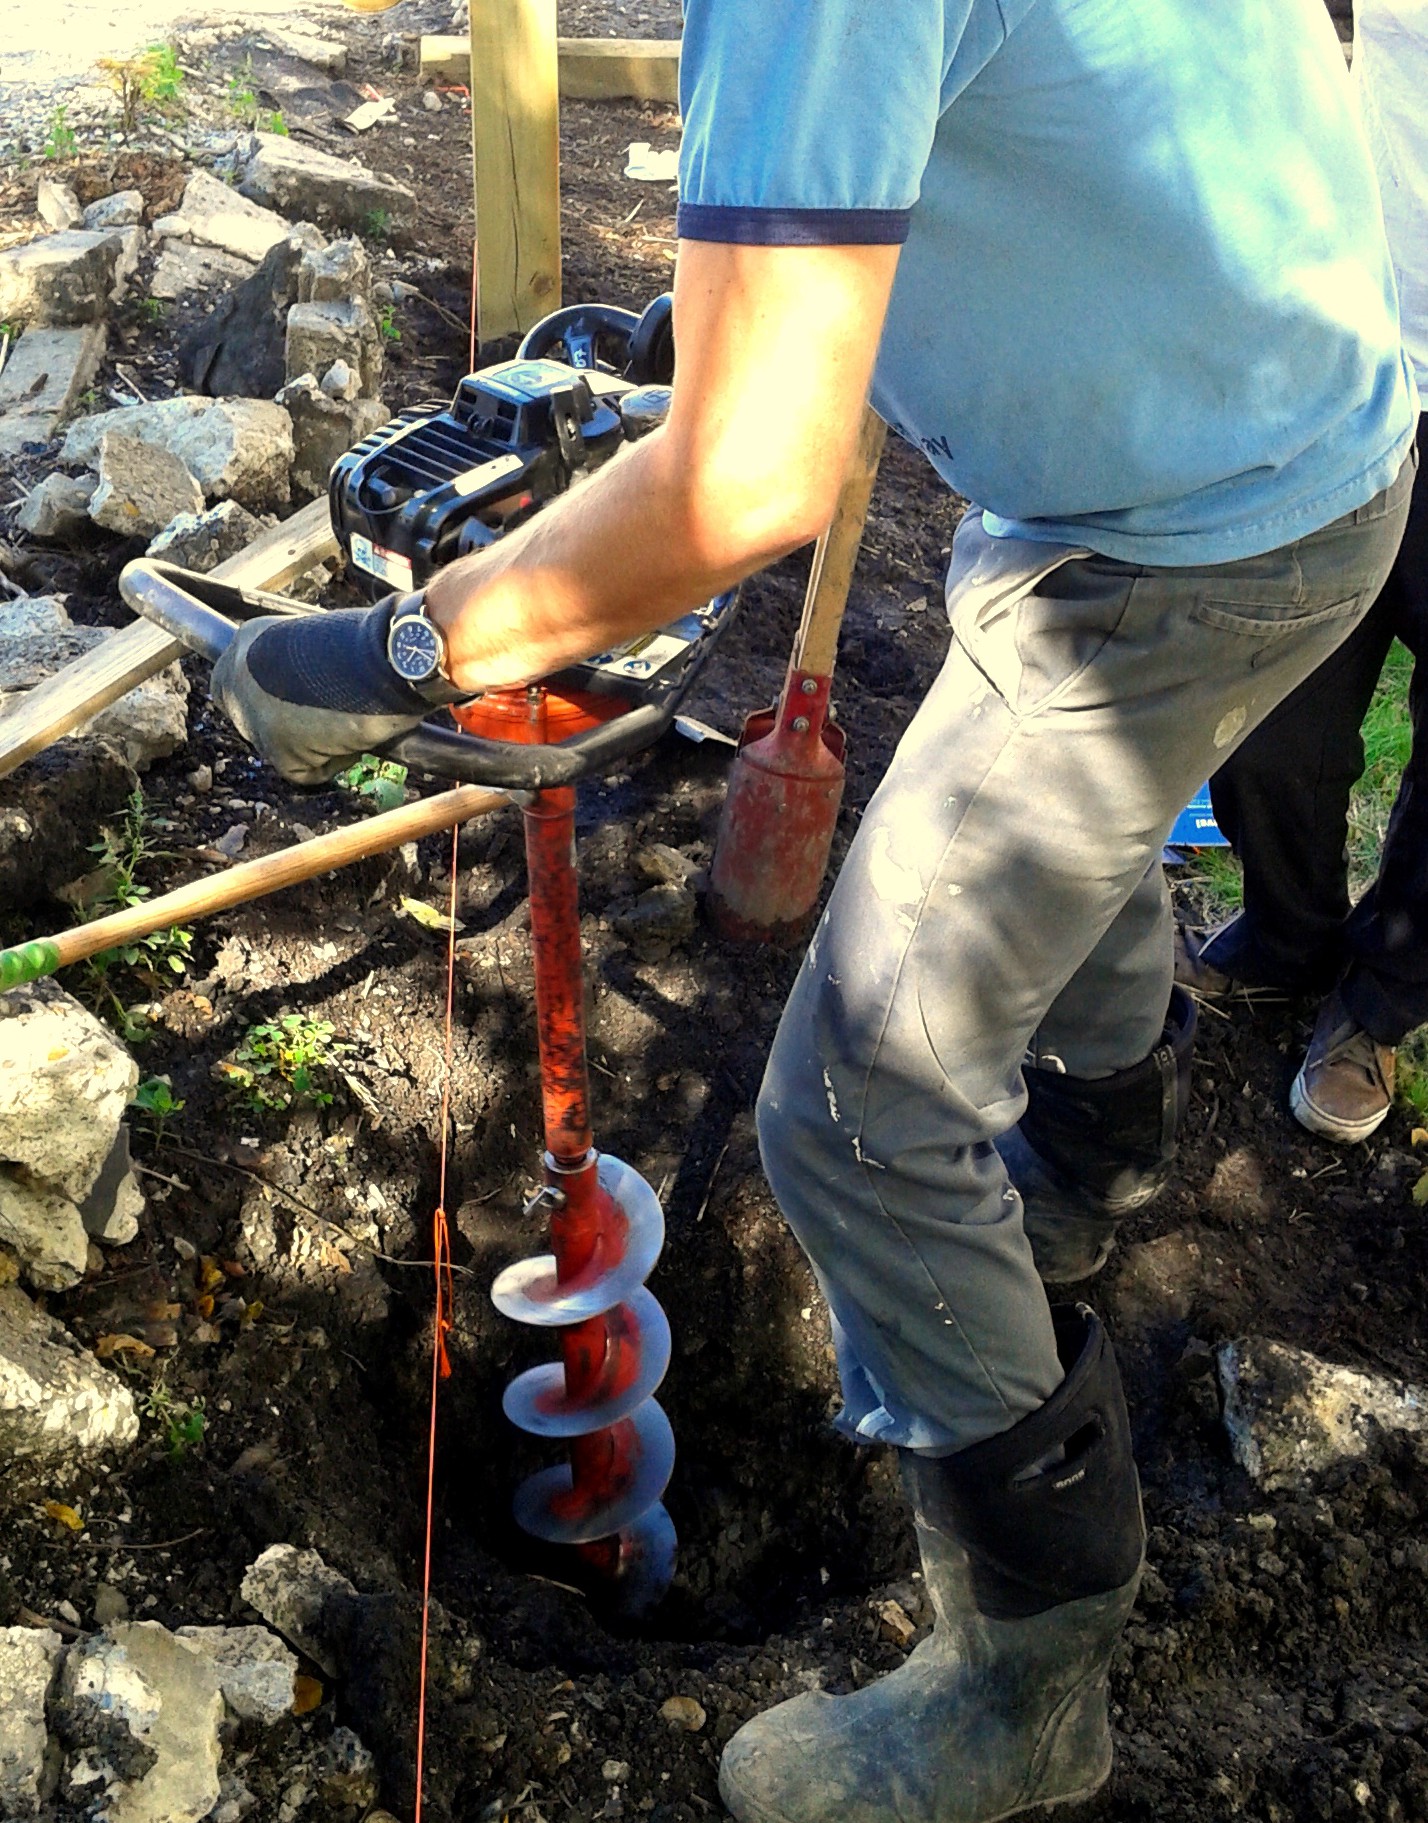
The second day of digging, we rented a power auger** from the big box store. We imagined that the ground was a Giant Bottle of Wine that only we could open with our magical Giant Cork Screw, and that any minute we would hit pay-dirt and Spanish tempranillo would squirt 6 feet into the air. Back in reality, the auger was useless the second it hit a chunk of concrete; then it was back to Neolithic times with the iron spike.
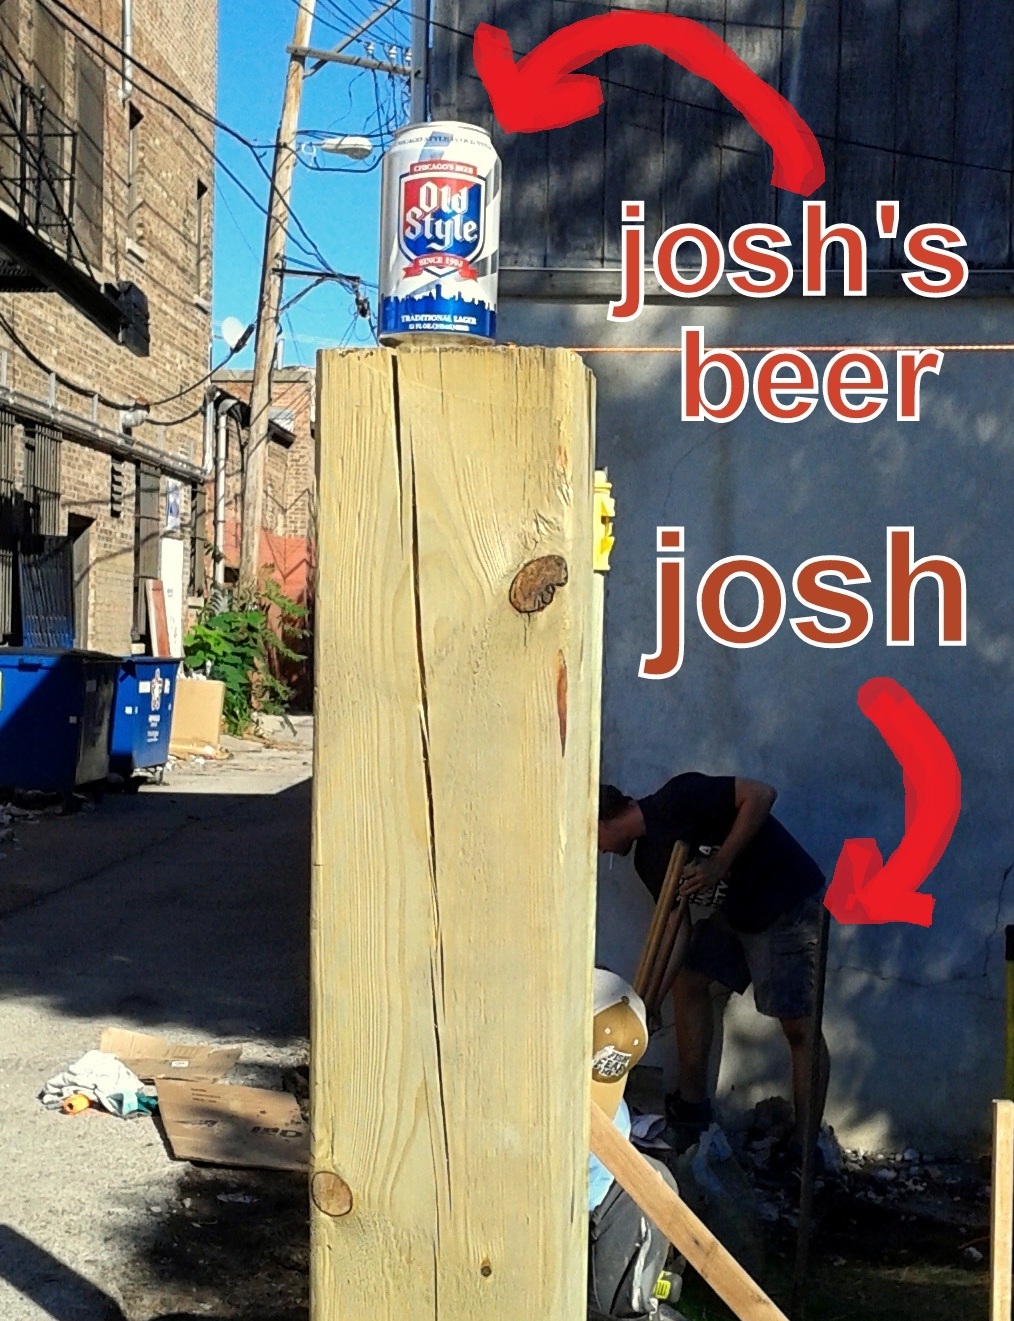
 Whew. This would be a good time to take a break and walk the kids to the park. Oh look, there’s your friend Josh with his kid. Tell Josh about the dirty, backbreaking work you have planned for that afternoon. Coincidentally, Josh is looking for something to do that day, preferably something that builds upper-body muscles. An hour later, Josh shows up in your back yard with a six-pack of Old Style. Josh, someday you’ll learn that WE’RE the ones who are supposed to buy YOU the beer.
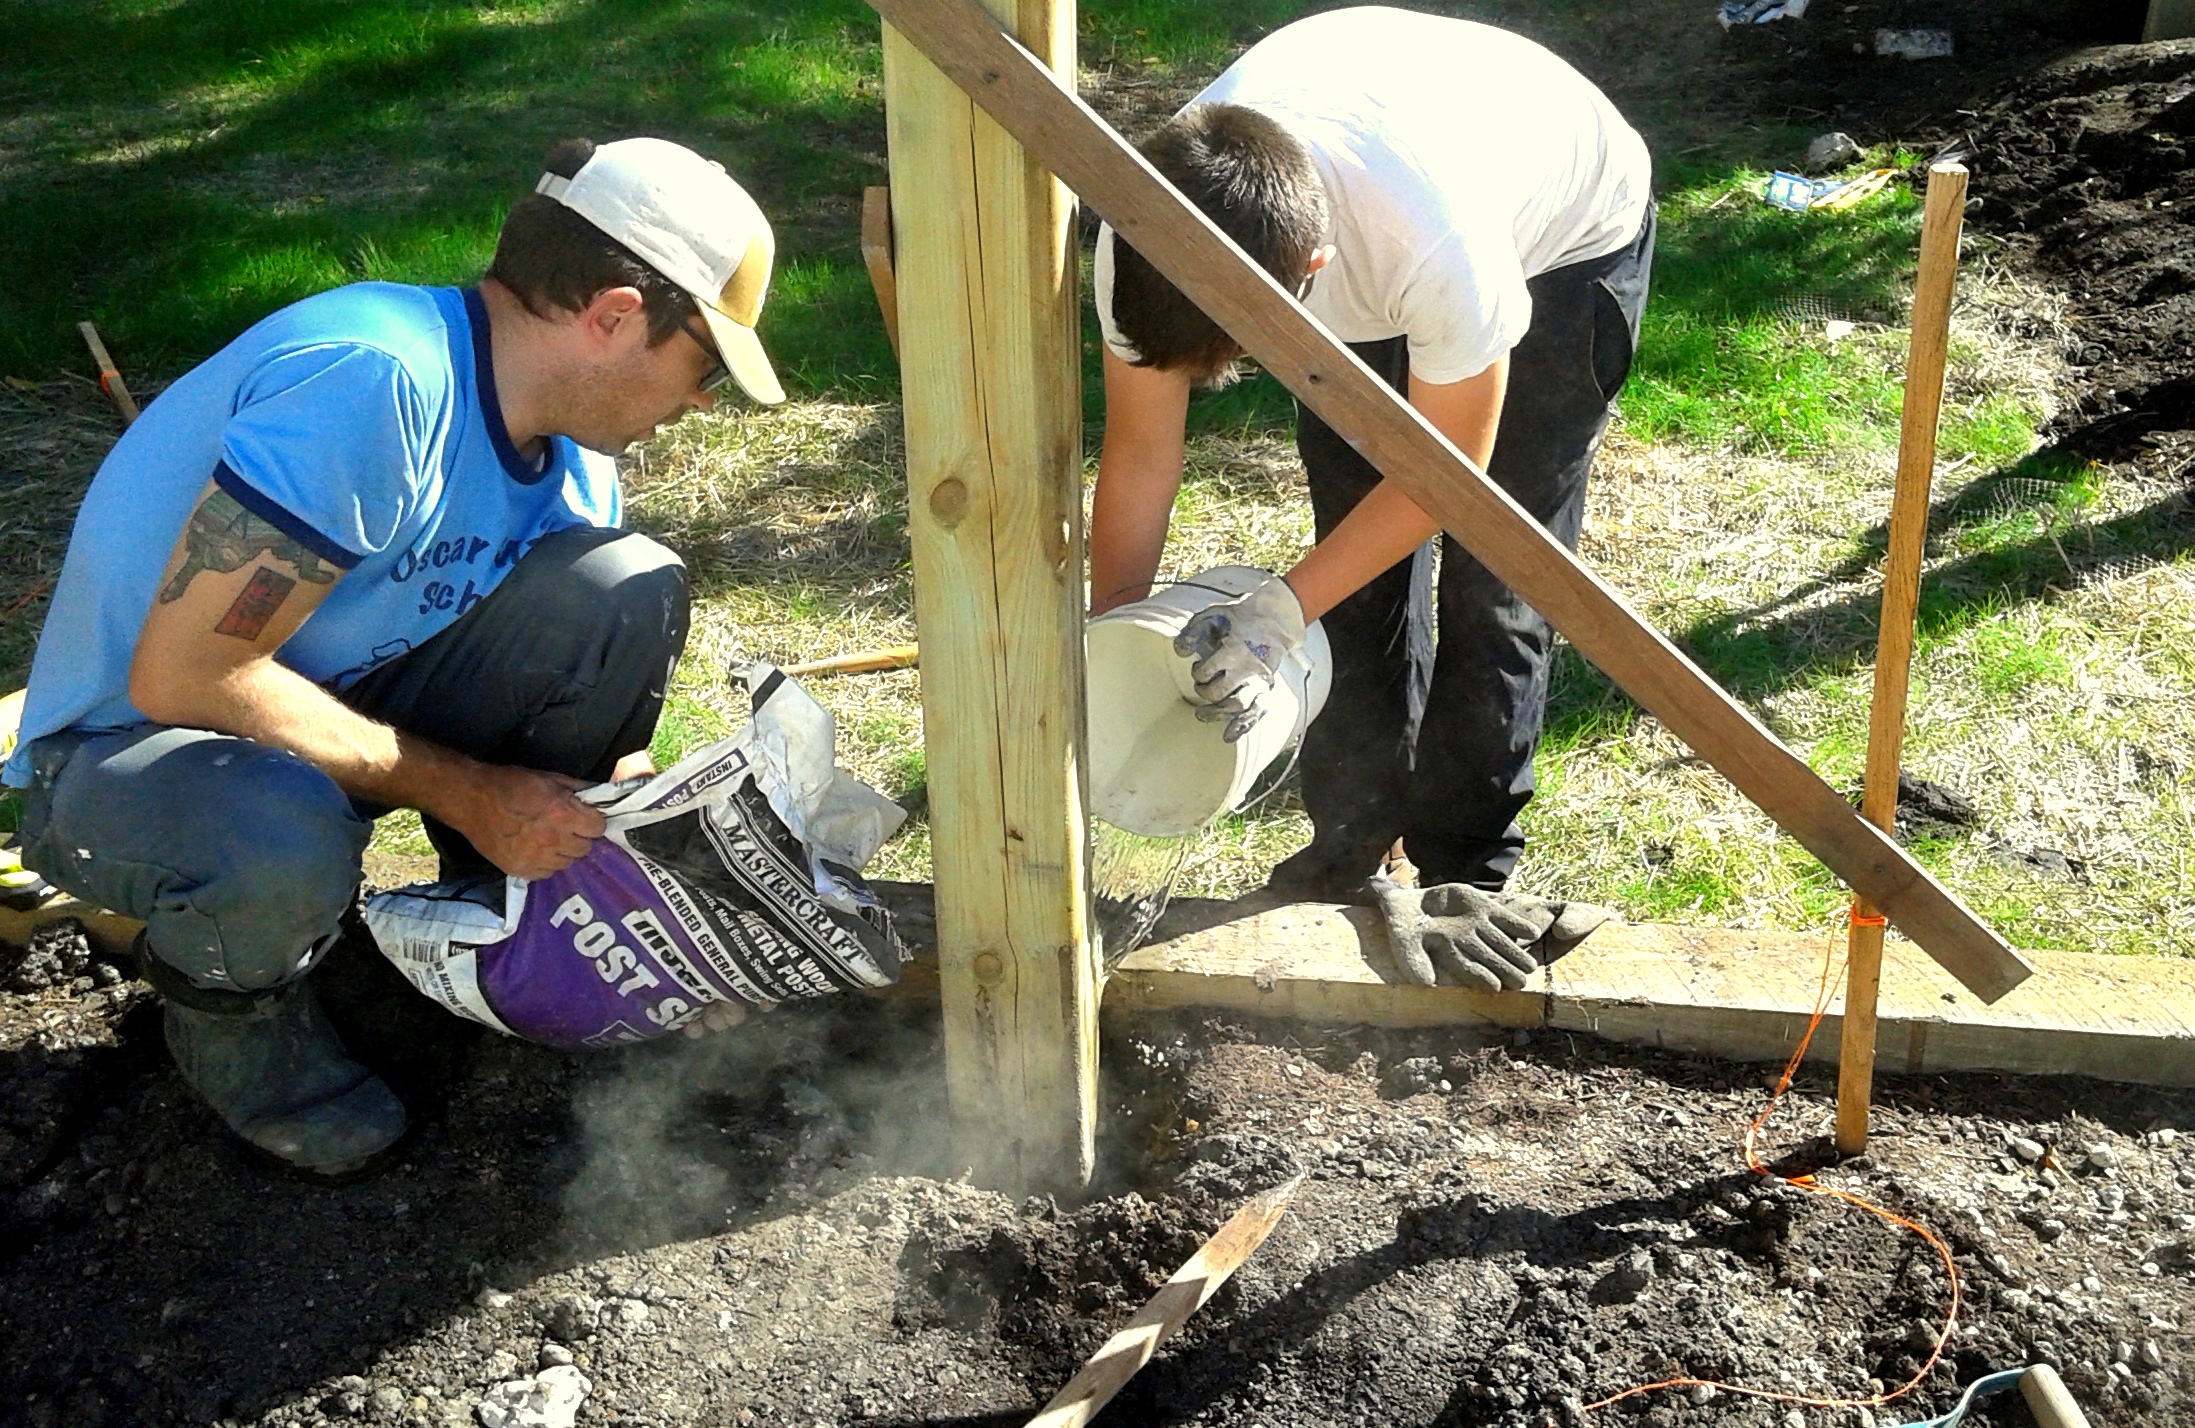
 With all this help, the holes practically dig themselves. Set the first post in its hole and check for levelness (levelity? levelation?) with a post level. Pour a bag of quick-set dry concrete into the hole, and then pour a gallon of water over that, and mix it up with a stick (not your Good Stick). Check to make sure your keys, wallet and phone are accounted for, because that stuff sets quick. Or as the bag says, “QUIK!” Repeat with all the other posts, obviously.
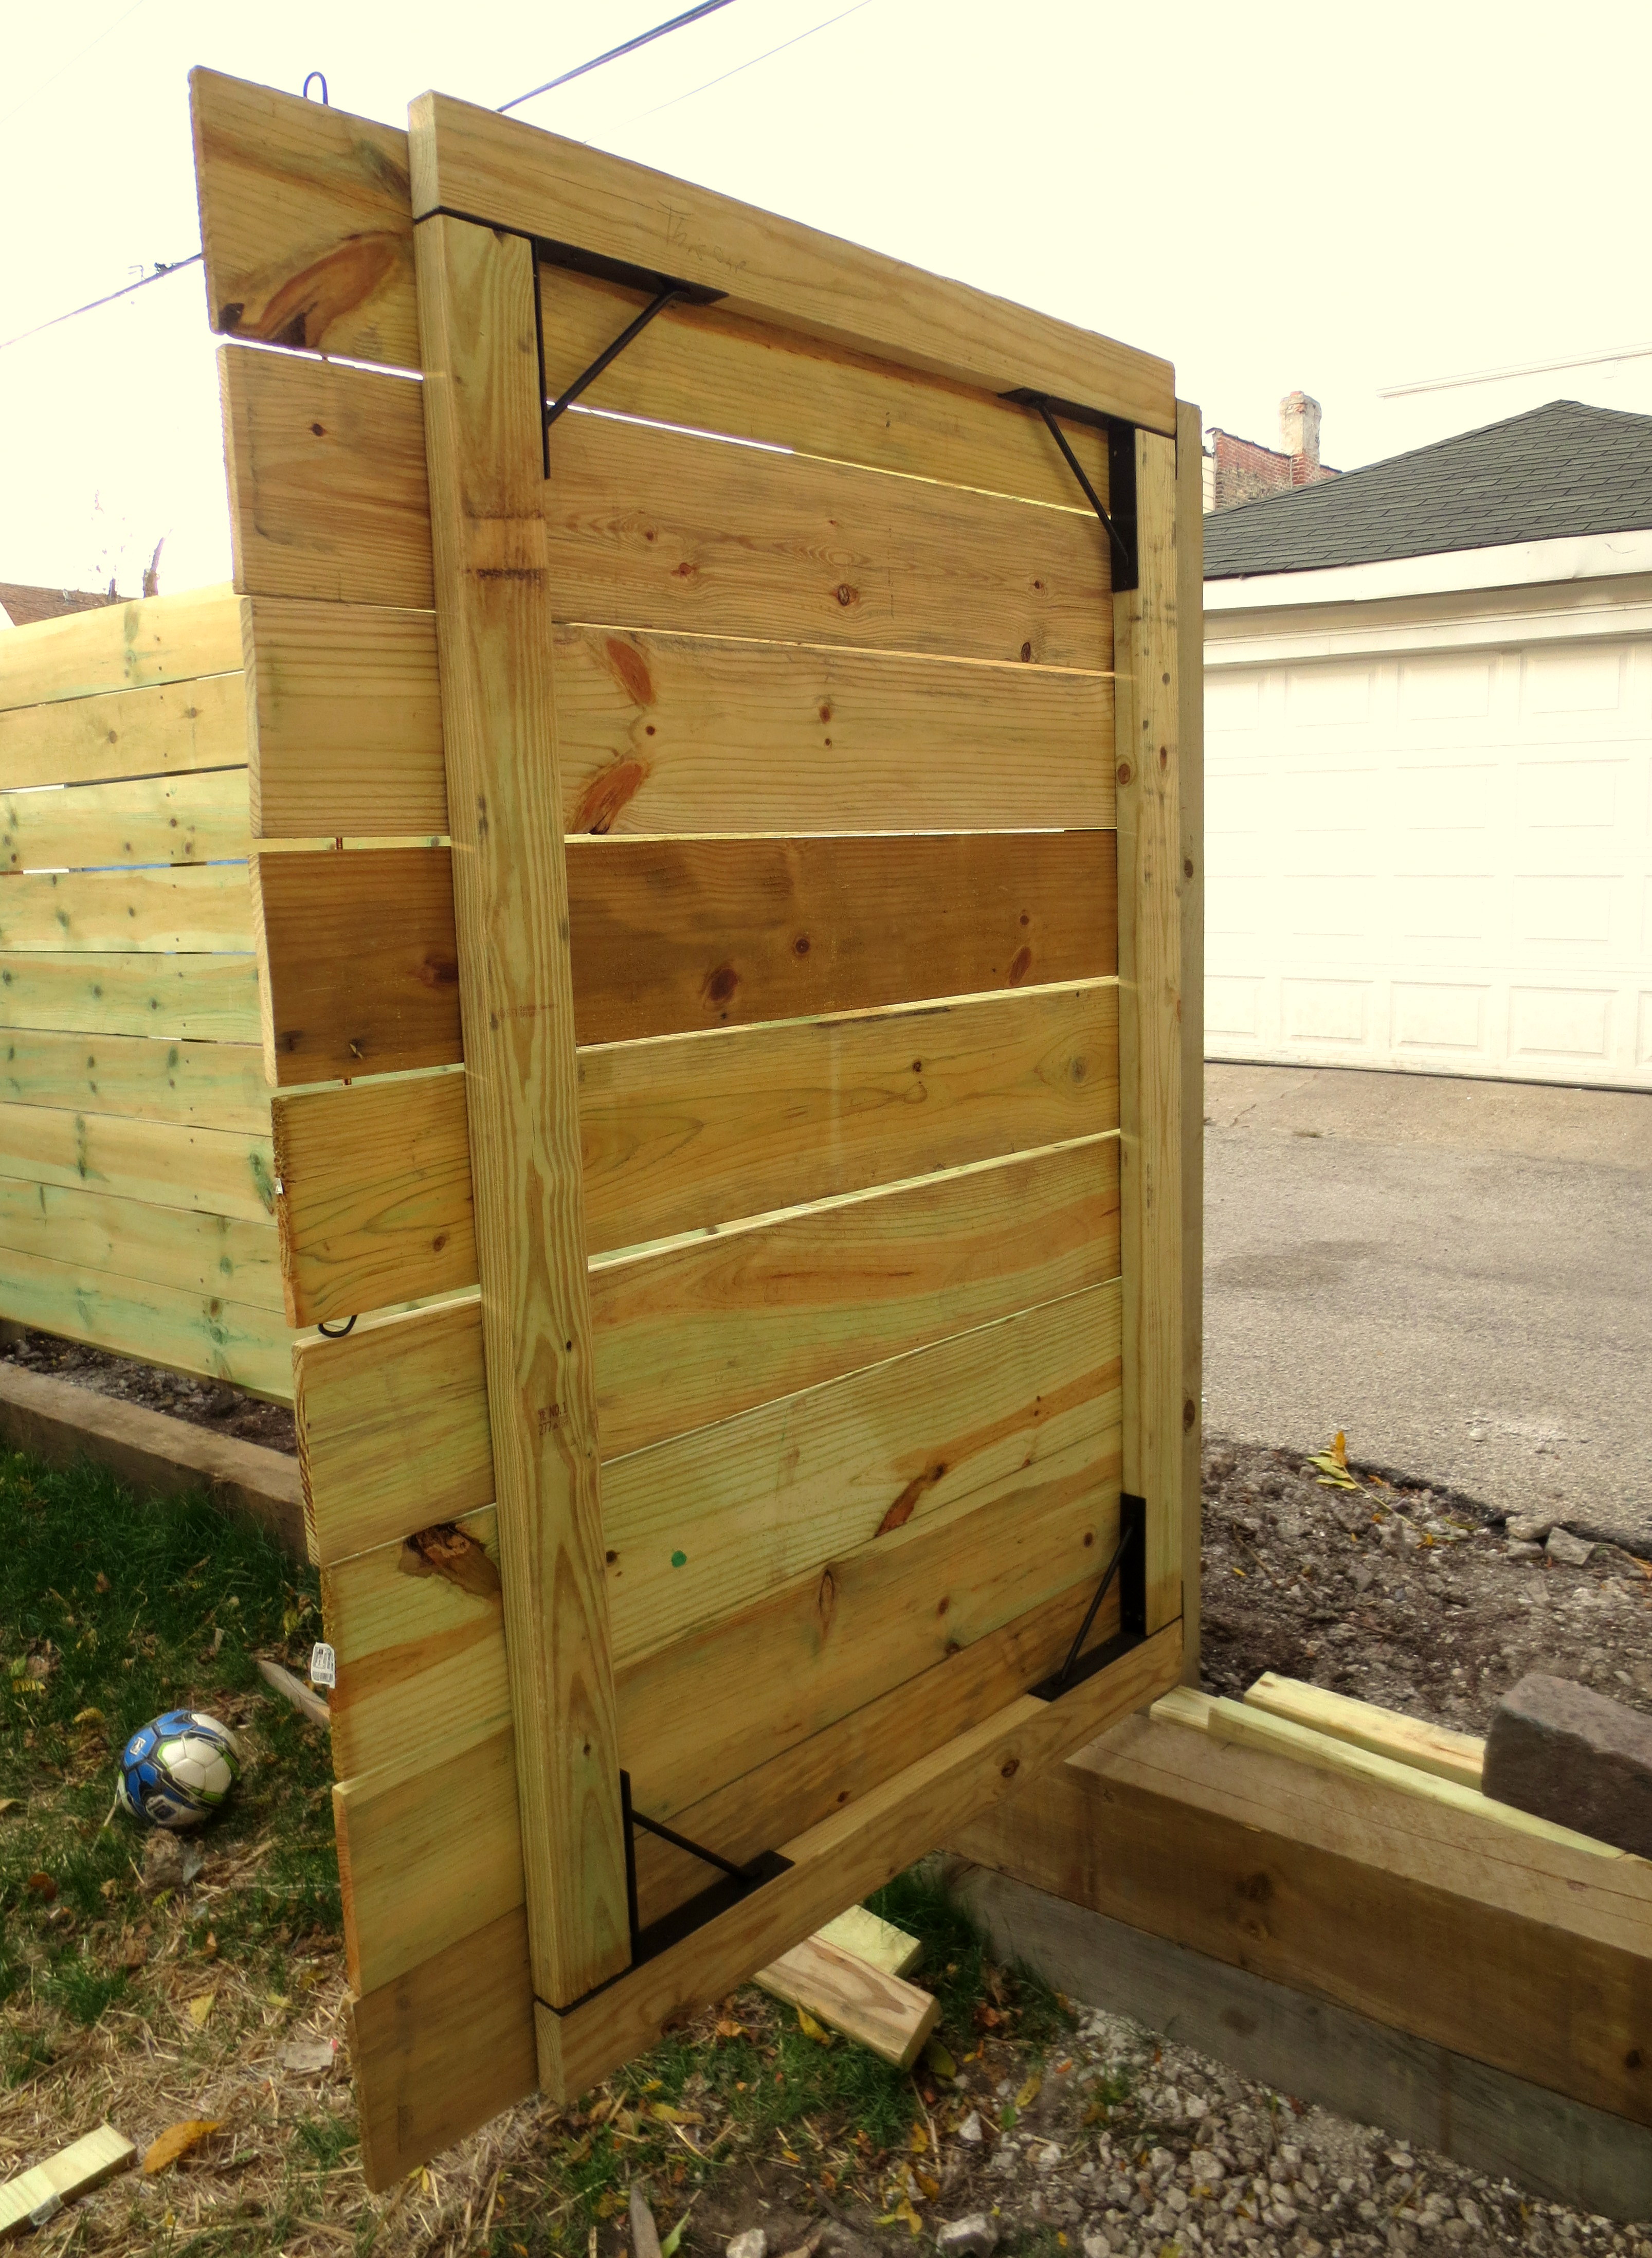
 STEP THREE — BUILD THE SKELETON: We didn’t want to screw the rails directly into the posts, like savages. Scott chose a more gentlemanly approach, installing brackets on the inside of the posts, near the top and bottom of where the pickets would hang, and then tenderly slipped 2x4s into the brackets.
 For extra stability, we then screwed one 2×4 to the horizontal rails between each post. This is to prevent the final pickets from sagging in the middle or becoming warped over time, as we all tend to do.
 With the skeleton complete, the finish line was in sight! Now, according to the Handsome Man on the Internet, all we had to do was grab some pre-assembled fence panels from the hardware store, screw them on, and within hours we would have a fence just like everybody else’s.
STOP RIGHT THERE. You are now free to do WHATEVER THE HECK YOU WANT with the rest of the fence. At this point it’s just decoration; You could make the “skin” of your fence out of peacock feathers or mastodon bones or baby socks or macramé or 3½-inch floppy disks or even pantyhose.***
Perhaps you’ll come home from a funeral and casually pick up the fence brochure that one of the contractors left. You contemplate the Conventionally Beautiful Blonde American Family, and their Photoshopped Blonde Dog and realize through your tears that life is too short for ugly fences.

Also, why don’t they have feet?
Later, you go for a walk around your neighborhood, and in a surge of fresh air it hits you: YOUR PICKETS SHALL BE HORIZONTAL. In the algebra of your aesthetics, Horizontal = Sleek + Modern + (A Little Bit Sexy).
You barrage your husband with more YouTube videos until he agrees. You spend a rare child-less Date Night at Menard’s ordering wood. Sure, it’s more expensive than the pre-made vertical panels, but what could be more romantic than a husband submitting to all his wife’s aesthetic desires, and then going out for ice cream? (don’t answer that).
Once the wood is delivered, you may have a second revelation: Unlike your TOTALLY CONVENTIONAL neighbors, who have obviously given up on being fun or interesting, you are going to hang the panels on the inside of the fence, leaving the skeleton exposed to the alley. You don’t wear your clothes inside out, or serve pancakes with the burnt, pockmarked side up, do you? NO. You want to see the finished side. The good-looking side.
STEP FOUR — HANG THE PANELS: Simply place the first panel over the bottom rail, level it, and shoot some nails into the posts and middle rail with your nail gun. Keep adding panels until you reach the top. What a great father-son bonding activity!
 Repeat the whole process on the next section, but check to make sure that the panels on adjacent sections are are always lined up. The goal is to create one continuous horizontal line across the entire width of the fence.
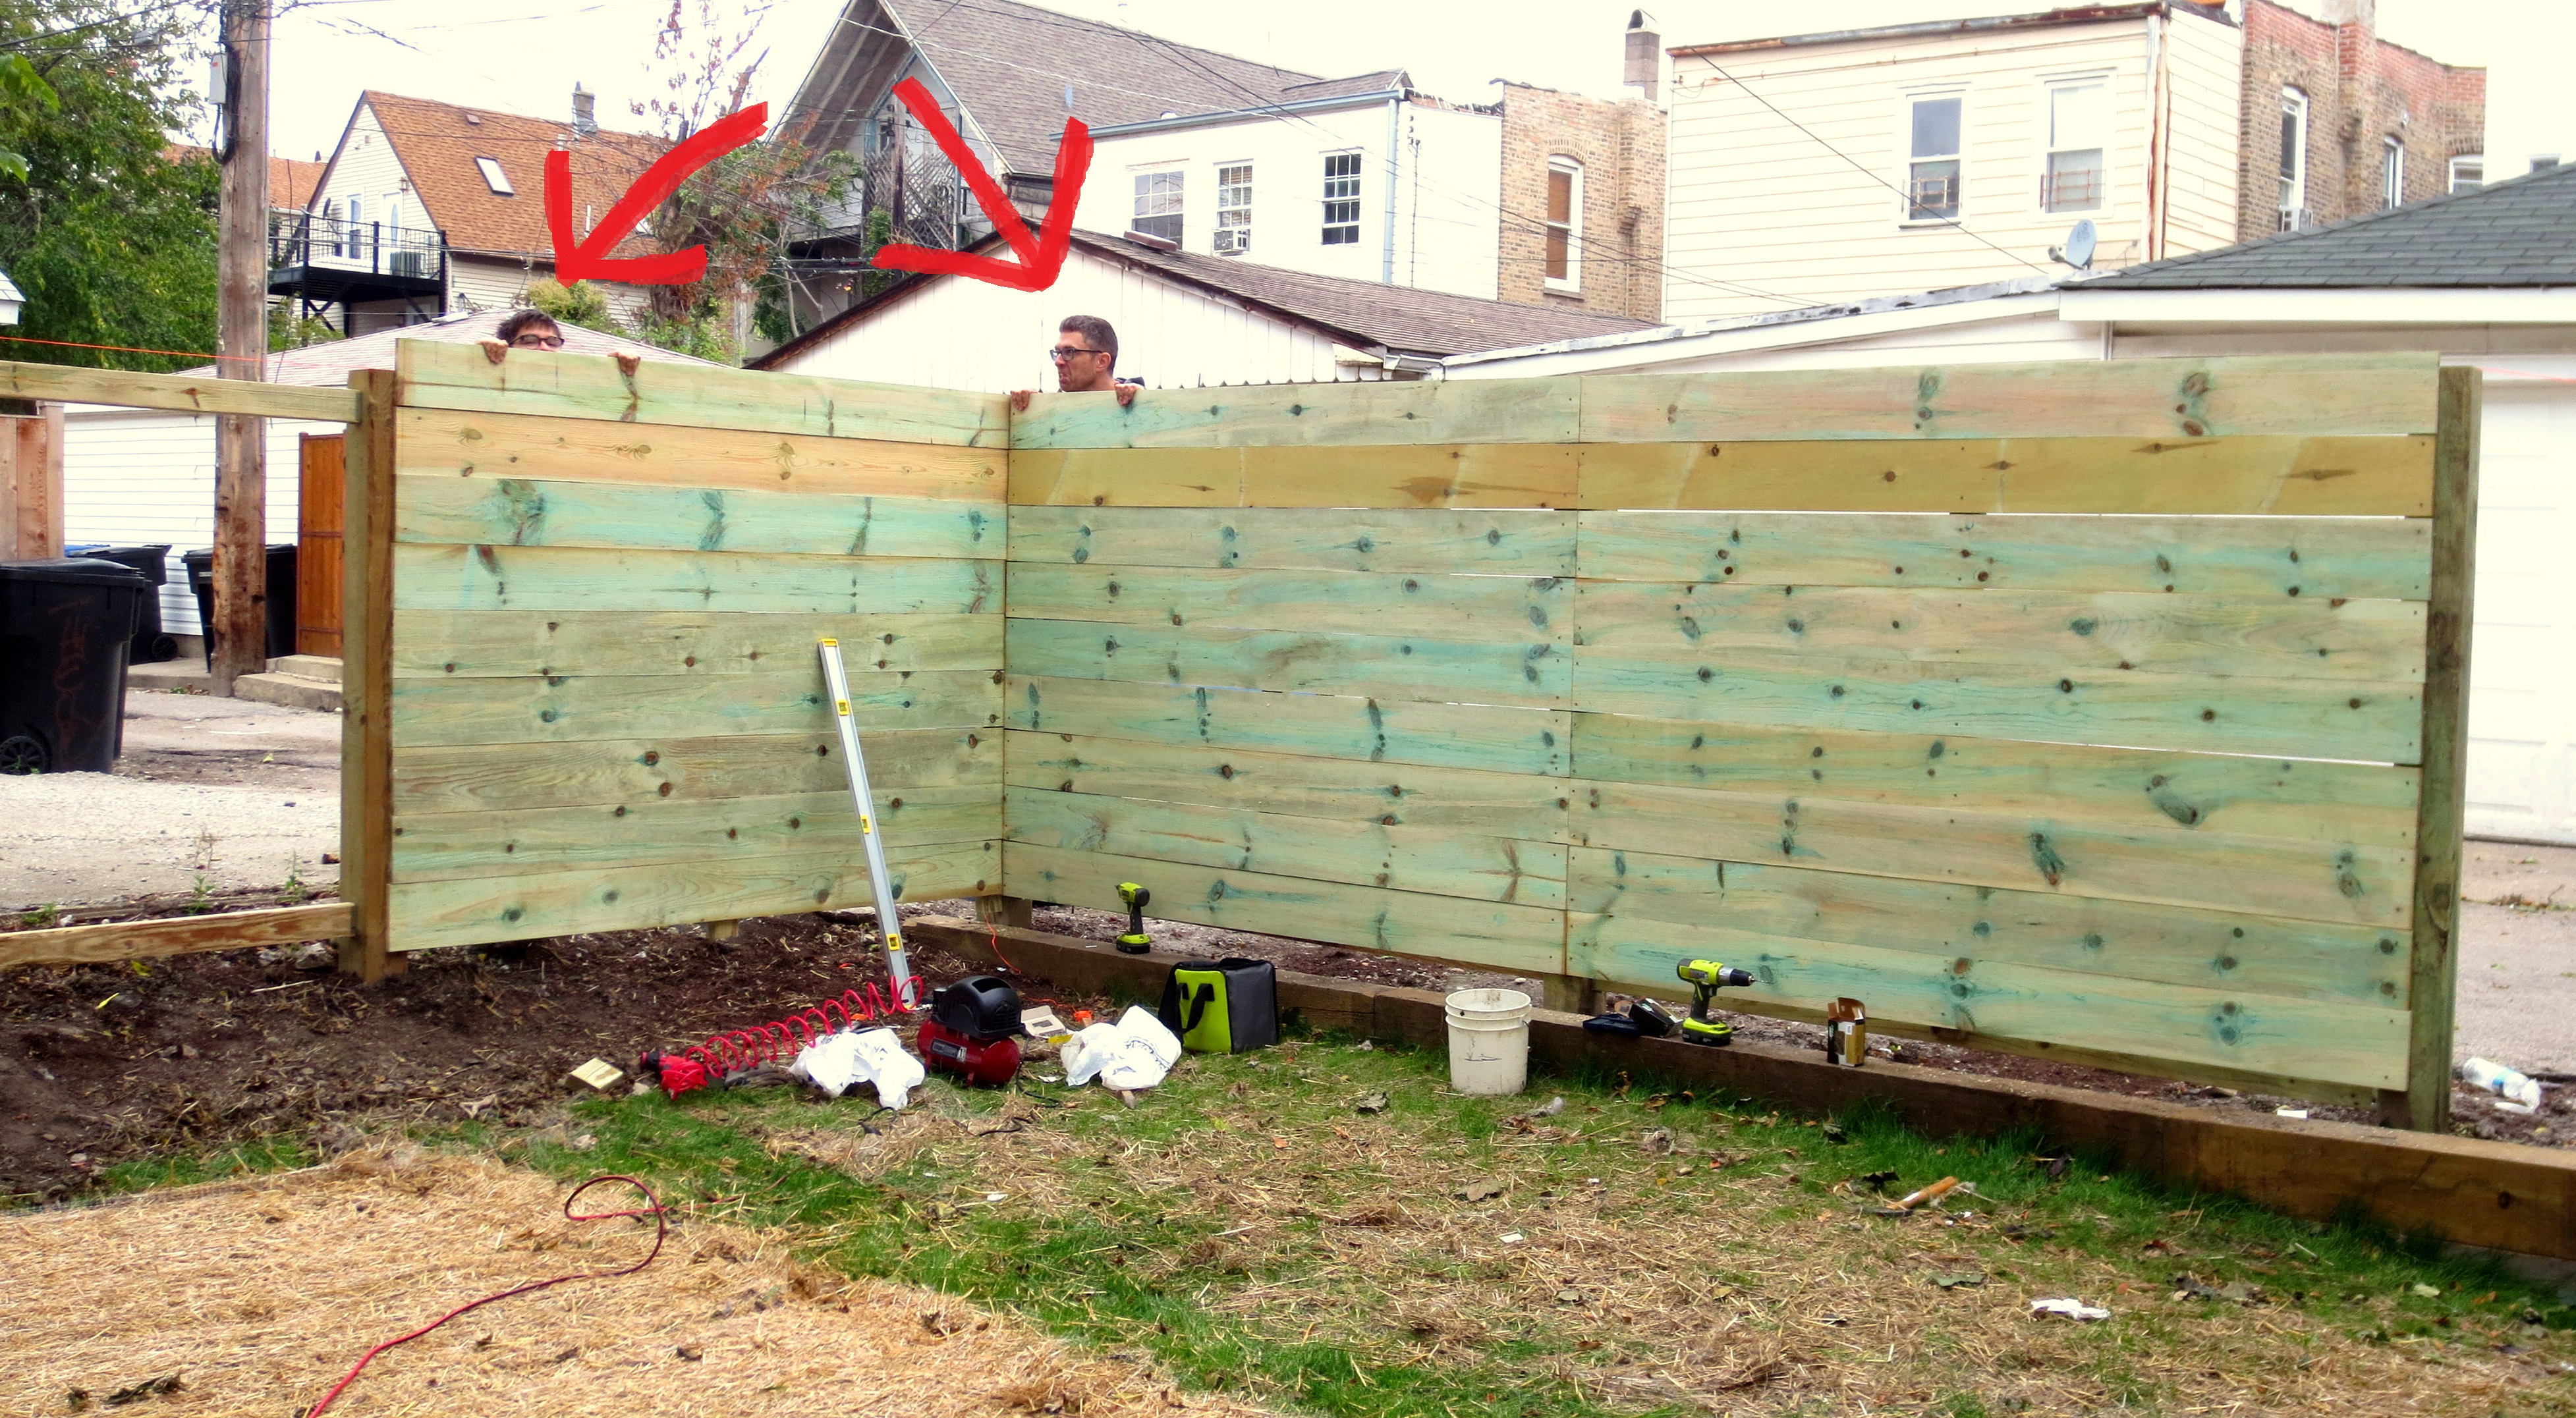
Just making sure that the neighborhood creeps can still peek over the top…
Once all the panels are nailed in place, drill pilot holes wherever the panel meets a post or a middle support rail. Then go back and insert a deck screw into each pilot hole with your impact driver. Our fence required 324 pilot holes, and then 324 screws. That’s 648 individual screwing events, most of them done by me.
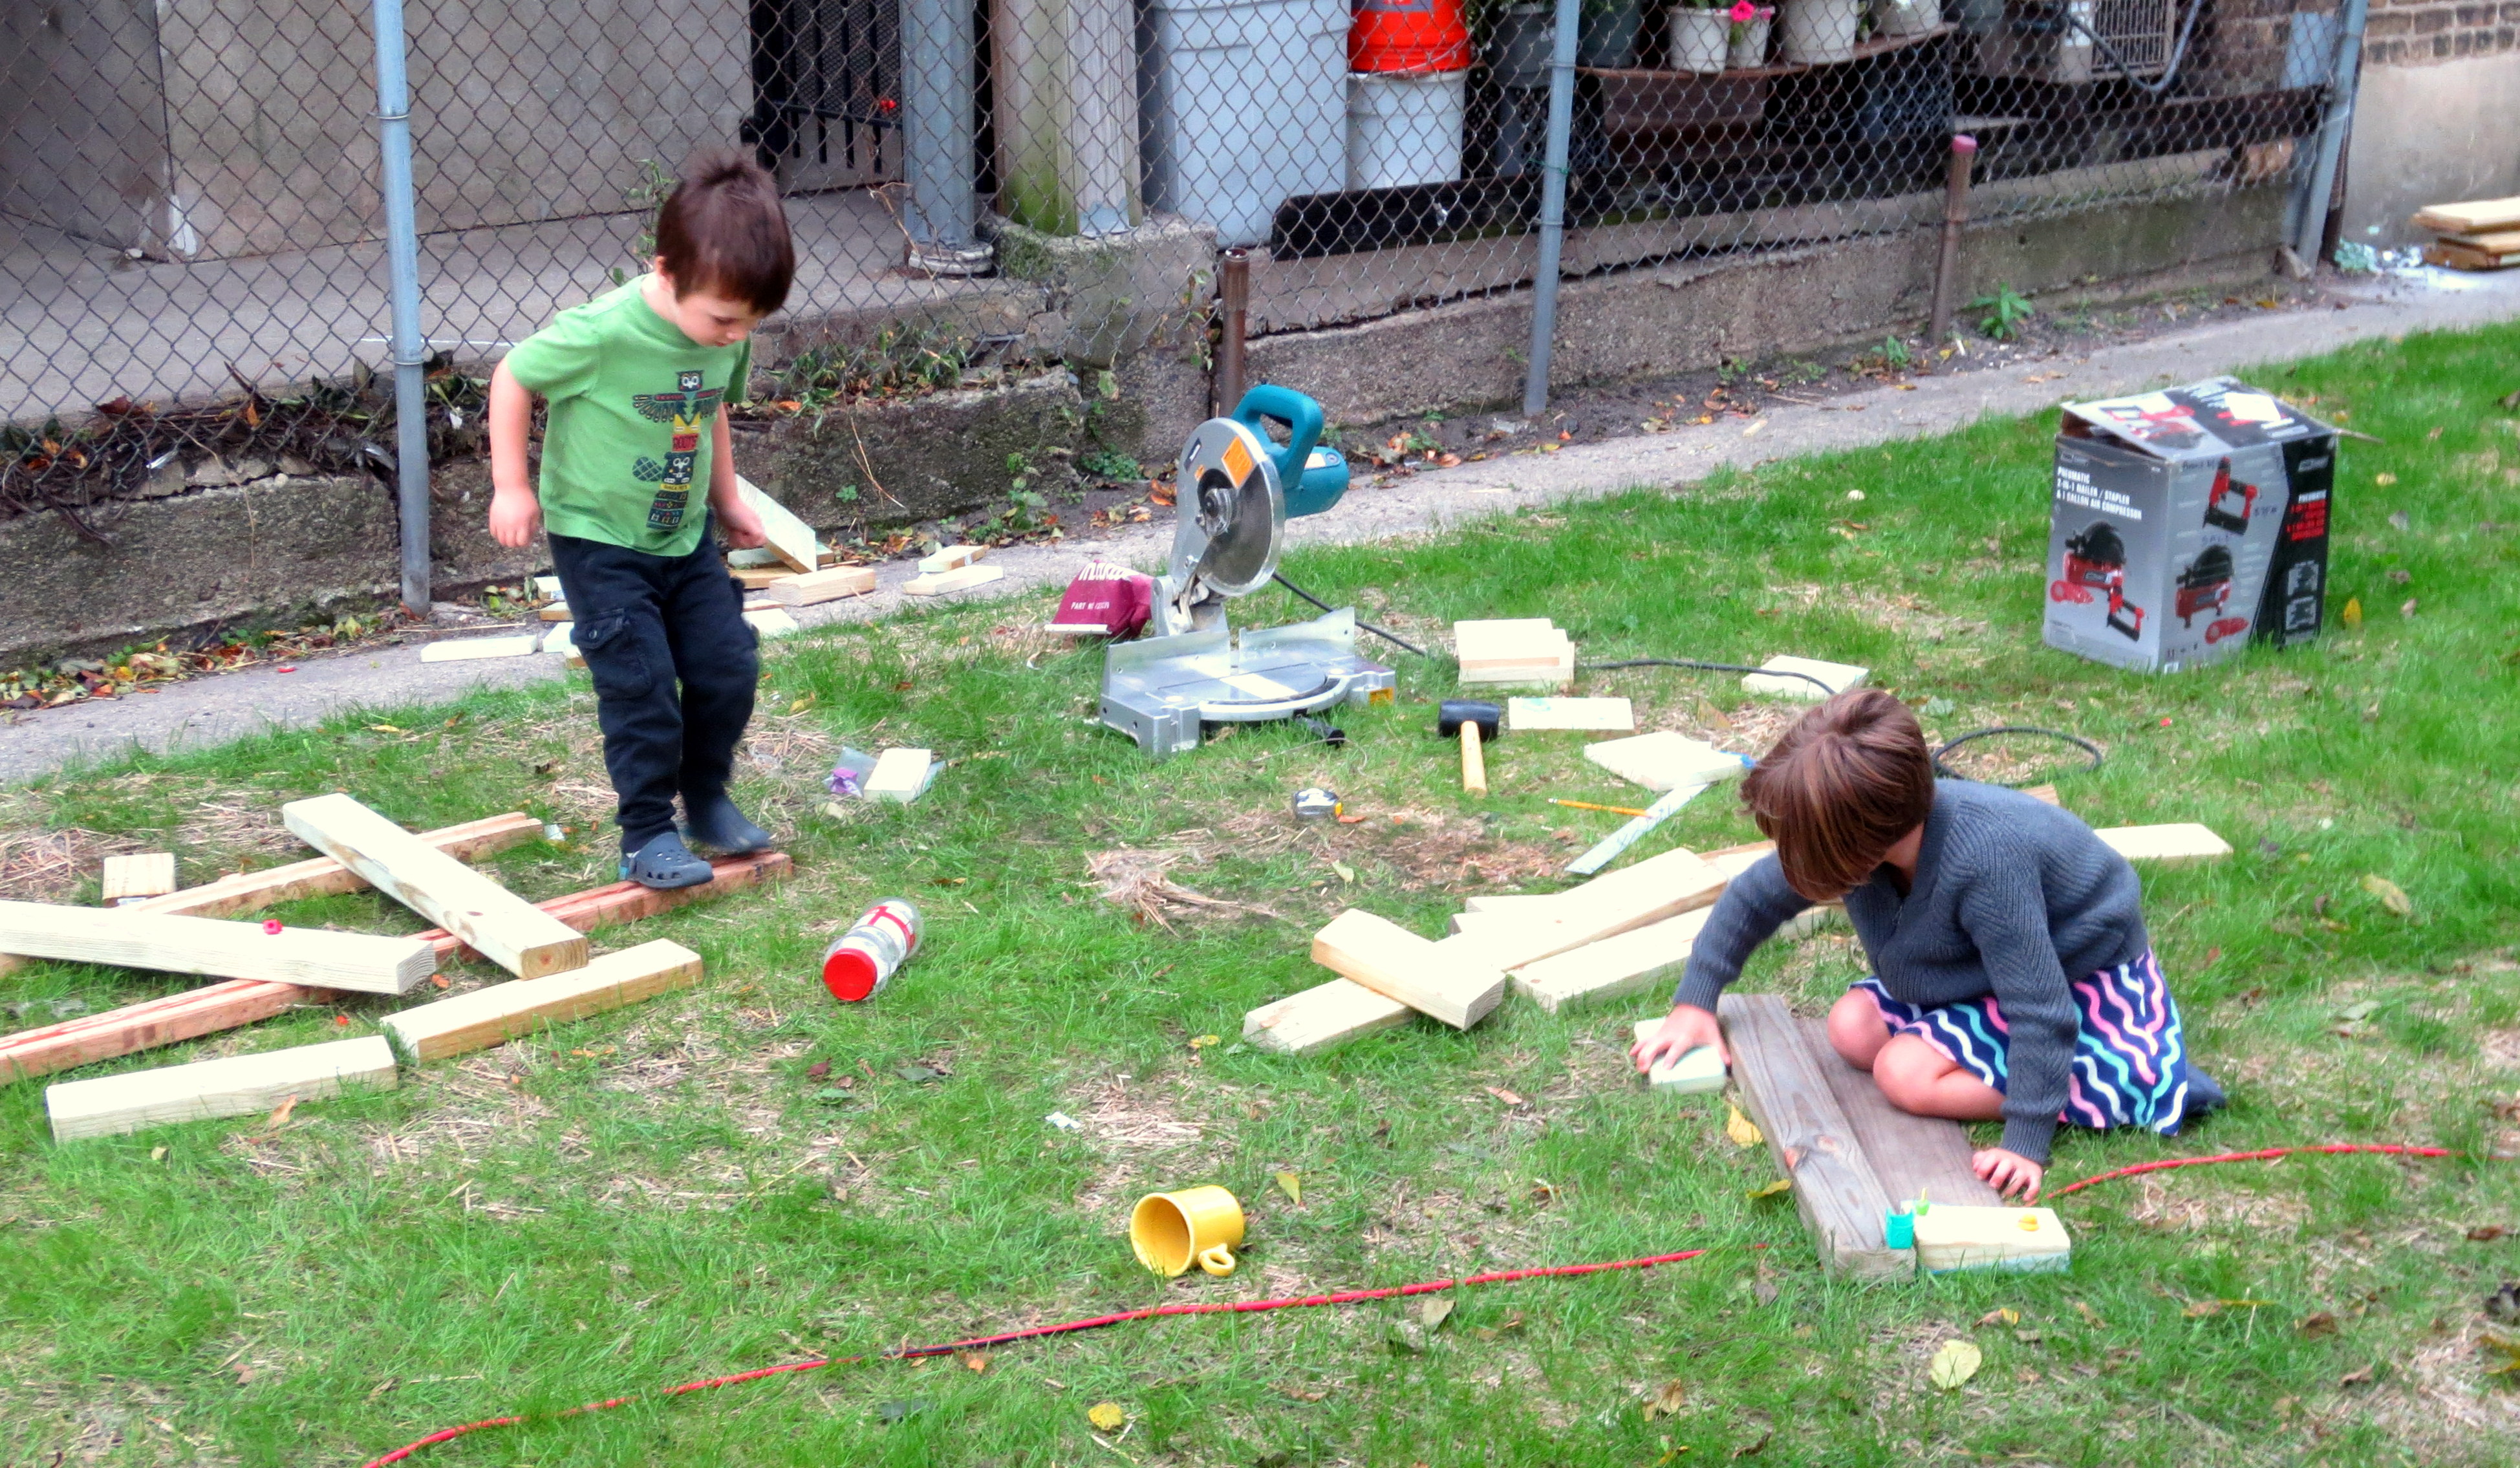
 Even though the little ones aren’t much help, they can have hours of fun playing with scrap wood. Be sure to unplug the chop saw and other power tools first!
 STEP FIVE — BUILDING THE GATE: Go to the hardware store and buy a gate kit – it includes brackets and hinges – and four 2x4s. Follow the directions and build the gate frame, hang it on a post, then fill it in with the same panels you used for the fence.
 Now bitten by the “unconventional fence” bug, Scott had the brilliant idea to extend the panels past the outer edge of the gate frame to achieve that seamless, “gate-free” look that every man dreams of:
 When our 15-year-old saw the final result (he was 14 when we started this project), he said, “Wow, it looks like a solid wall – no way in and no way out.” Yeah, something like that.

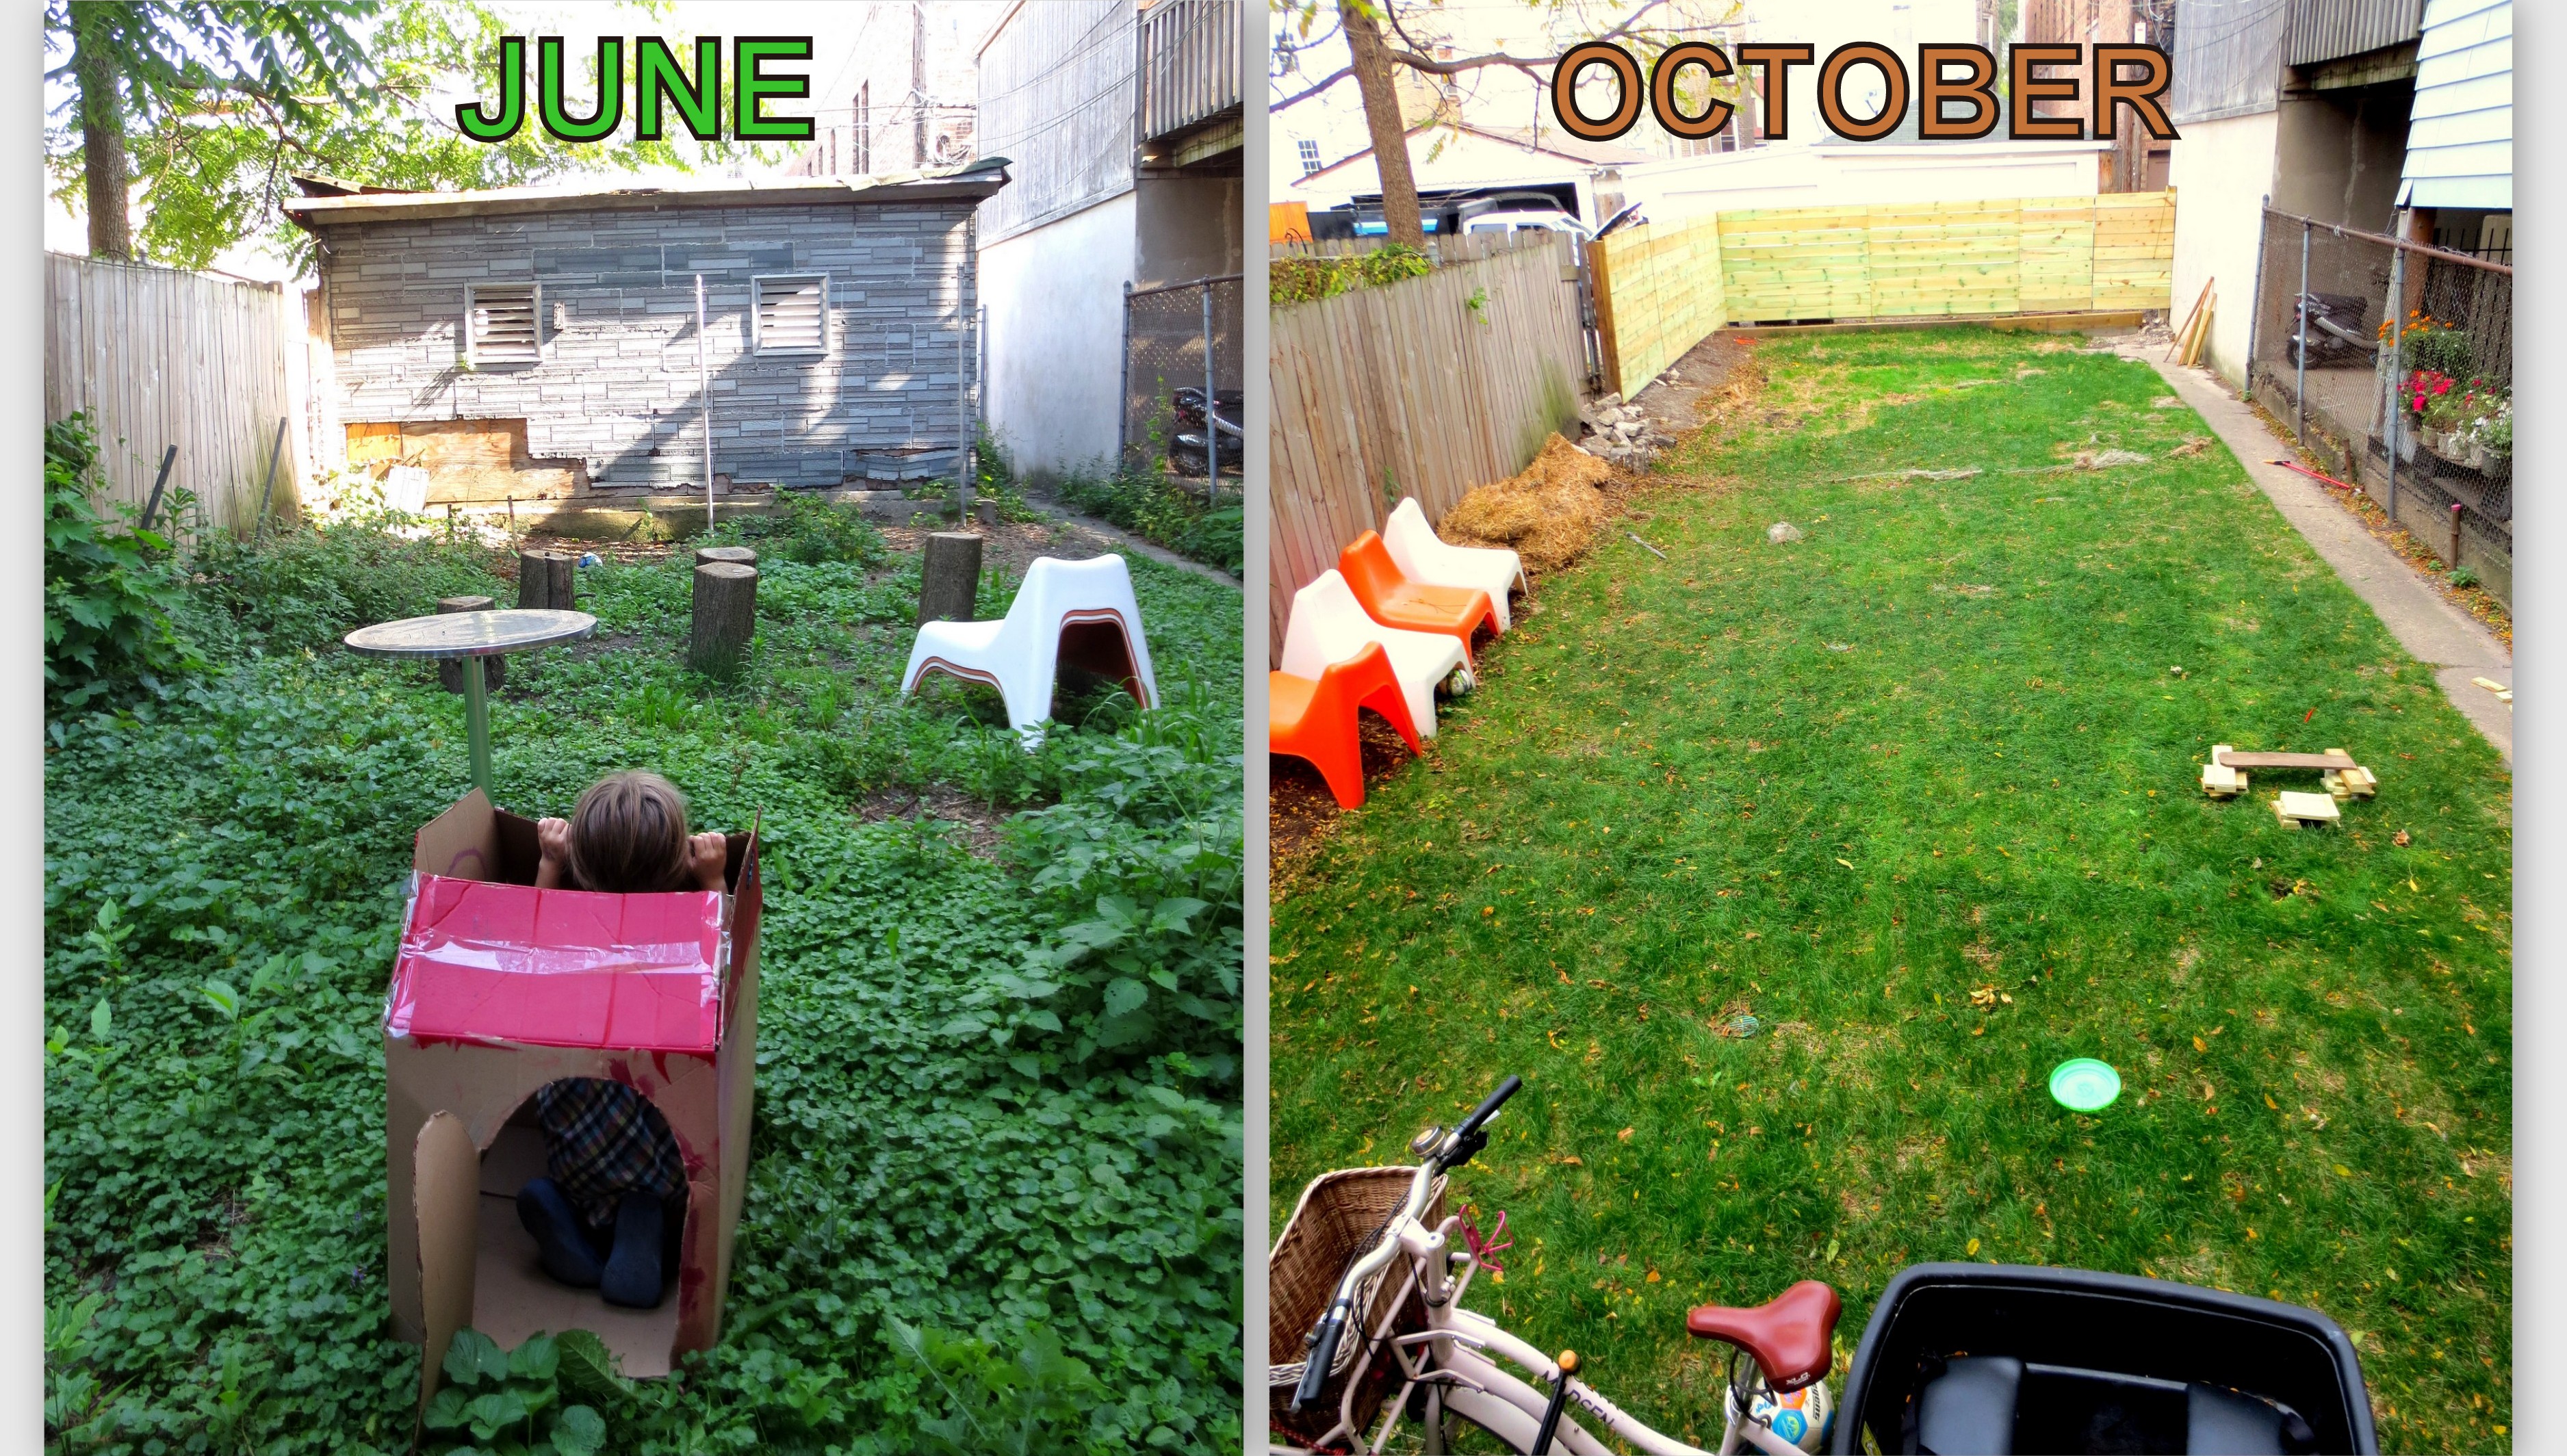
 And since it wouldn’t be the Internet without a proper “before-and-after,” let’s take a look at three months of progress in the Babushka yard:
—————————————————————
* For those of you too young to remember, pantyhose are a special nylon or polyester casing for women’s legs designed by evil men to invoke itching, sweating, and an overwhelming need to overthrow the patriarchy. Kids, if you encounter a pair of pantyhose, quickly leave the room and tell an adult.
** The tool rental catalog calls it a “one-man auger,” since you can also rent a “two-man auger.” However, when arriving at the rental counter, Scott inflicted a major blow against sexism by loudly requesting a “one-PERSON auger.”
*** I hope none of you are under the impression that this fence is keeping bad guys out. I’ve jumped higher fences while 6 months pregnant (hint: you climb on top of a trash can first). Also, bad guys can just walk into our front door, at which point they will trip over some toddler shoes, become impaled on an action figure and run away screaming.

Take that, poopy dog! Good work, and also, incidentally, welcome to Team Projectophile, suddenly useful Firstborn. My only slight concern is with that gate – all the screws and hardware are on the outside, freely available to alley scavengers (who do we know like that?). You might wake up one morning and find the brackets all gone!
LikeLike
Oh, man, I hadn’t even thought of the hardware! Though most of the scrappers in our neighborhood won’t do much more than jump out of their truck and throw something in. I wouldn’t call them lazy, but I hope they wouldn’t go to the trouble of disassembling our gate when there’s probably an entire stove sitting out just a few feet away.
LikeLike
You’re probably right… And you could just glue the hardware in place some time.
LikeLike
Nice! i agree with this part “Check to make sure your keys, wallet and phone are accounted for, because that stuff sets quick” i recently lost my favorite hammer replacing a post on my fence this summer
LikeLike
So your hammer ended up in the concrete? Wow! I will confess to wondering what would happen if I stuck my hand or foot in the concrete while it was setting (I didn’t try).
A few months ago, my husband was hanging drywall in the ceiling of our tiny half bath (tiny = you can touch both walls with your arms spread). He had finished drilling the drywall and was smoothing over the seams with joint compound, and then dropped the entire pan of mud right onto the drill. That stuff sets hard within minutes. There was nothing we could do — its not like you can throw a power drill in the dishwasher. Happily, neither of us really liked that drill, so it was an excuse to buy a new and better one the next day!
LikeLike
Your fence reminds me so much of the first wood fence I built with my ex-husband (No, DIY did not end our marriage, but he was most definitely not a willing partner in the DIY efforts.) We didn’t have the internet for researching fence building techniques back in the Dark Ages of the 1980s, so I spent a lot of time just figuring it out for myself. We, too, used brackets to hang our cross-pieces. At that point in time it was much less expensive to buy individual boards rather than pre-built panels. Plus, I figured out that if we bought 10ft long boards for our pickets and cut them in half we would save even more money. What I didn’t do was measure the boards to see if they were really 10ft long. We measured 5ft from one end on each one and started cutting. It wasn’t until we started putting them up that we noticed the two “halves” of each board were different in length by about an inch. Rather than go back and cut an inch off of twenty-gajillion boards (we were fencing around the entire back yard (about 180ft total) we decided to alternate long and short boards to give the fence “interest”. It worked and evidently the next people to own that house liked it, too, because when look at the Google Maps street view I see the thing is still standing almost 30 years later.
LikeLike
What a great story. I love how you solved the problem by making it look like it was your ORIGINAL idea to have them zigzag (do you still have a picture?)
And yes, not pictured here is us (usually Scott) using the chop saw a million times to get the boards the right size. And even then, they were still –just– a little bit off. Mostly not enough to notice.
I am very, very grateful that we now have the internet to help learn stuff like this. This project come together like the way I use a lot of recipes — look up a half dozen recipes online and then make something up using the best parts of each. You learn to see what parts are essential and what parts you can play around with for flavor.
LikeLike
Trying to find a photo of it in the jumble of shoeboxes that are my “photo albums” would take too long, so I took a screen shot from the street view of google maps, then posted that to facebook so I could then post the link here. I hope you can see it.
LikeLike
I do that with recipes, too. I think you end up with a really good flavor that way.
LikeLike
I love it! The lesson here is truly that doing it yourself and running out of money or screwing something up along the way gives you much more charming results! How was the ground in that part of the world?
LikeLike
It was sandy and rocky underneath the sand. But no pantyhose. We also rented a gas powered post hole auger. That was an exciting experience in itself!
LikeLike
I like your horizontal fence and hidden gate! Should I know why it’s green? Pressure-treated or something?
A couple of months ago, we made an offer on a 1962 ranch that didn’t have a fully fenced yard. So I went online and bought a copy of Sunset’s Fences and Gates from 1958, all the while imagining my beautiful mid-century privacy fence. We withdrew our offer (major plumbing problems) before the book ever made it to me. It’s still sitting in the envelope unopened. And we’re still looking for a house.
LikeLike
The green is actually whatever chemical they slather it in to make the wood suitable for outdoor use. My understanding is that the green will fade with time.
That’s too bad about your dream house! I just googled “Sunset’s Fences and Gates” and am overwhelmed with the fence possibilities! (fencibilities?) The great thing is that once you figure out the basic structural plan, you can go crazy with the style.
Still trying to combine my love of Mid-Century Modern with the reality of my 1893 Victorian worker’s cottage. Maybe you could call it all post-modern?
LikeLike
Pingback: Compressing my Sadness: Good-Bye to a Friend | projectophile
Pingback: Track Your Tool Mooching with a Basement Borrow Board | projectophile
We bought the metal spikes that are sold for mailboxes and those brackets.
My approach is, what is the least expensive way requiring no skills that still looks great!
Ya’ll did great!
LikeLike