
Memorial Day – the unofficial start of summer – always sneaks up on me like a kitchen gadget I ordered online with the slowest shipping option. Delivery took so long, eventually I forgot that I bought it. Then one late spring day a man in brown (or maybe purple) uniform struts up to our building with a package wedged in his arm pit, studies the row of doorbells, but then flings the package over the fence and screeches away in his doorless brown (or purple) chariot. I scamper down with a box cutter and greedily tear open my shiny new summer.
This year, Memorial Day landed on our doorstep as a family of three. They had lived upstairs from us for 5 years, but then returned to their ancestral land of Ohio, and have been terribly missed ever since. We’d bought our identical condos a week apart, been pregnant at the same time, our babies delivered by the same midwife. We kicked off our long weekend together with a BBQ, and lots and lots of beer, and debated which couple would have been the “wacky neighbors” in the sitcom version of our lives.
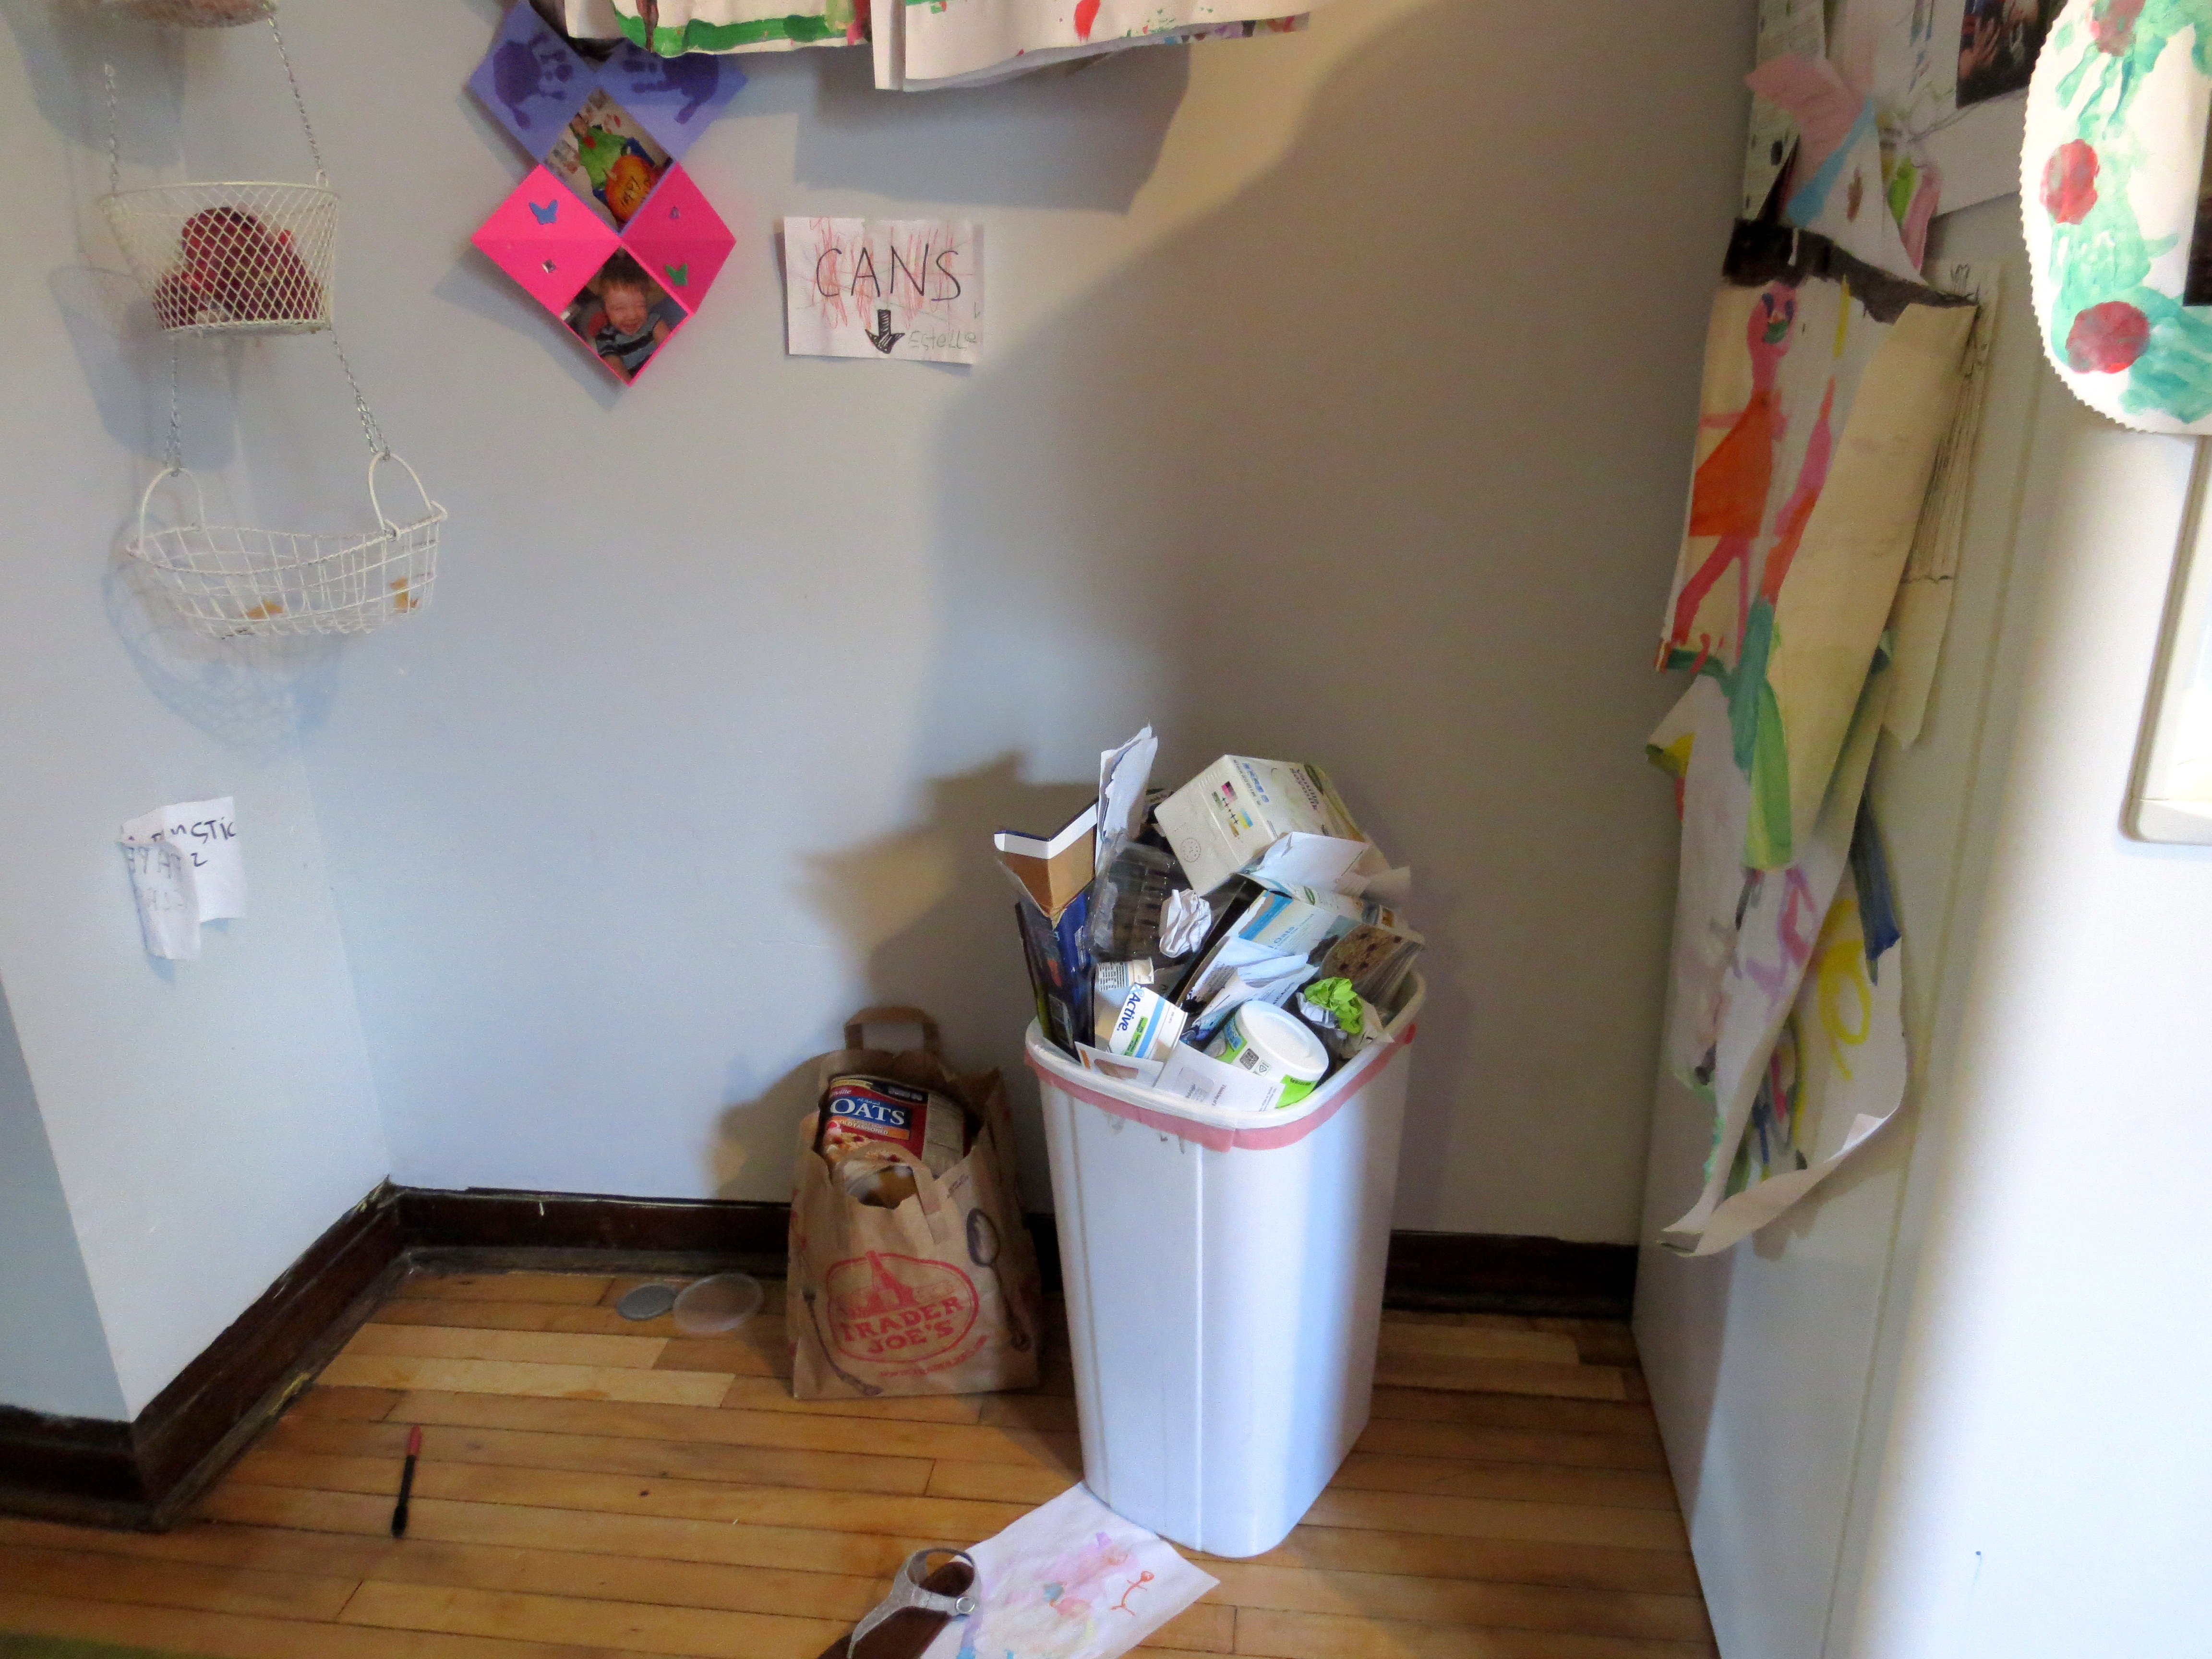
 The empty beer cans quickly piled up in an ugly, dark nook of our kitchen that I affectionately call the “recycling center.” The Center is normally a couple of cheap plastic bins or paper bags overflowing with yogurt containers and junk mail. You may also find splatters on the wall from us tossing a wet, mostly-but-not-quite-clean, can of beans into one of the bins.
 For months, I’d been dreaming of erecting a formal structure to contain all this ugliness. And then just when I needed it most, this messed up little cabinet appeared in the alley two blocks away:
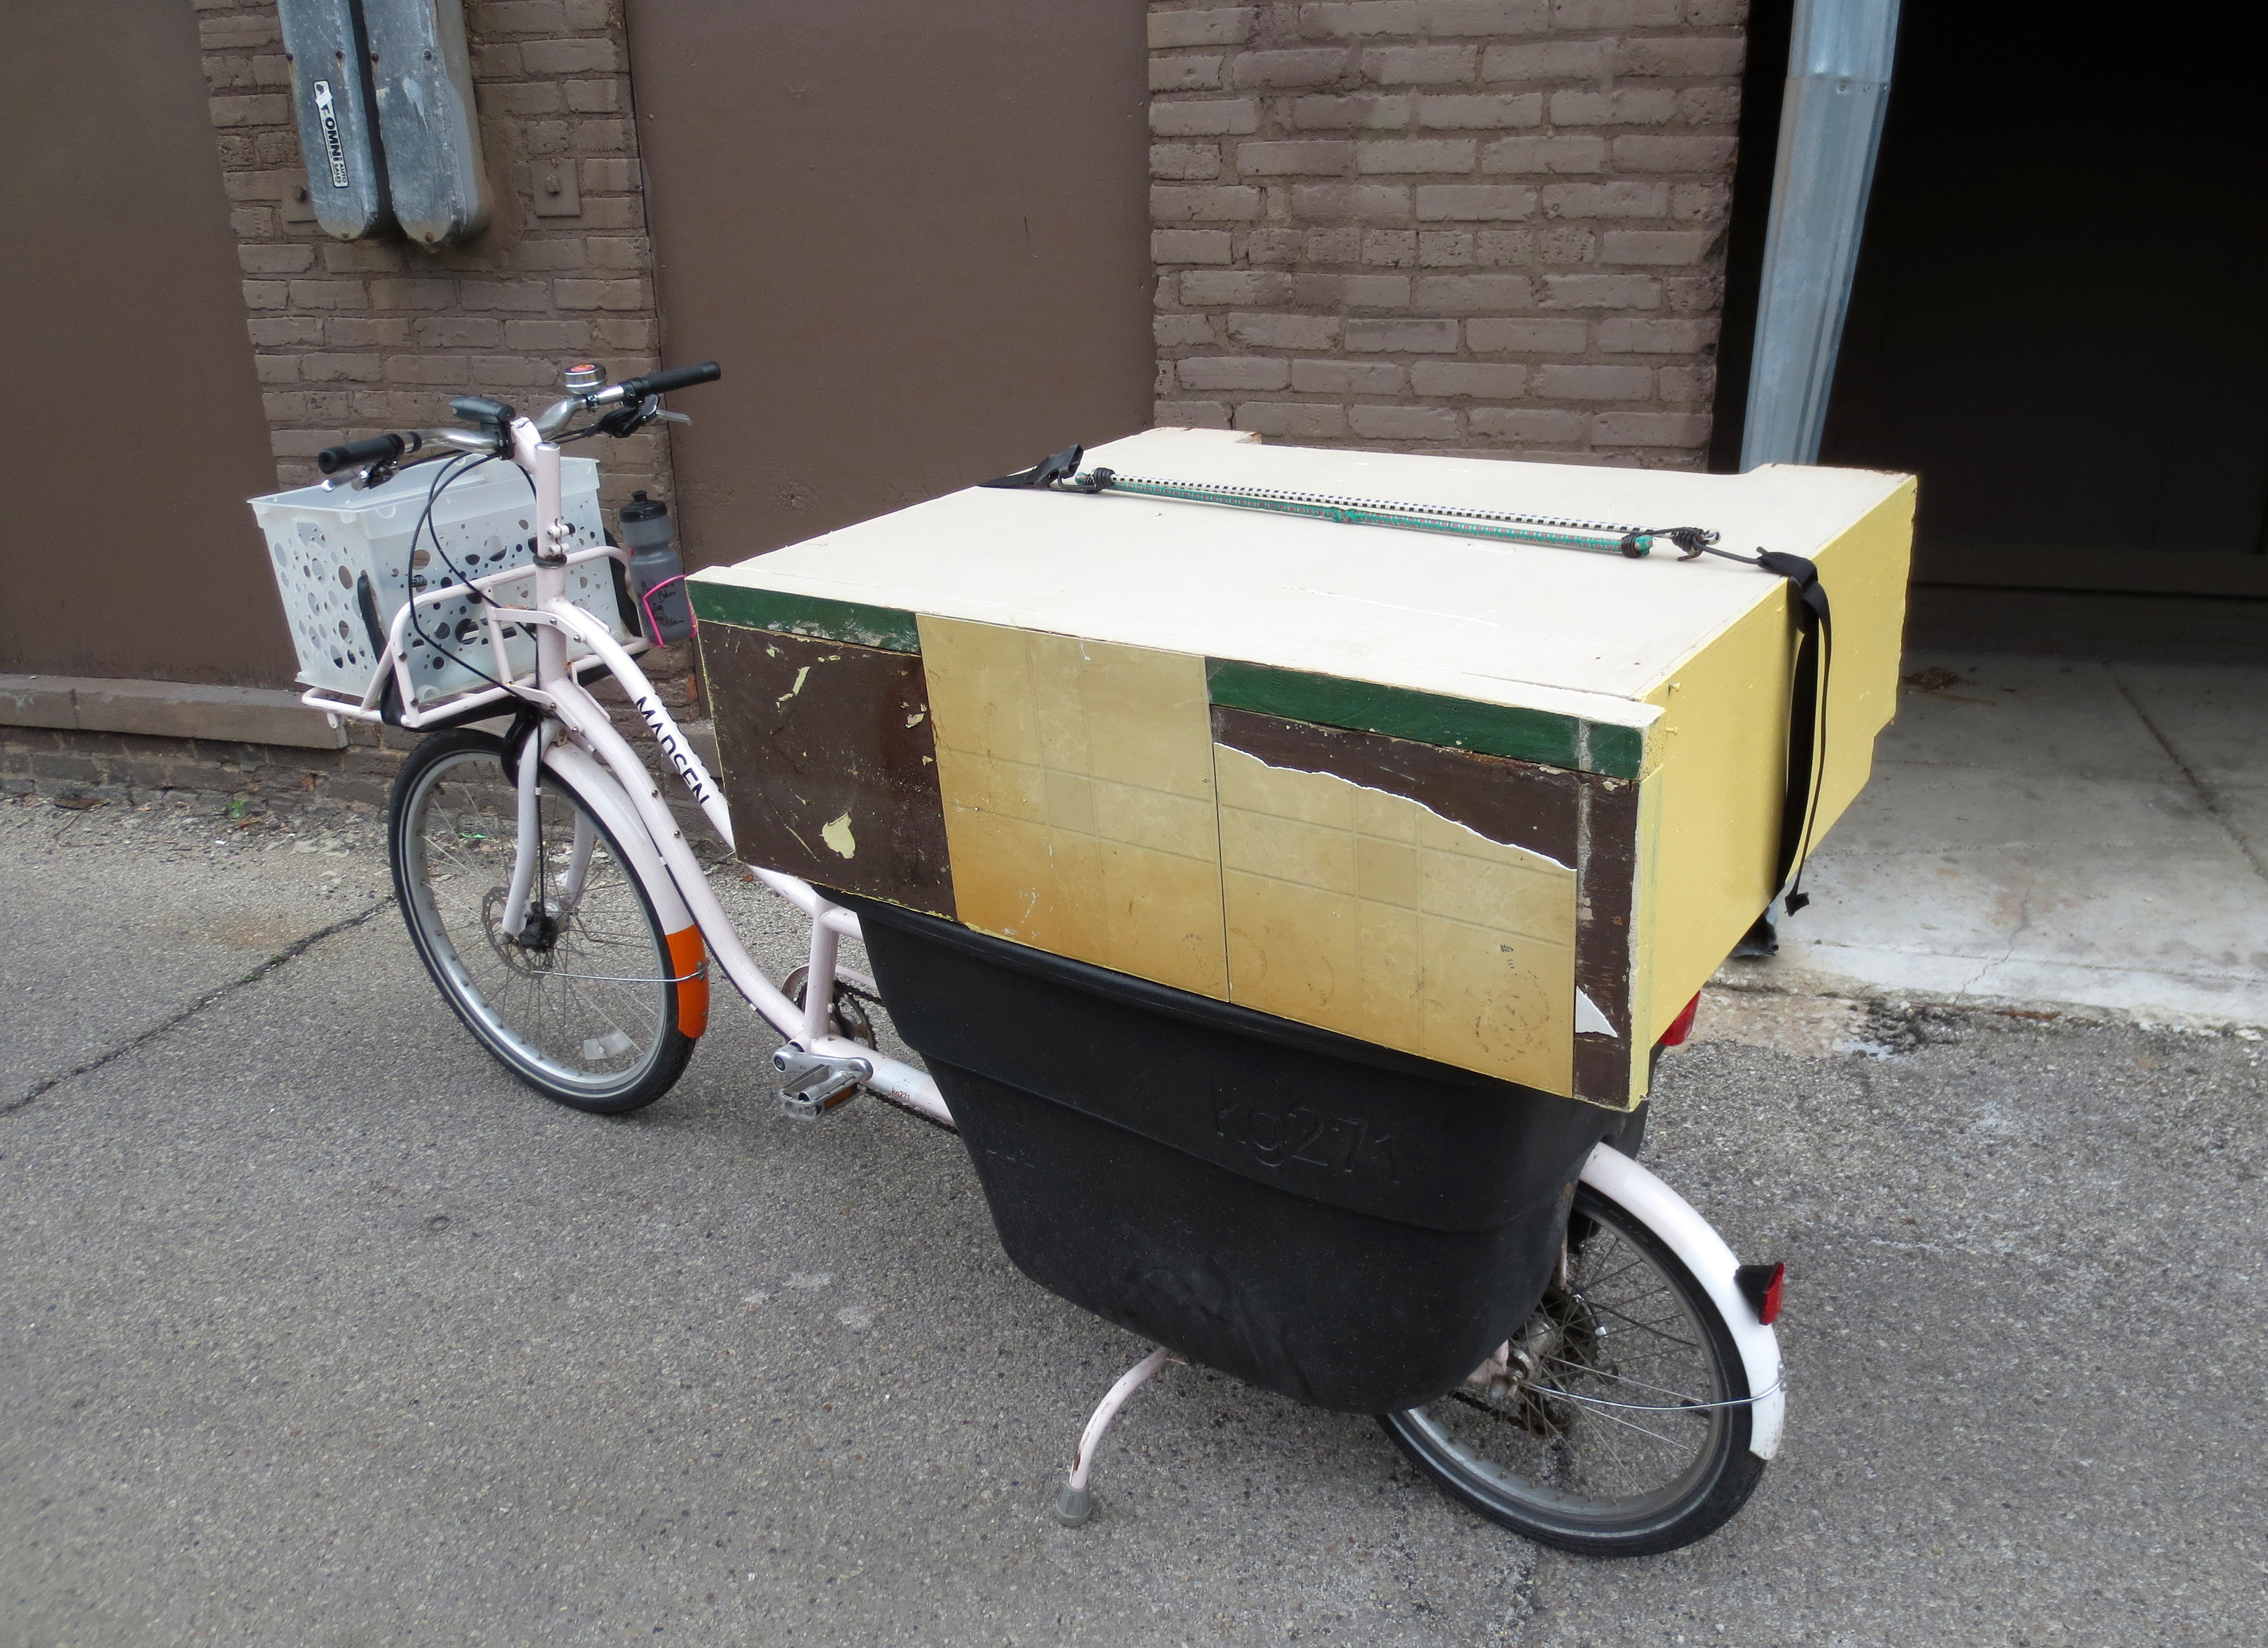
 I struggled to get this beast onto the back of my cargo bike, when a couple of young bearded gentlemen rolled past. “Could you guys give me a hand?” In minutes, my cabinet was secured under a tight web of seat belts and bungee cords. And no, there wasn’t a small child still wedged under there:
 I knew right away this cabinet was the one. The perfect size for our kitchen nook, it could snugly hold two small trash bins. And like all great treasures from the alley: Messed up in every way except structural. Ugly, but solid.
BUILDING AN UP-CYCLED RECYCLING CENTER
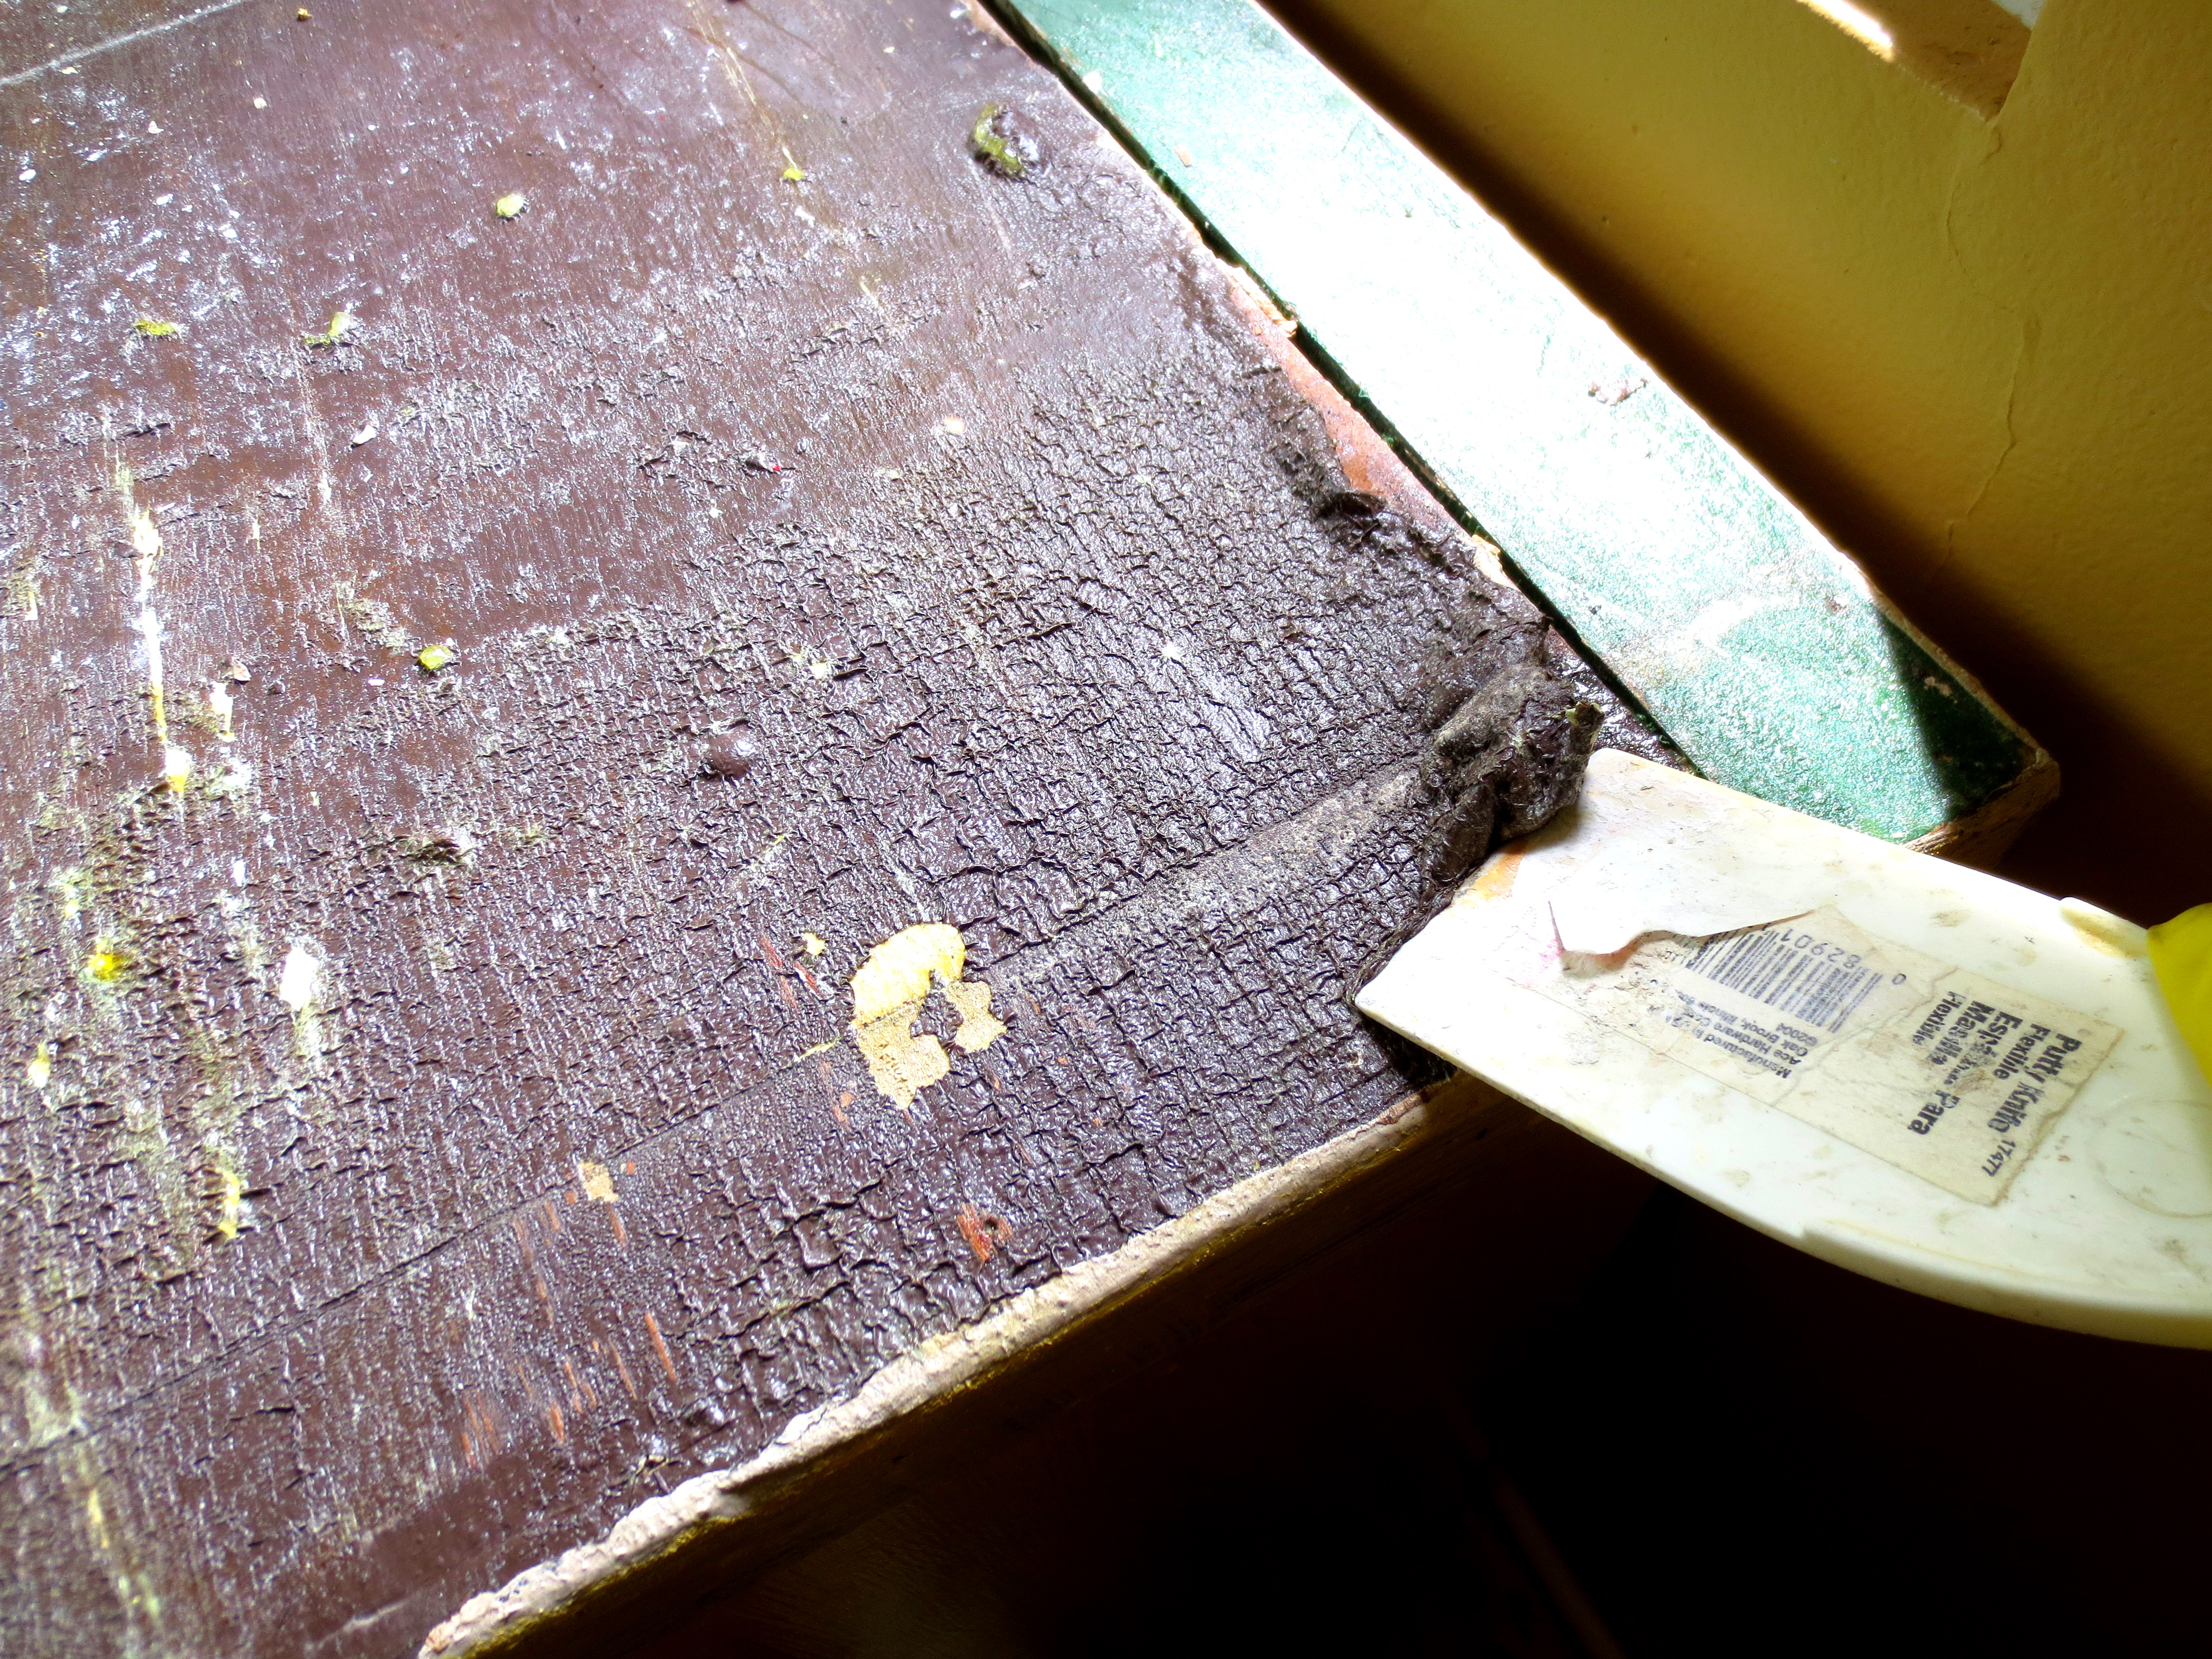
 STEP ONE – STRIP N’ SAND: First, the fun (i.e., destructive) part — pry these crazy floor tiles off the top of the cabinet. I used a six-in-one painter’s tool and scraper and a bit of swearing to get it all off..
 …only to find at least four coats of paint, even over the door hinges. And those doors had to come off.
Now that I’m done reproducing (not that it’s any of your business!), it was time to satisfy my curiosity about Paint Stripper – full of chemicals known to the State of California to do all sorts of harm to my nervous and reproductive systems. But we’re in Illinois, Scott joked, so it doesn’t count! Following the directions on the can, I got one or two coats off the top.
 But most importantly, I got enough paint off the hinges that I could finally remove the doors.
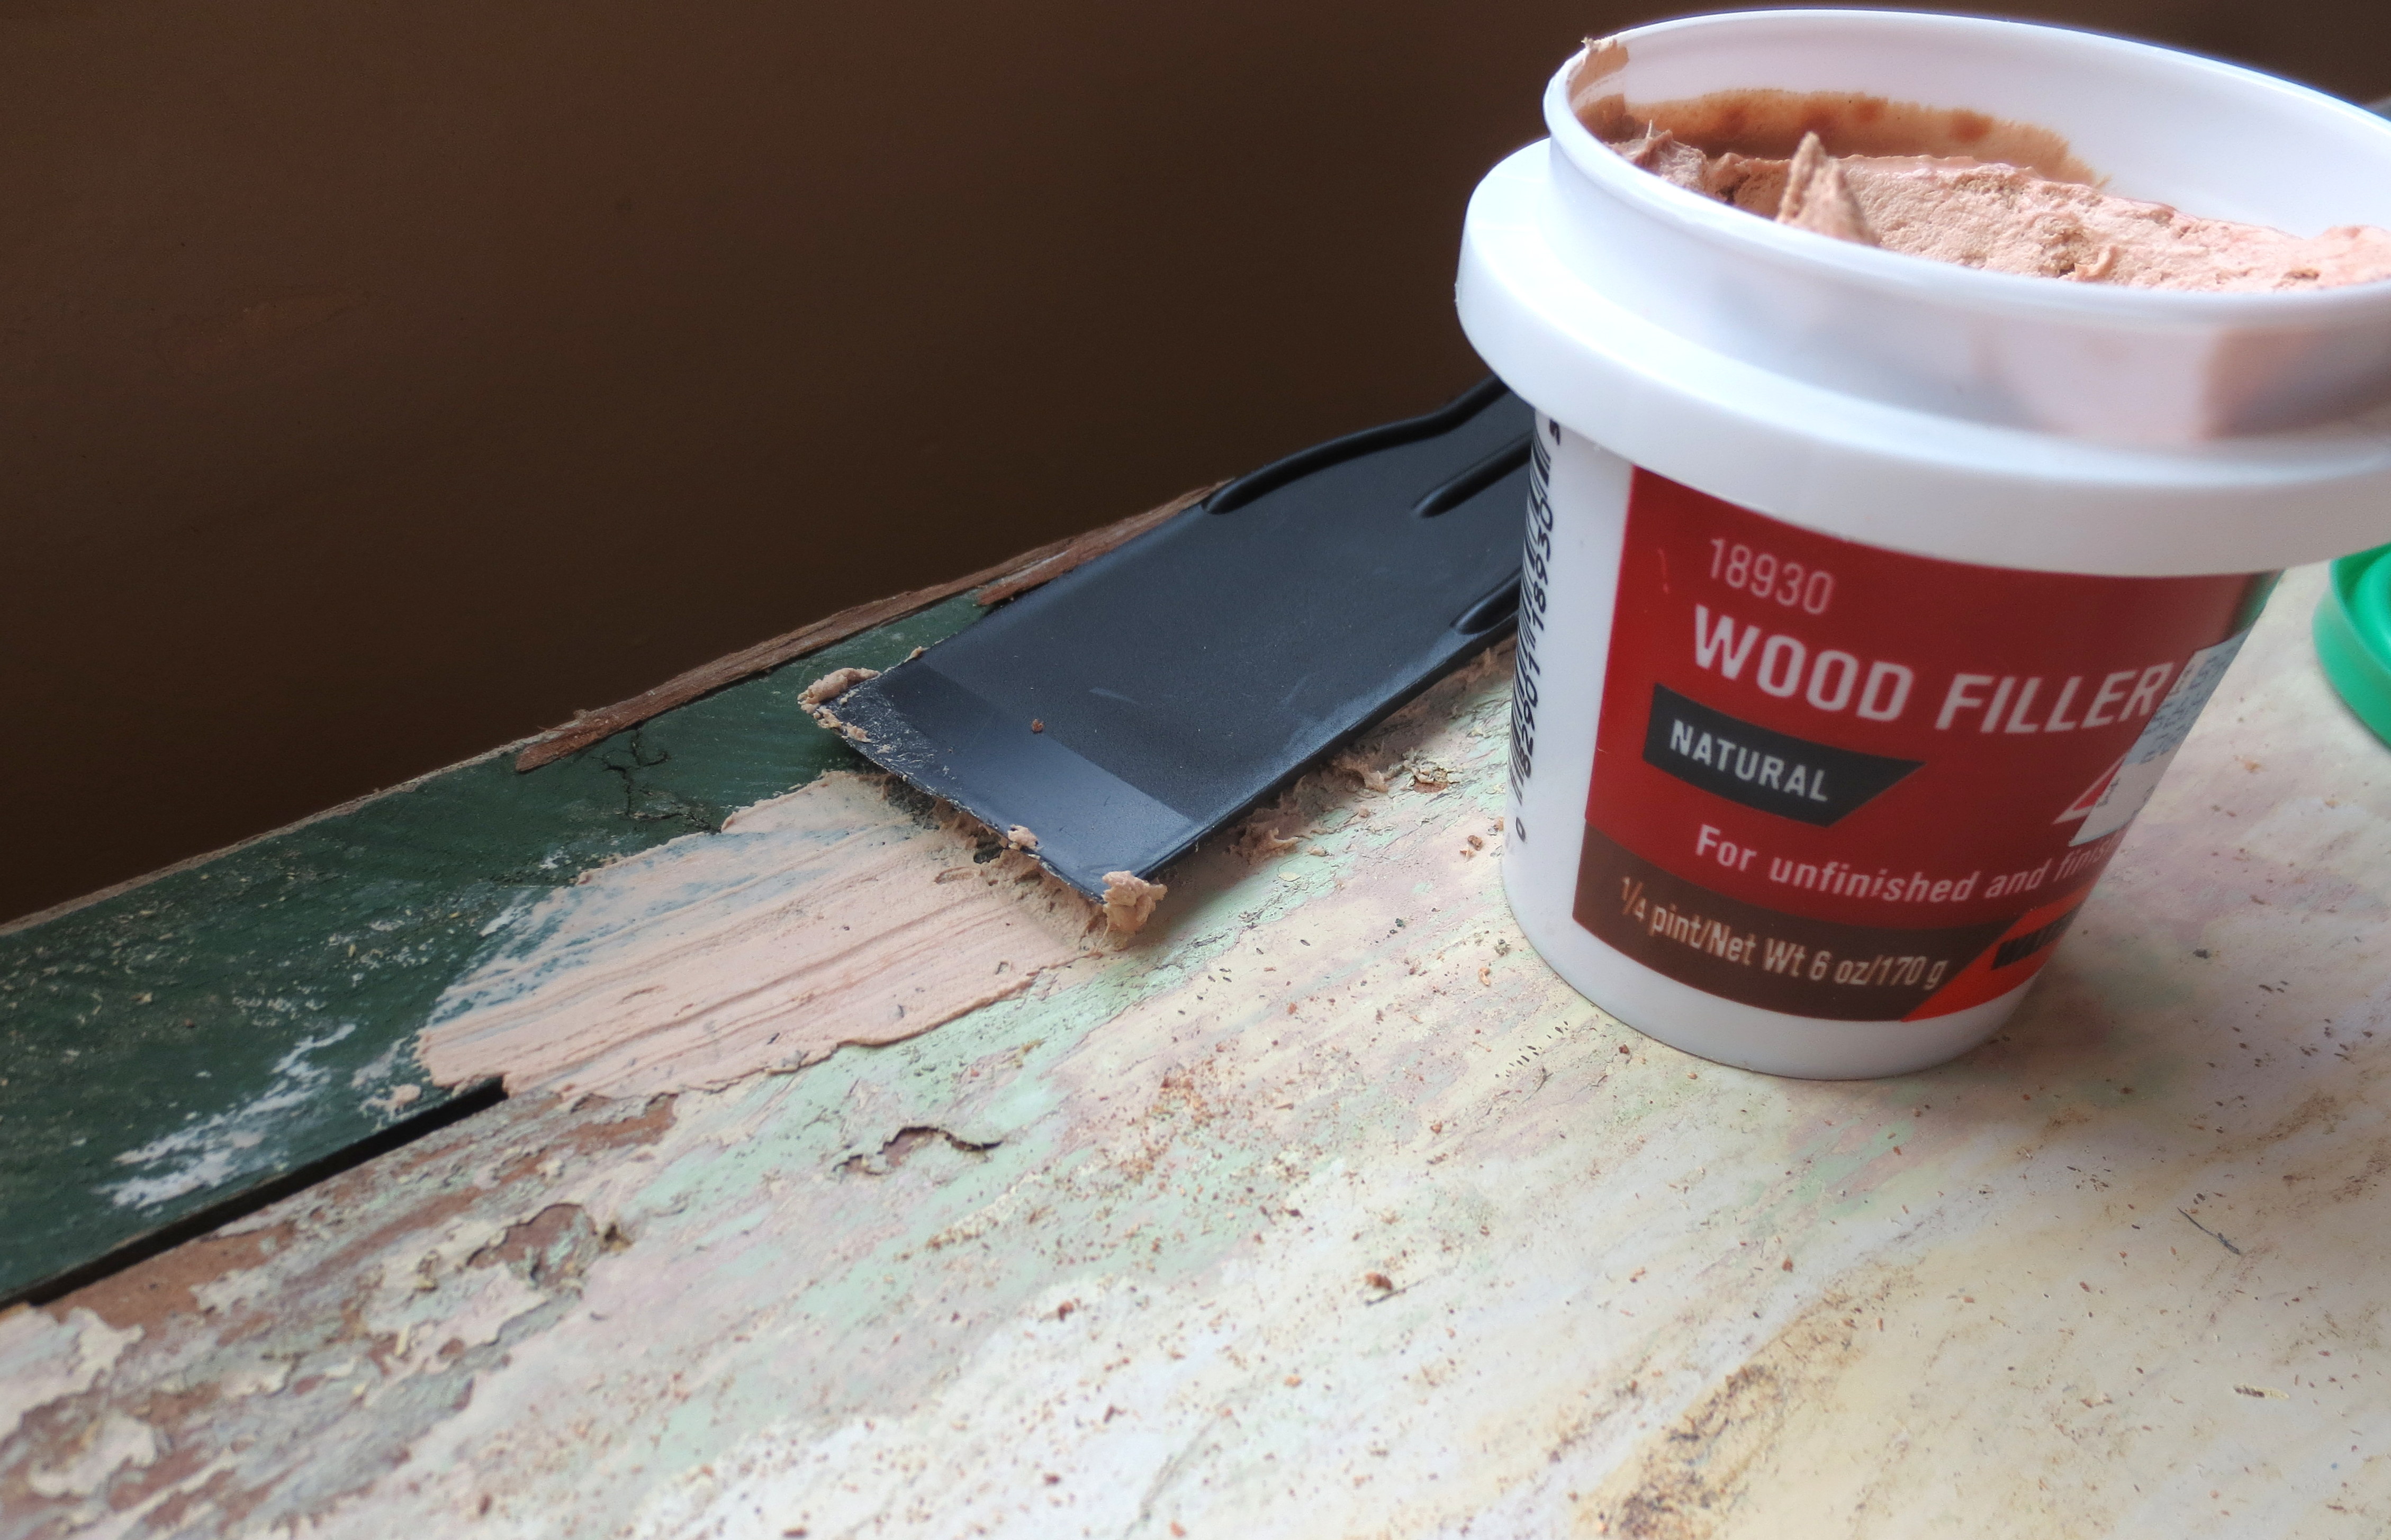
 Next, I filed a huge gap between the back panel and the top panel with wood filler. When it dried, I sanded the excess wood fill by hand.
 Finally, I sanded over the entire “skin” of the cabinet and the doors using my orbital sander and 150-grit paper. I didn’t go nuts with the sanding — I just needed to rough up the surface enough to accept the new coat of paint. A light intimidation, really. See, this cabinet was made with cheap, thick plywood; there’s no point in sanding down to the “natural beauty of the wood” as all those trolling internet paint-haters would say (you know who you are). Some things must be re-painted.
STEP TWO – CUT THE CAN HOLES: Speaking of experimentation, this project presented the perfect opportunity for me to splurge on a new toy – a jigsaw! As per my custom, I arrived at the hardware store having done no prior research and bought the third most expensive jigsaw. Or third cheapest, if you’re a glass-half-empty sort (there were five total). It’s the Goldilocks approach to tool-purchasing, and it’s worked pretty well so far.
I got home and watched exactly four instructional videos on YouTube, with the volume on. Since I couldn’t figure out how to properly remove the shelves without taking the cabinet completely apart, I just cut trash-can-shaped holes in them with my new saw. Did I mention how nasty the inside of this thing is?

 To make the recycling holes at the top, I traced two shapes. One was small and circular, for cans, which get separated for an old neighborhood lady who collects them for money. The other was the shape of a large take-out container.*
 To saw into the MIDDLE of a piece of wood, you must first drill a pilot hole at least as big as your jigsaw blade.
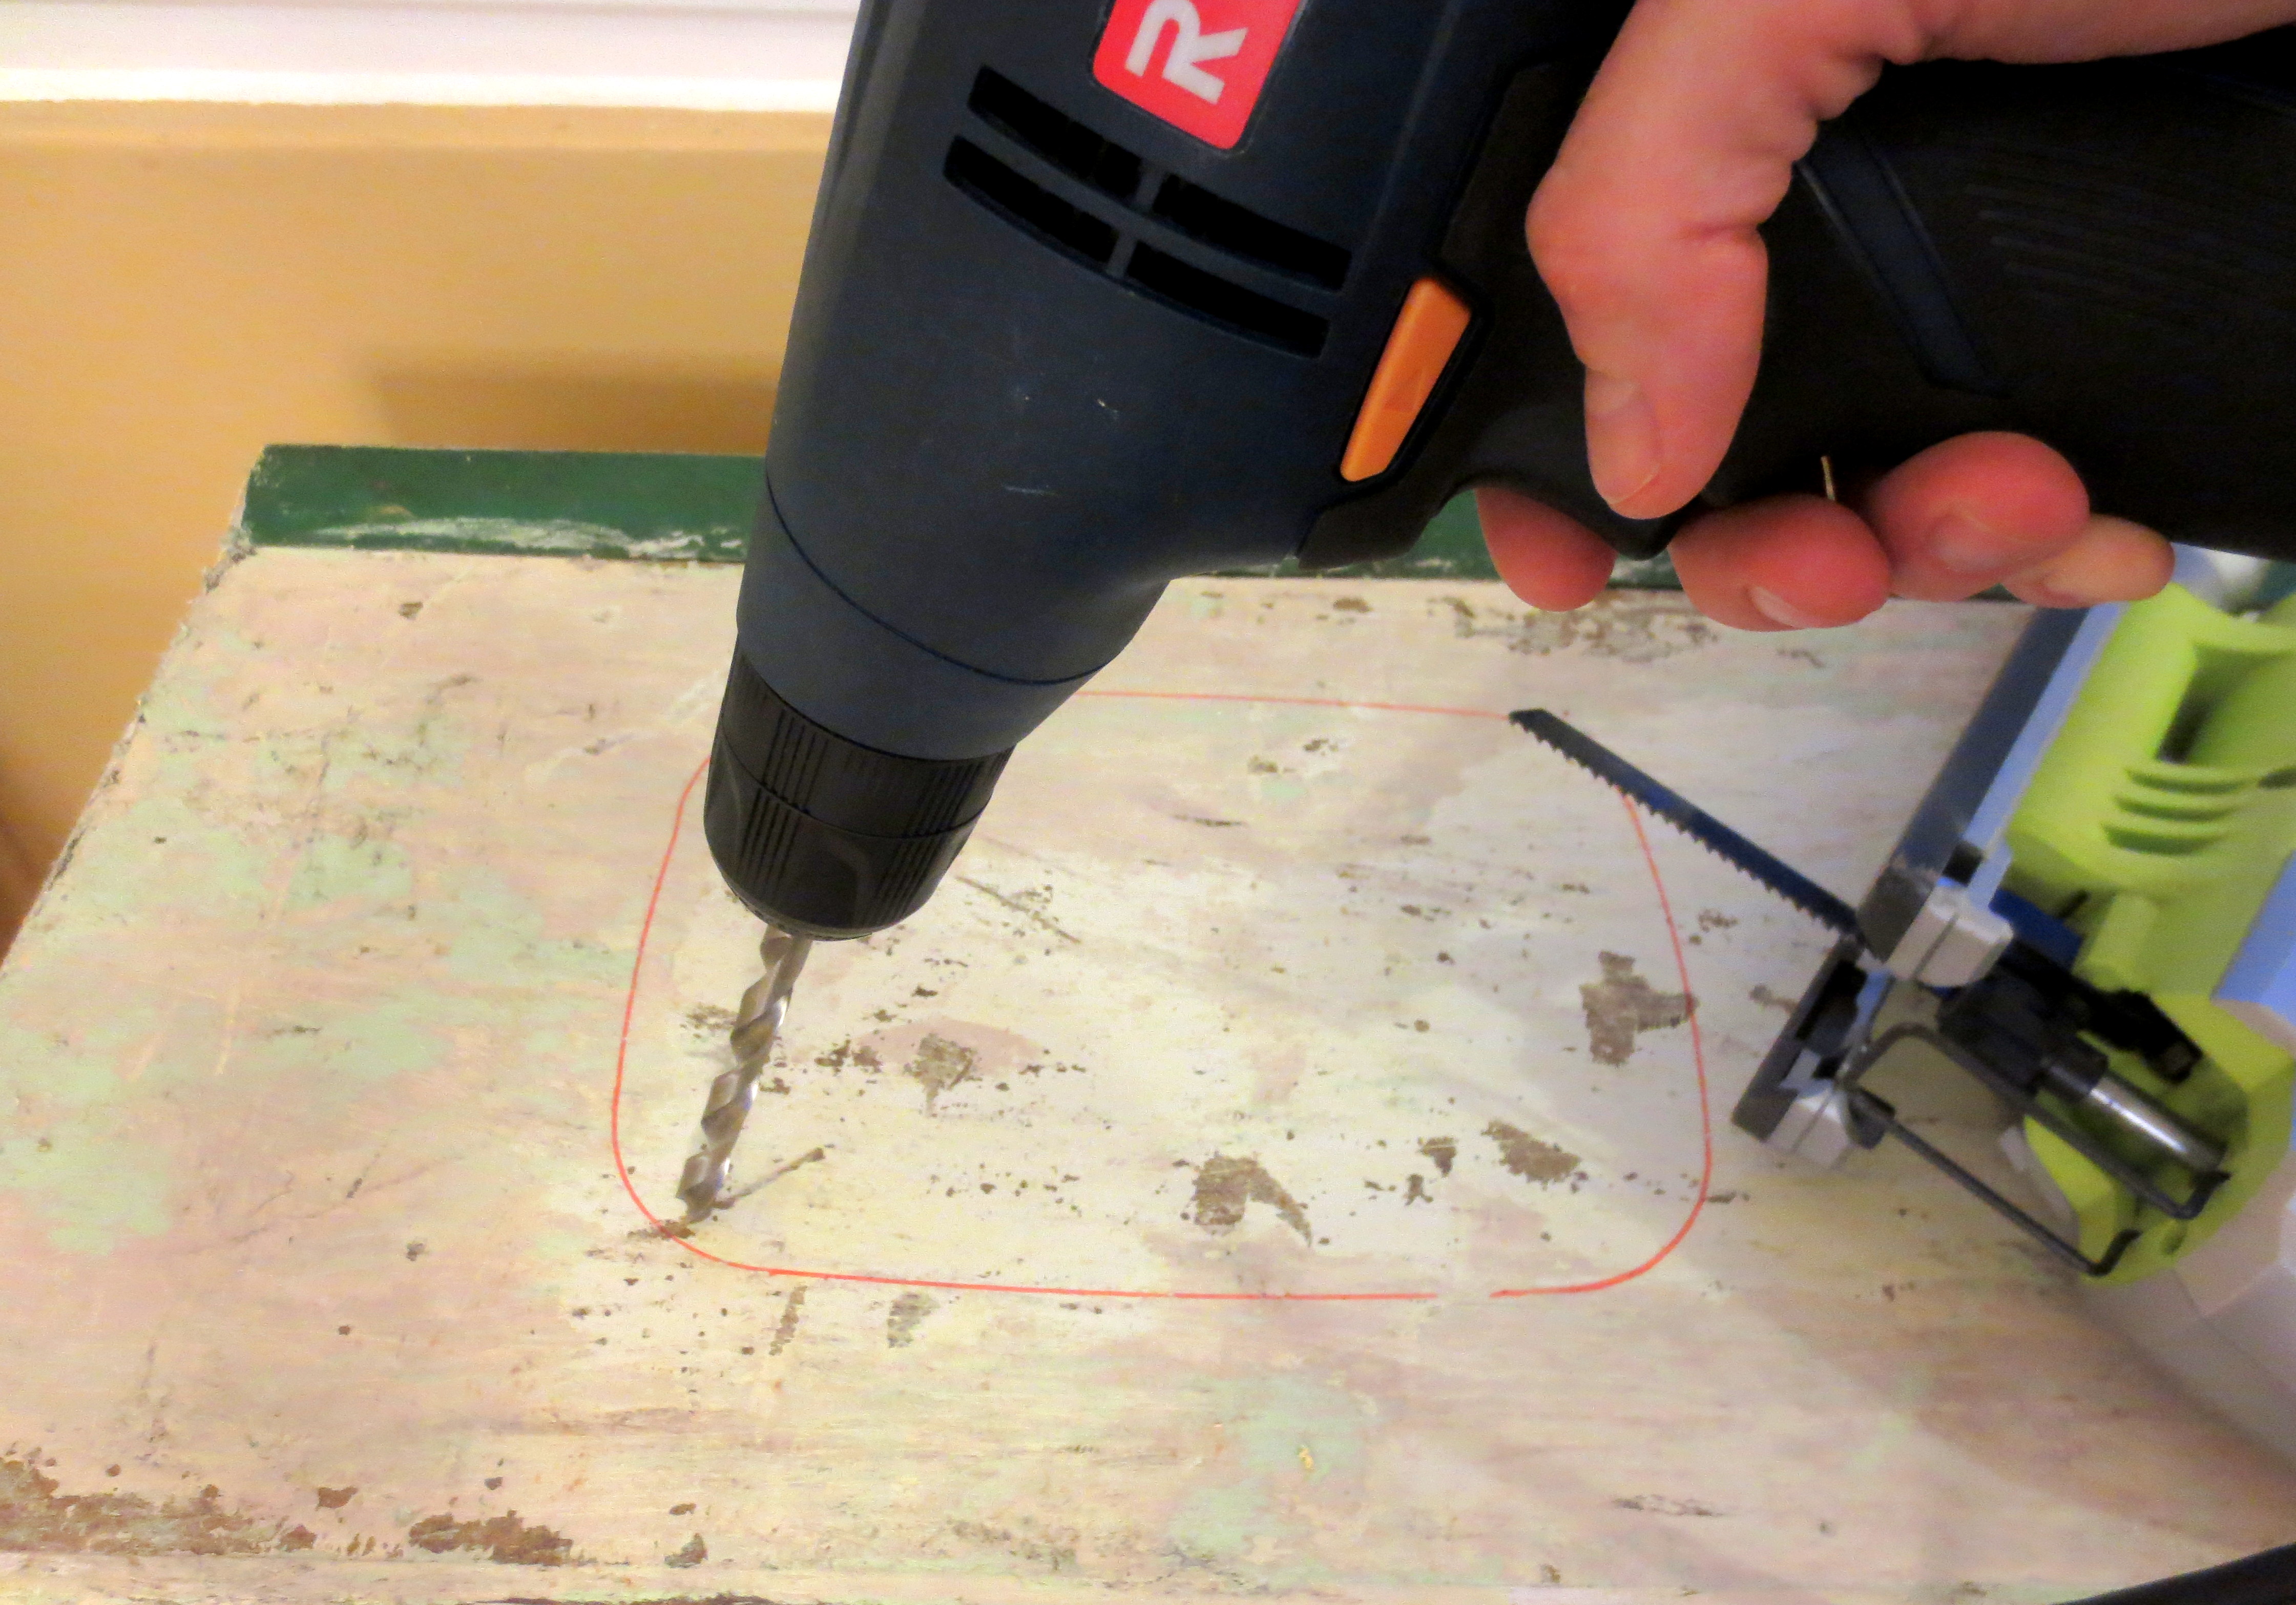 Dial your saw down to the lowest speed and insert the blade into the pilot hole.
 Very slowly, saw around the perimeter until you hear the satisfying thump of that perfect shape of wood falling down into the abyss.
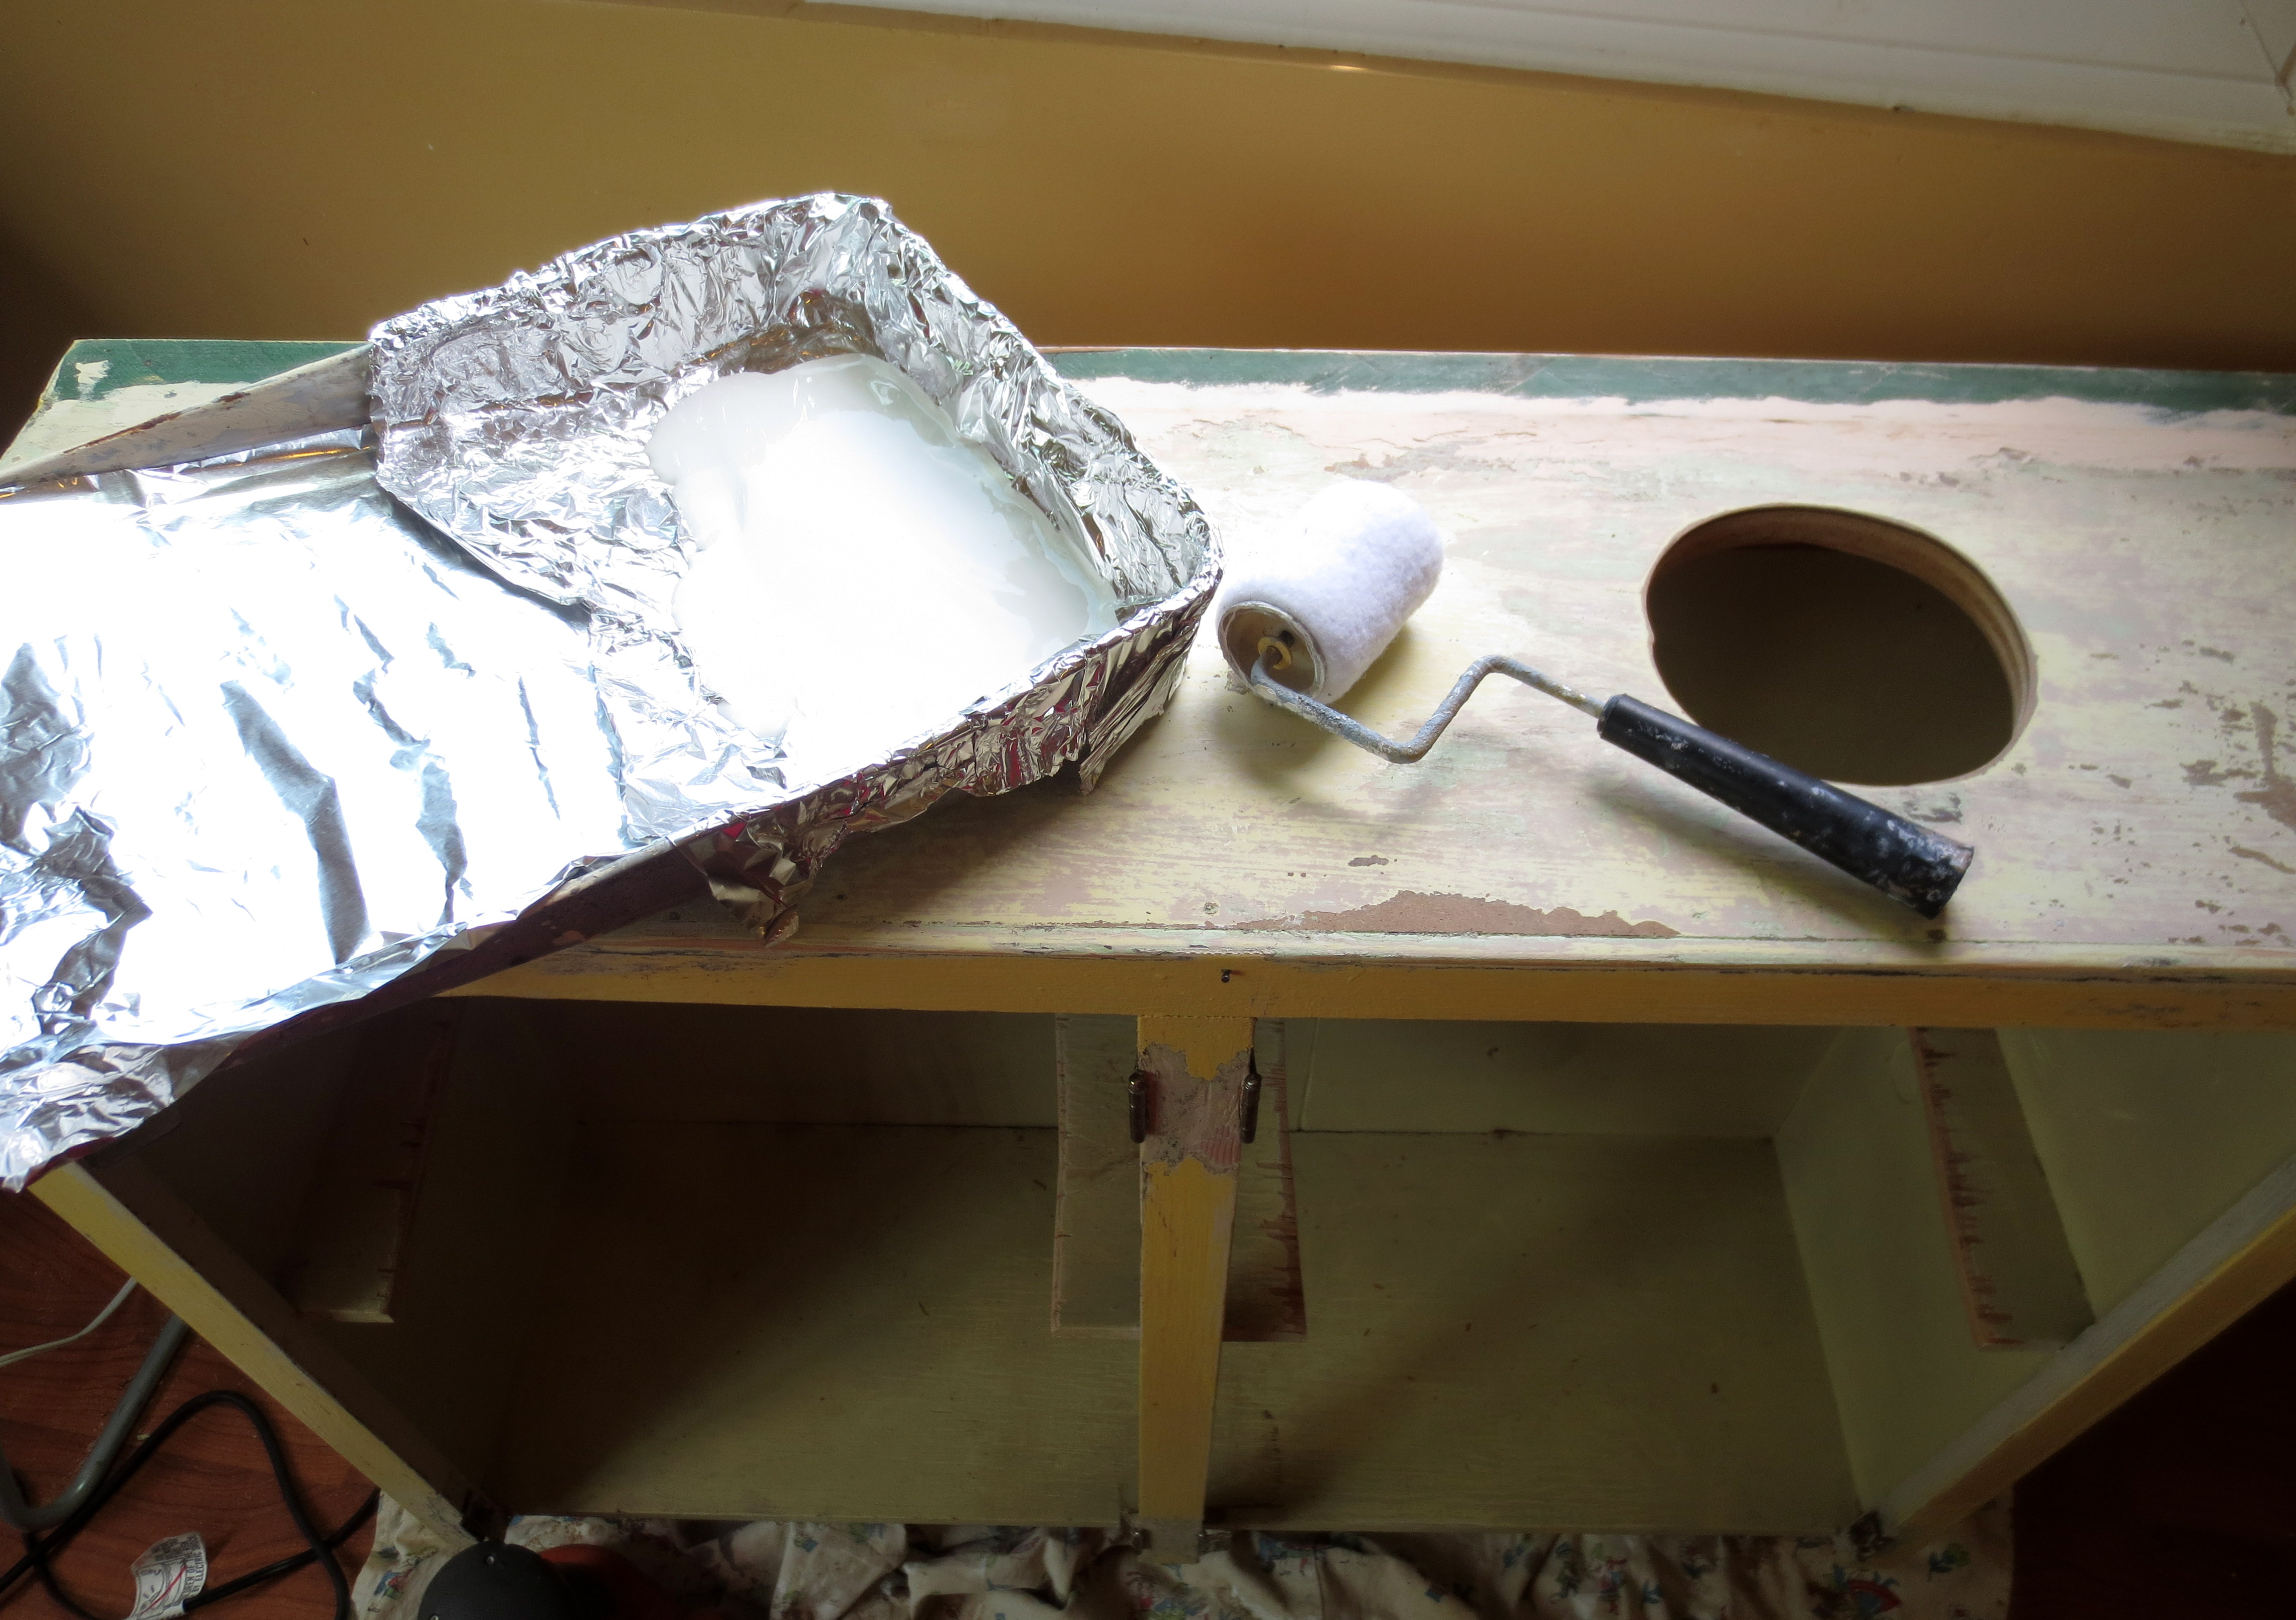
 Once you complete hole-cutting, sand down the inside and edges of your holes.**
STEP THREE – PRIME-N-PAINT: Everything is now covered in a fine misting of sawdust, including your lungs. Wipe it all down with a damp rag. Since we are dealing with an array of unknown finishes, we need to start fresh with a coat of oil-based primer on the cabinet and doors. I suggest using a roller brush, and coating your tray with aluminum foil for easy clean-up (sorry, you’ll have to toss the brush).
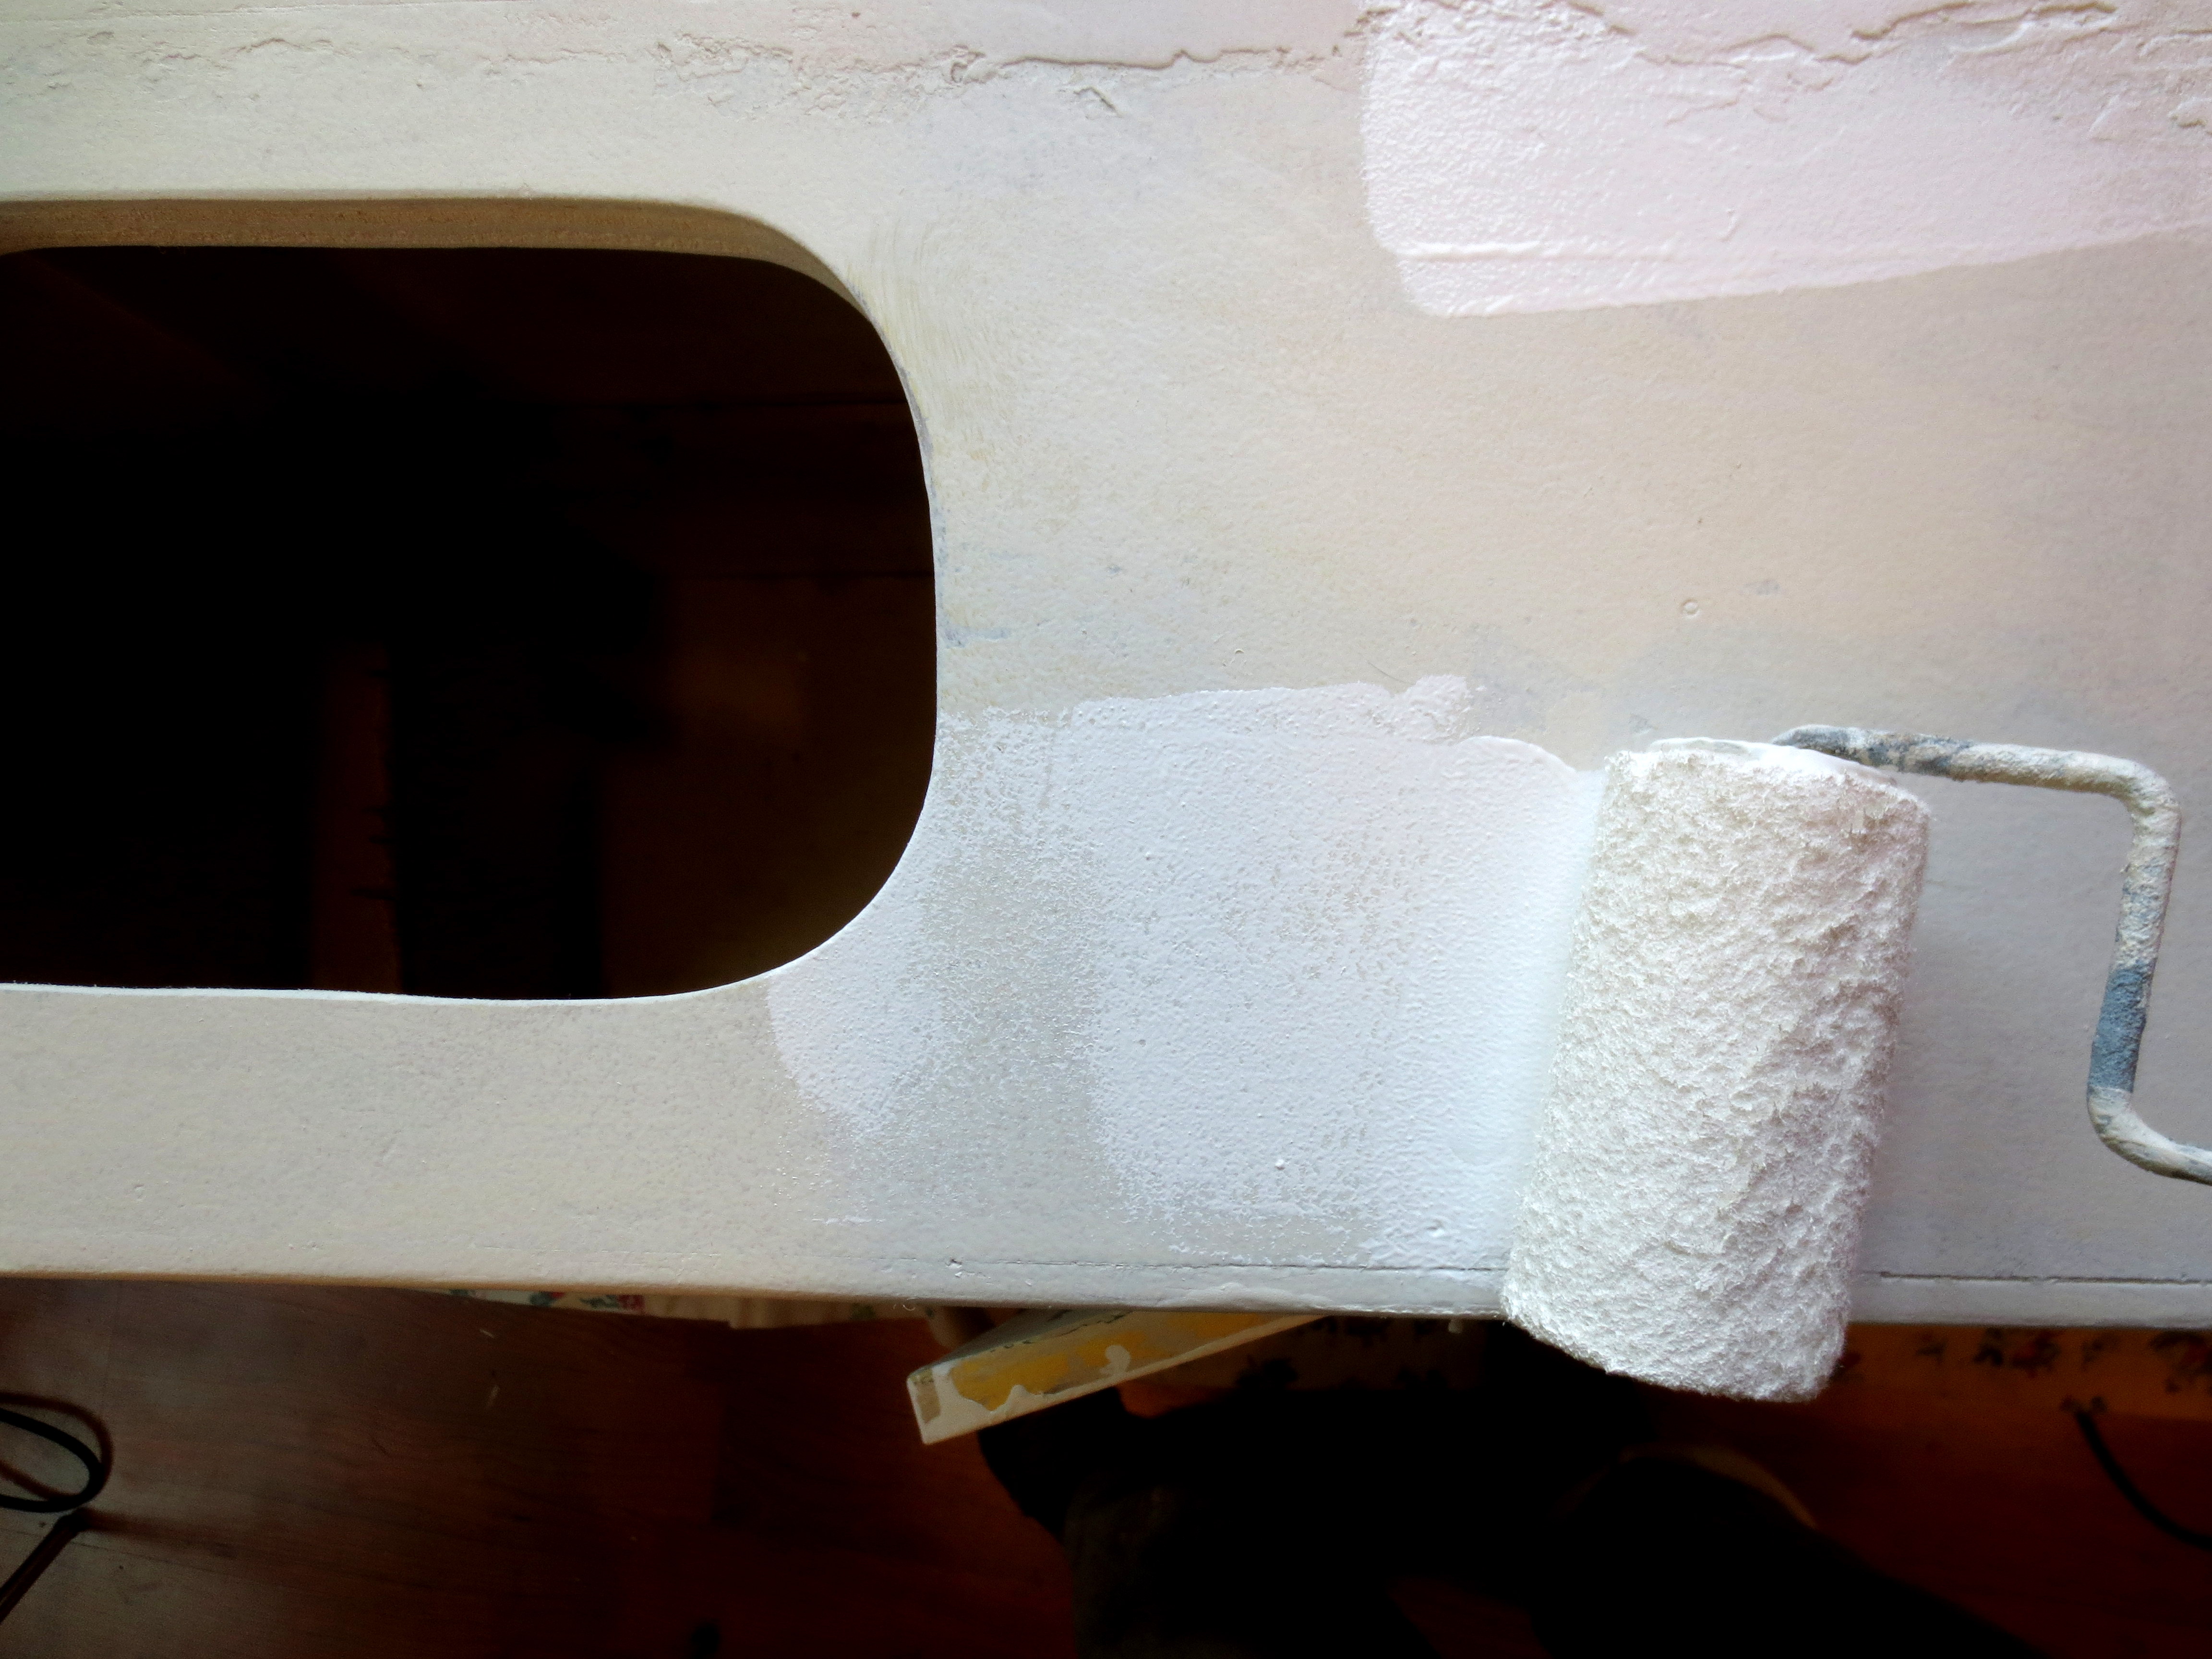
 Then apply two or three coats of white latex (water-based) paint to everything, including the inside of your recycling holes.
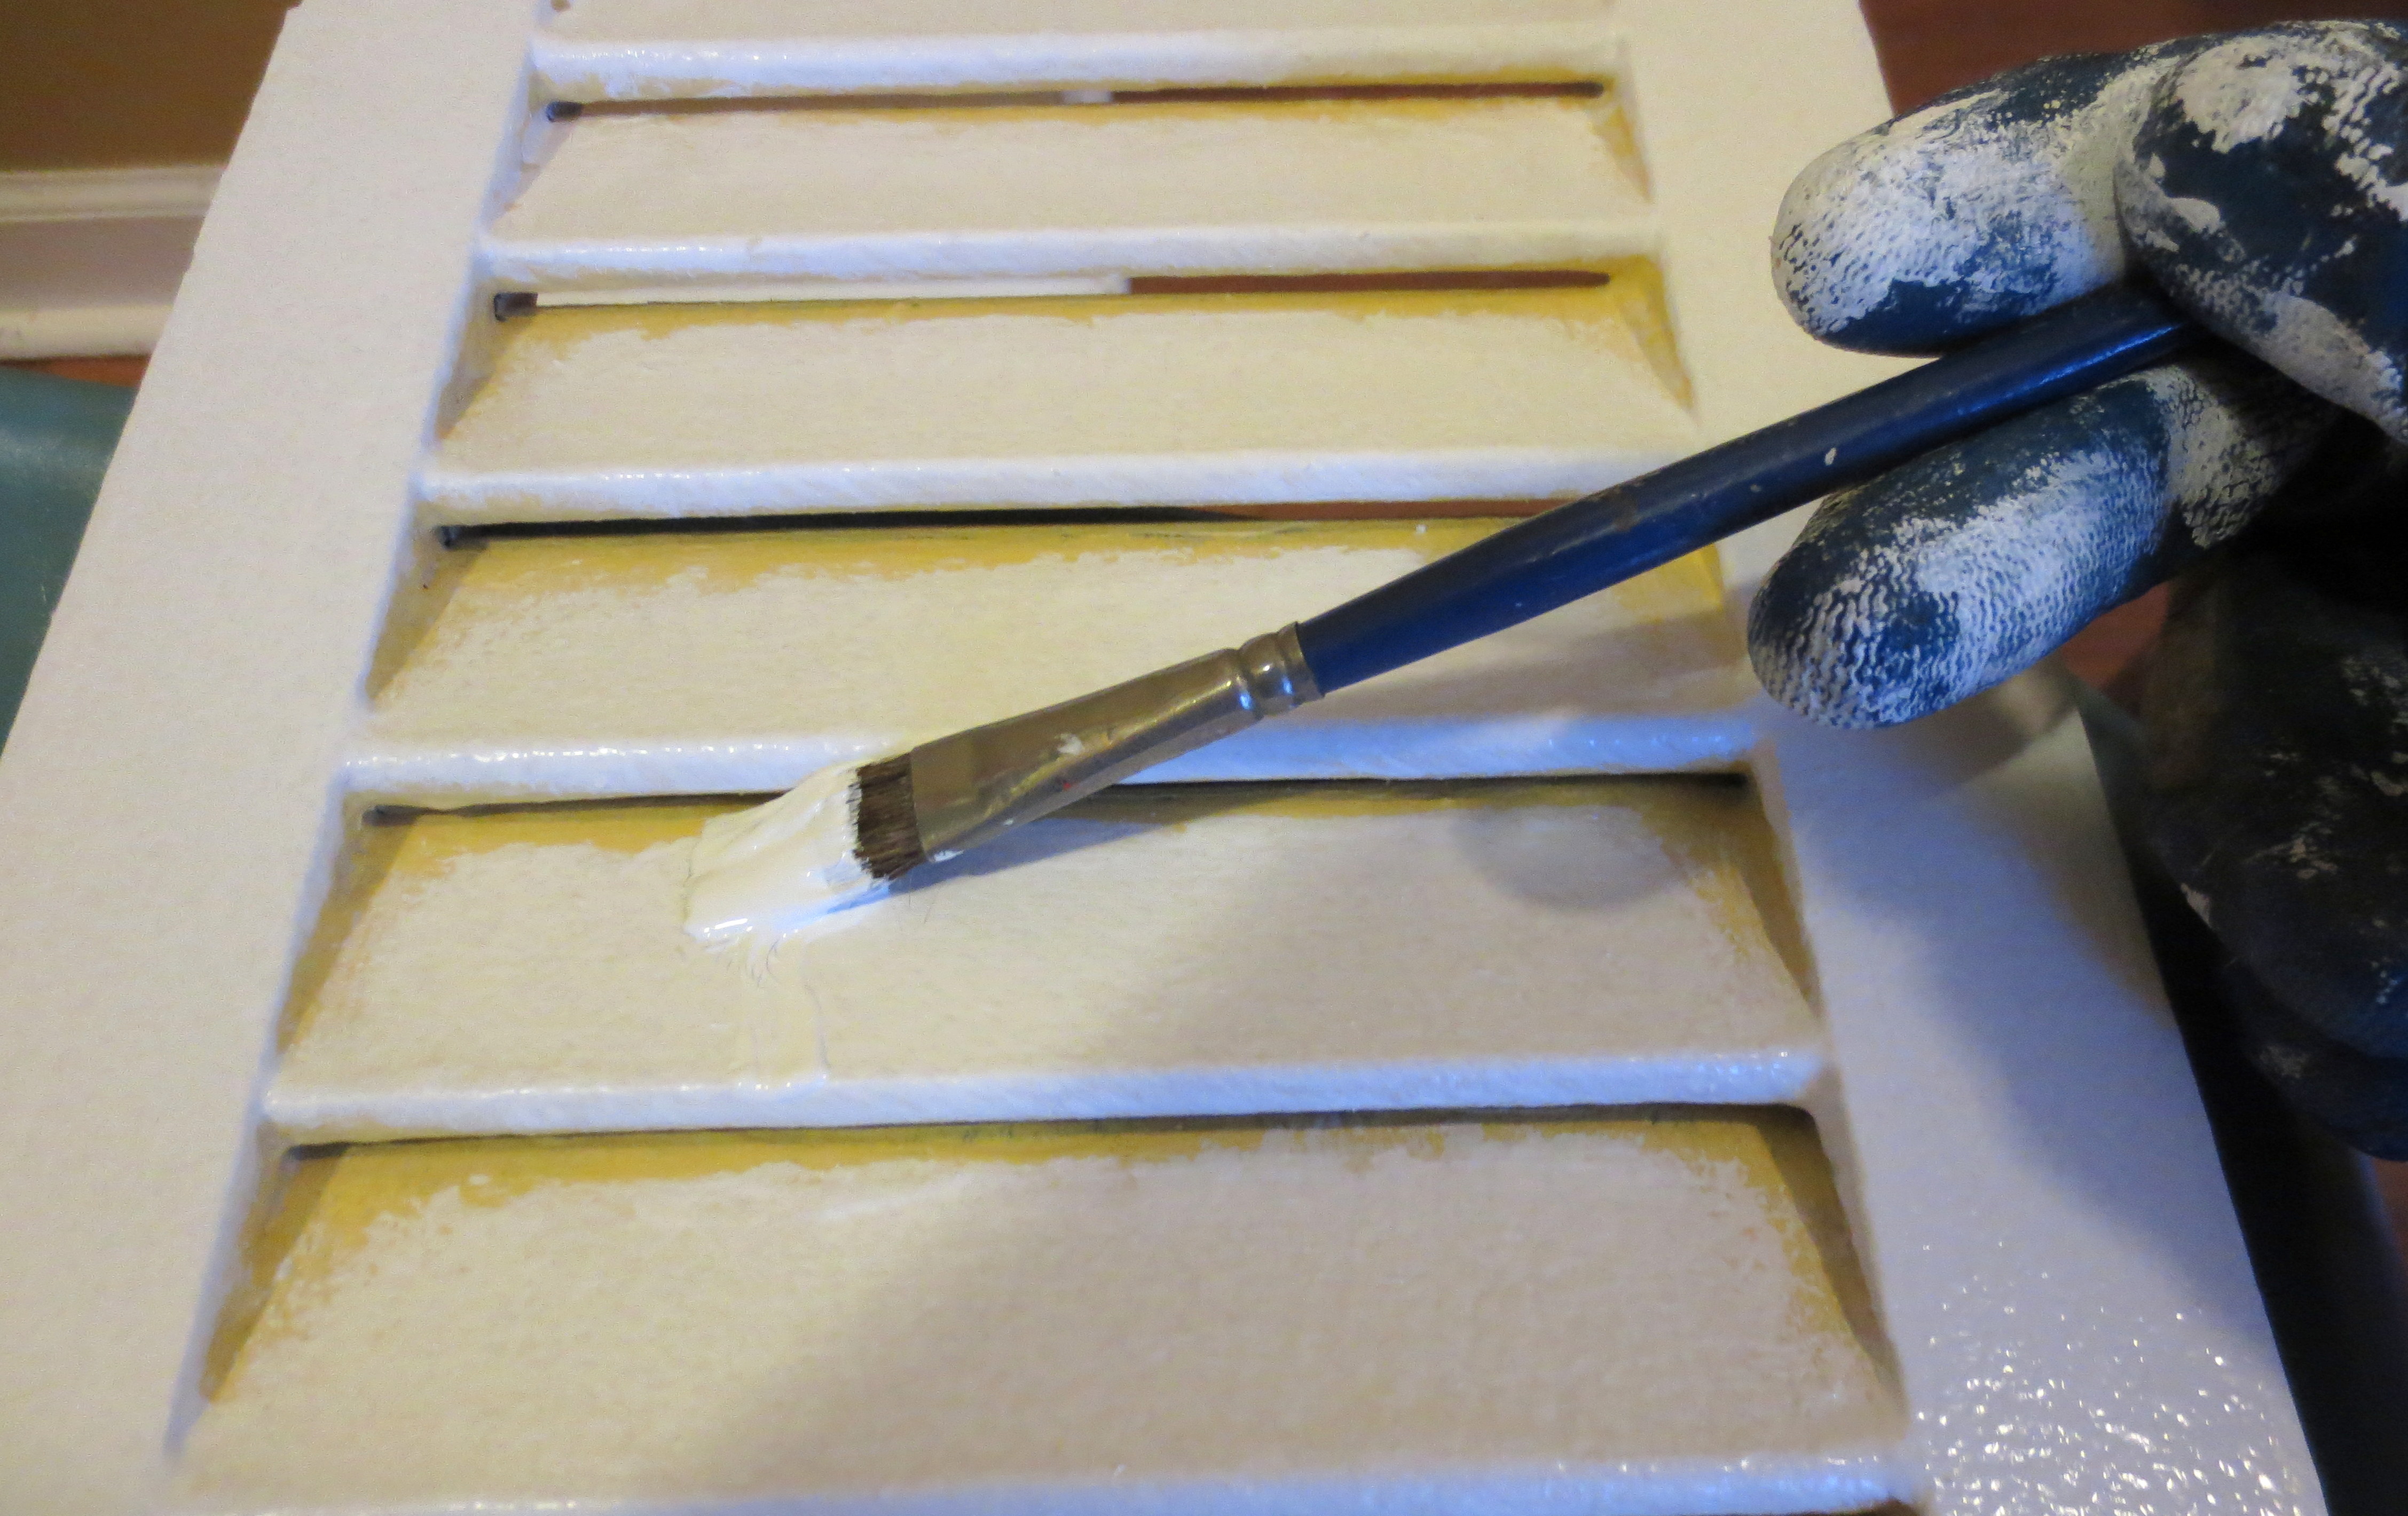
 You’ll probably need to steal one of your kids’ crappy little paintbrushes to get in the nooks and crannies of the cabinet door slats.
 Sand it all down with a high-grit sandpaper (220 is good), and wipe down clean.
Finally, apply three coats of clear Polycrylic finish, sanding lightly between applications. Trust me – if your family is like mine (as in, likes to toss not-quite-clean tuna cans across the room), then you’re going to need a hard, smooth finish for easy clean up.
 STEP FOUR — DOOR DÉCOR: I confess, I cannot stand the look of horizontal slat doors on cabinets, or really anything. Maybe because my house growing up had faux slat shutters framing the windows, and it drove my kid brain crazy that they couldn’t actually close. Like eyelids that couldn’t blink. Just a big lie in plain sight.
Um, but anyway – even with my fancy saw, it was too much trouble to cut the horizontal slats out, so I came up with a distraction. Bright yellow, uneven, VERTICAL slats,inspired by one of my Grandpa’s paintings.
Luckily, those greedy developers are still gutting the building next door, so there is always a big pile of unsecured wood pieces headed for the landfill:
 I sanded them down, and cut 16 pieces, each about 18 inches long. With my jigsaw!
 Then I painted them with a couple coats of bright yellow paint leftover from my hubcap wall art project.
 I playfully arranged the slats so that each door would mirror its “pair.”
 Once I found a pleasing pattern, I slathered the back of them with wood glue and set them in place, making sure to press down and wipe off any glue that had oozed out the sides. You’ll have about five minutes to make minor adjustments before the glue gets stiff.
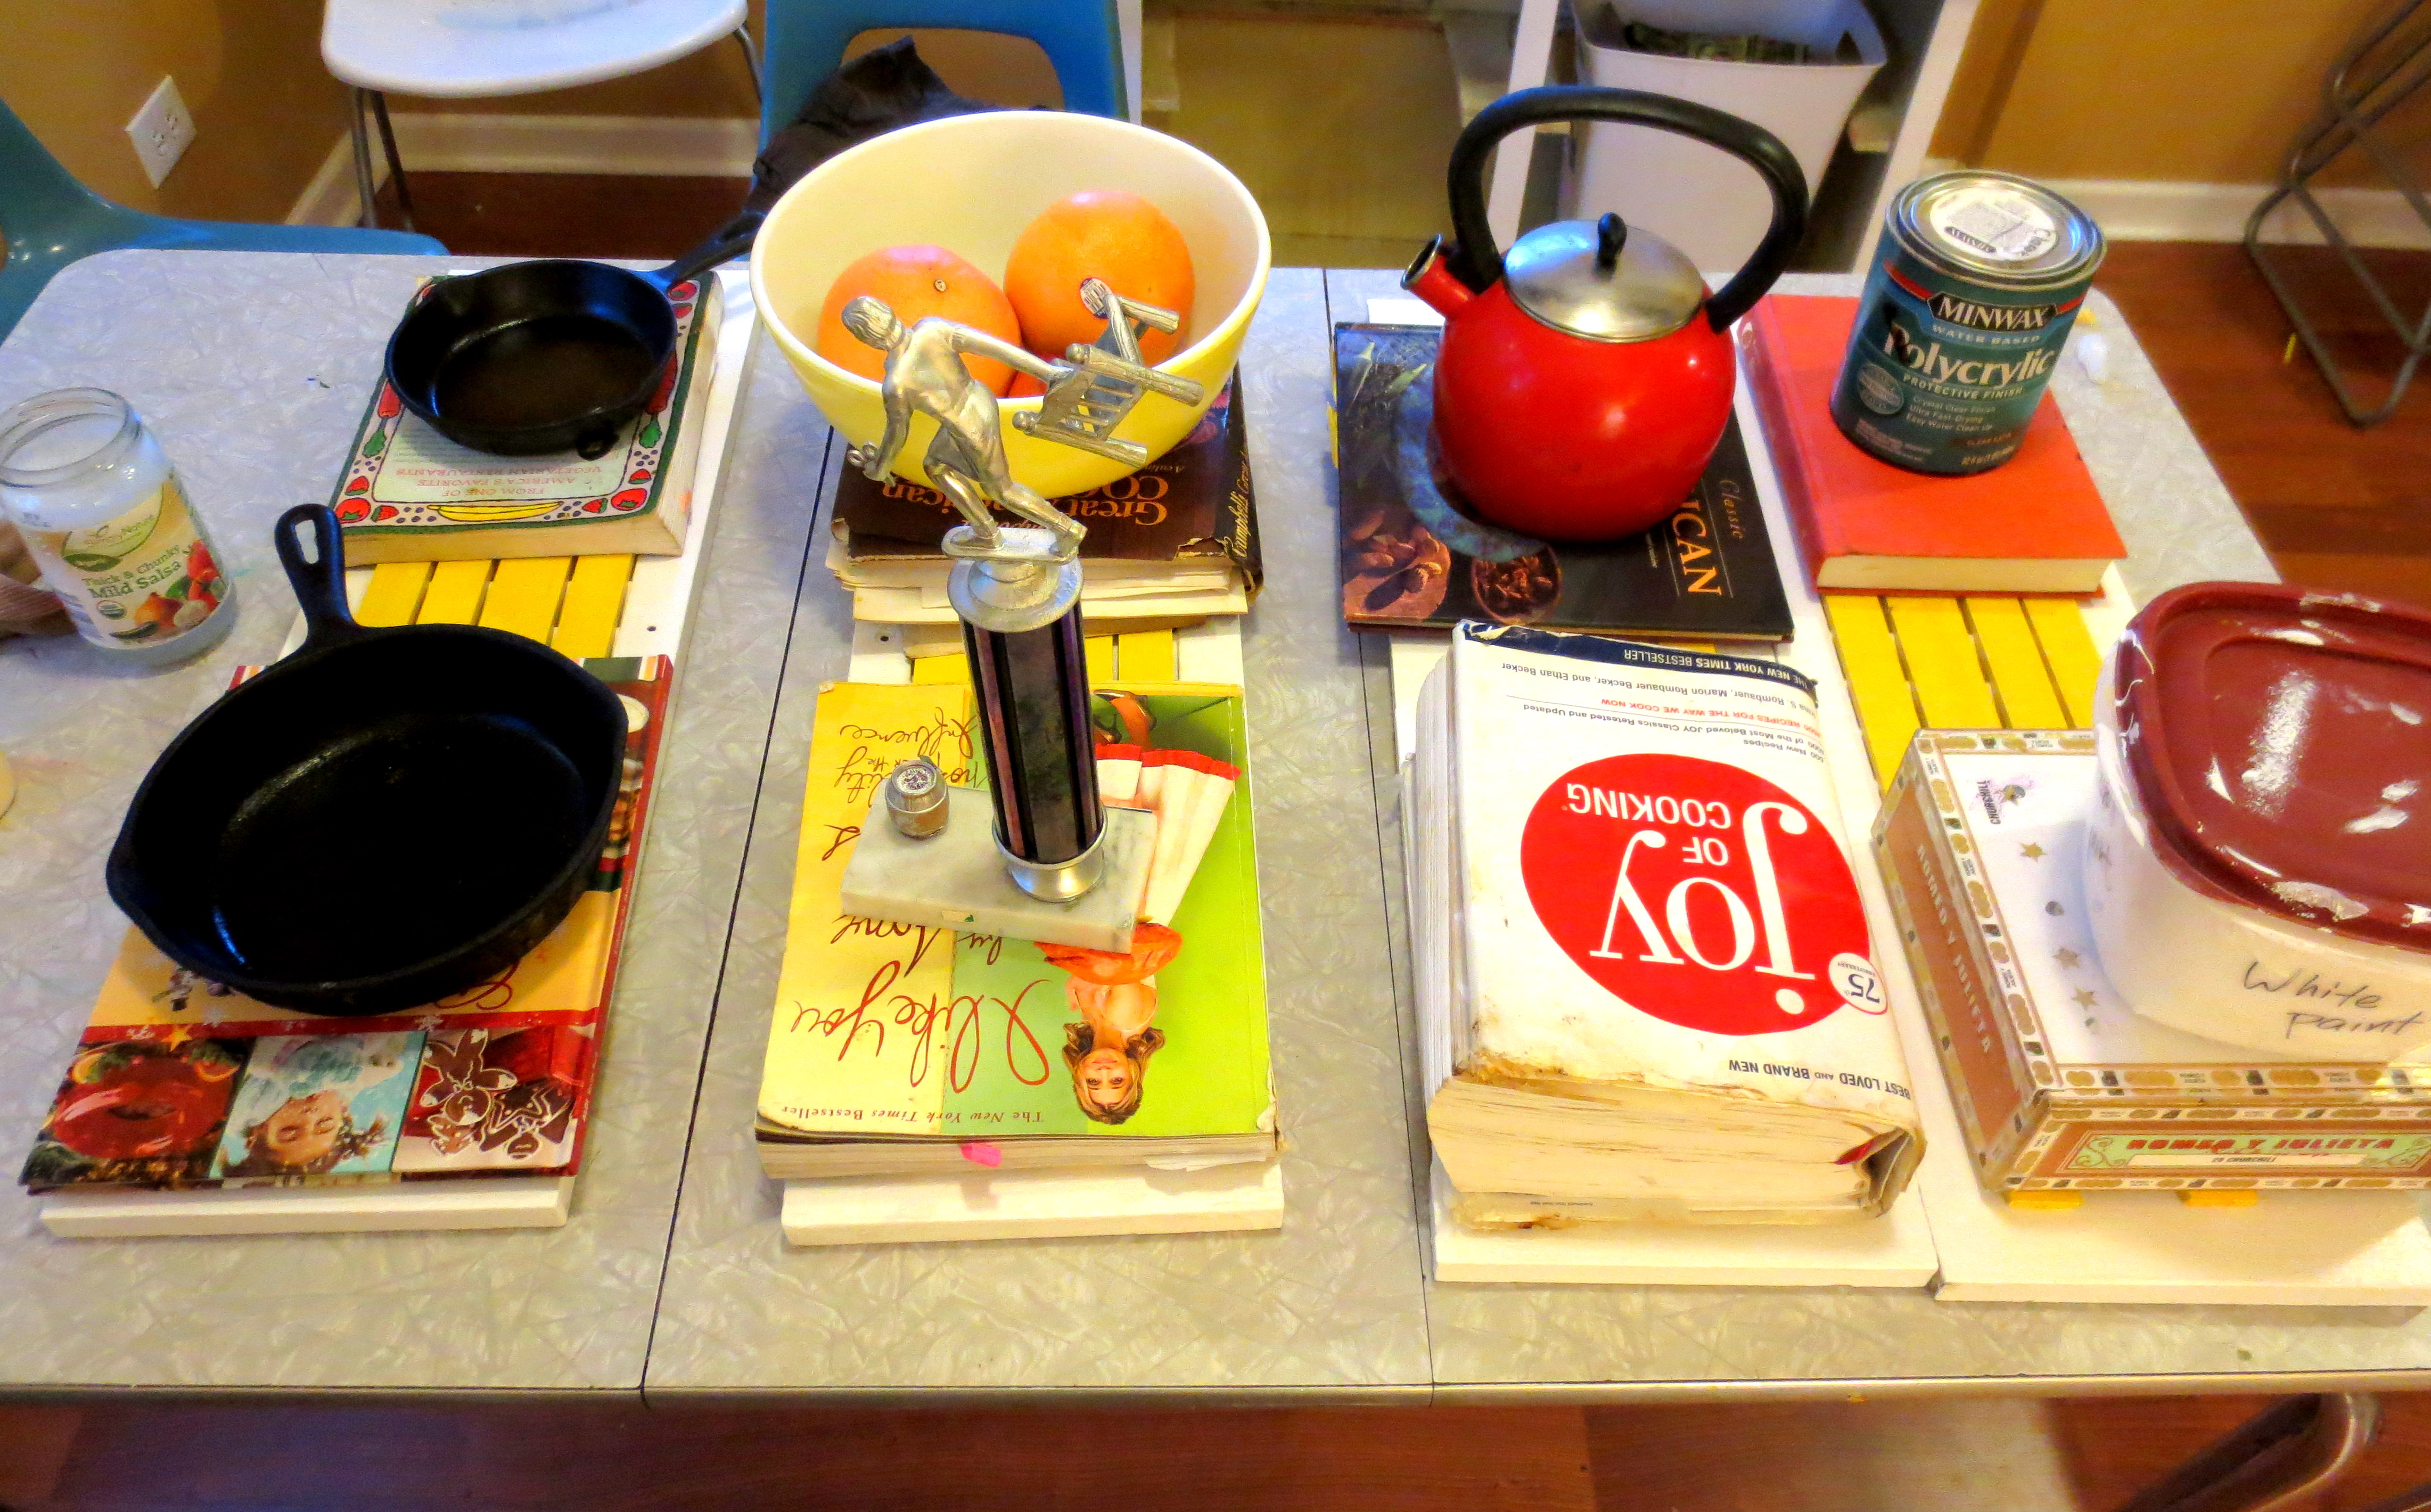
 I covered all the newly-slatted doors with various combinations of cookbooks, skillets and trophies. You want to apply pressure, but not enough to crack anything. Be gentle — all this stuff came out of the trash!
 Let the whole business rest for at least half an hour.
Now, alert readers may have noticed that this cabinet came with only one of its four door pulls attached. But on the way home from school last week we found this old dresser in the alley. It was D.O.A. – that’s scavenger-talk for too messed up to be salvaged – but the drawer pulls were fabulous. I told the kids to keep watch while I unscrewed all of them and slipped them into my purse.
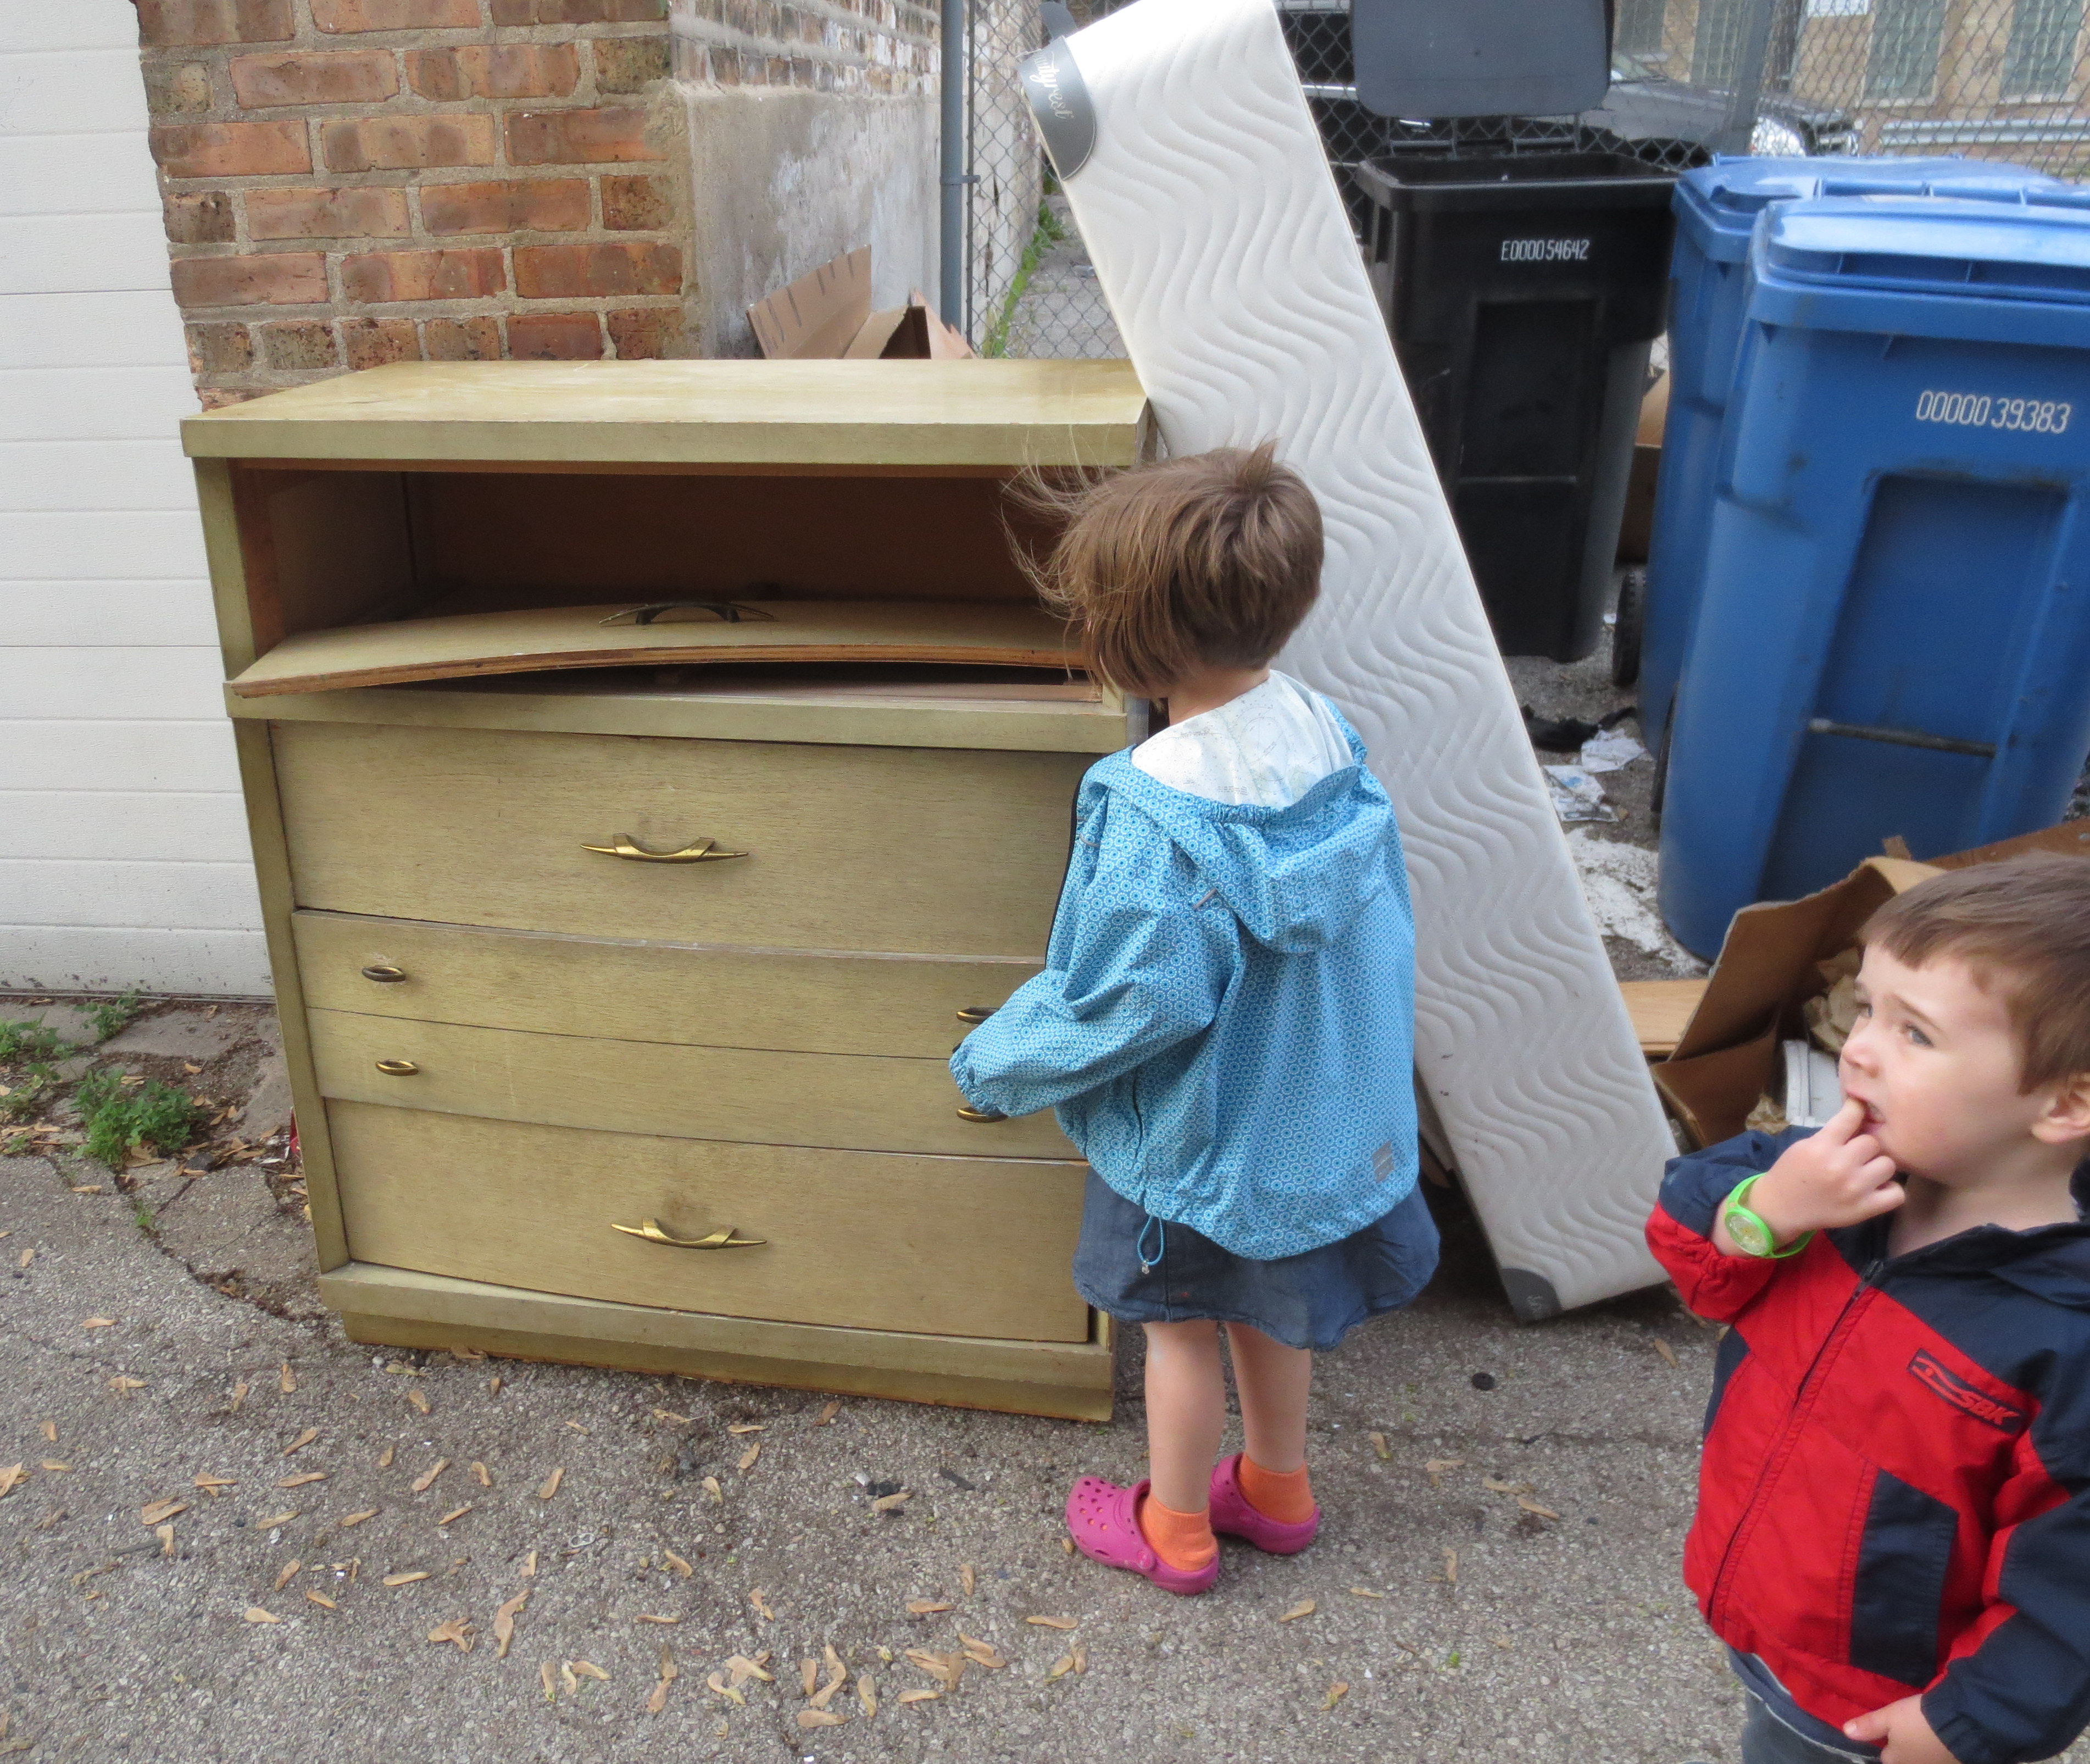 I never imagined having to tell my daughter, “Please don’t climb on that soiled mattress!”
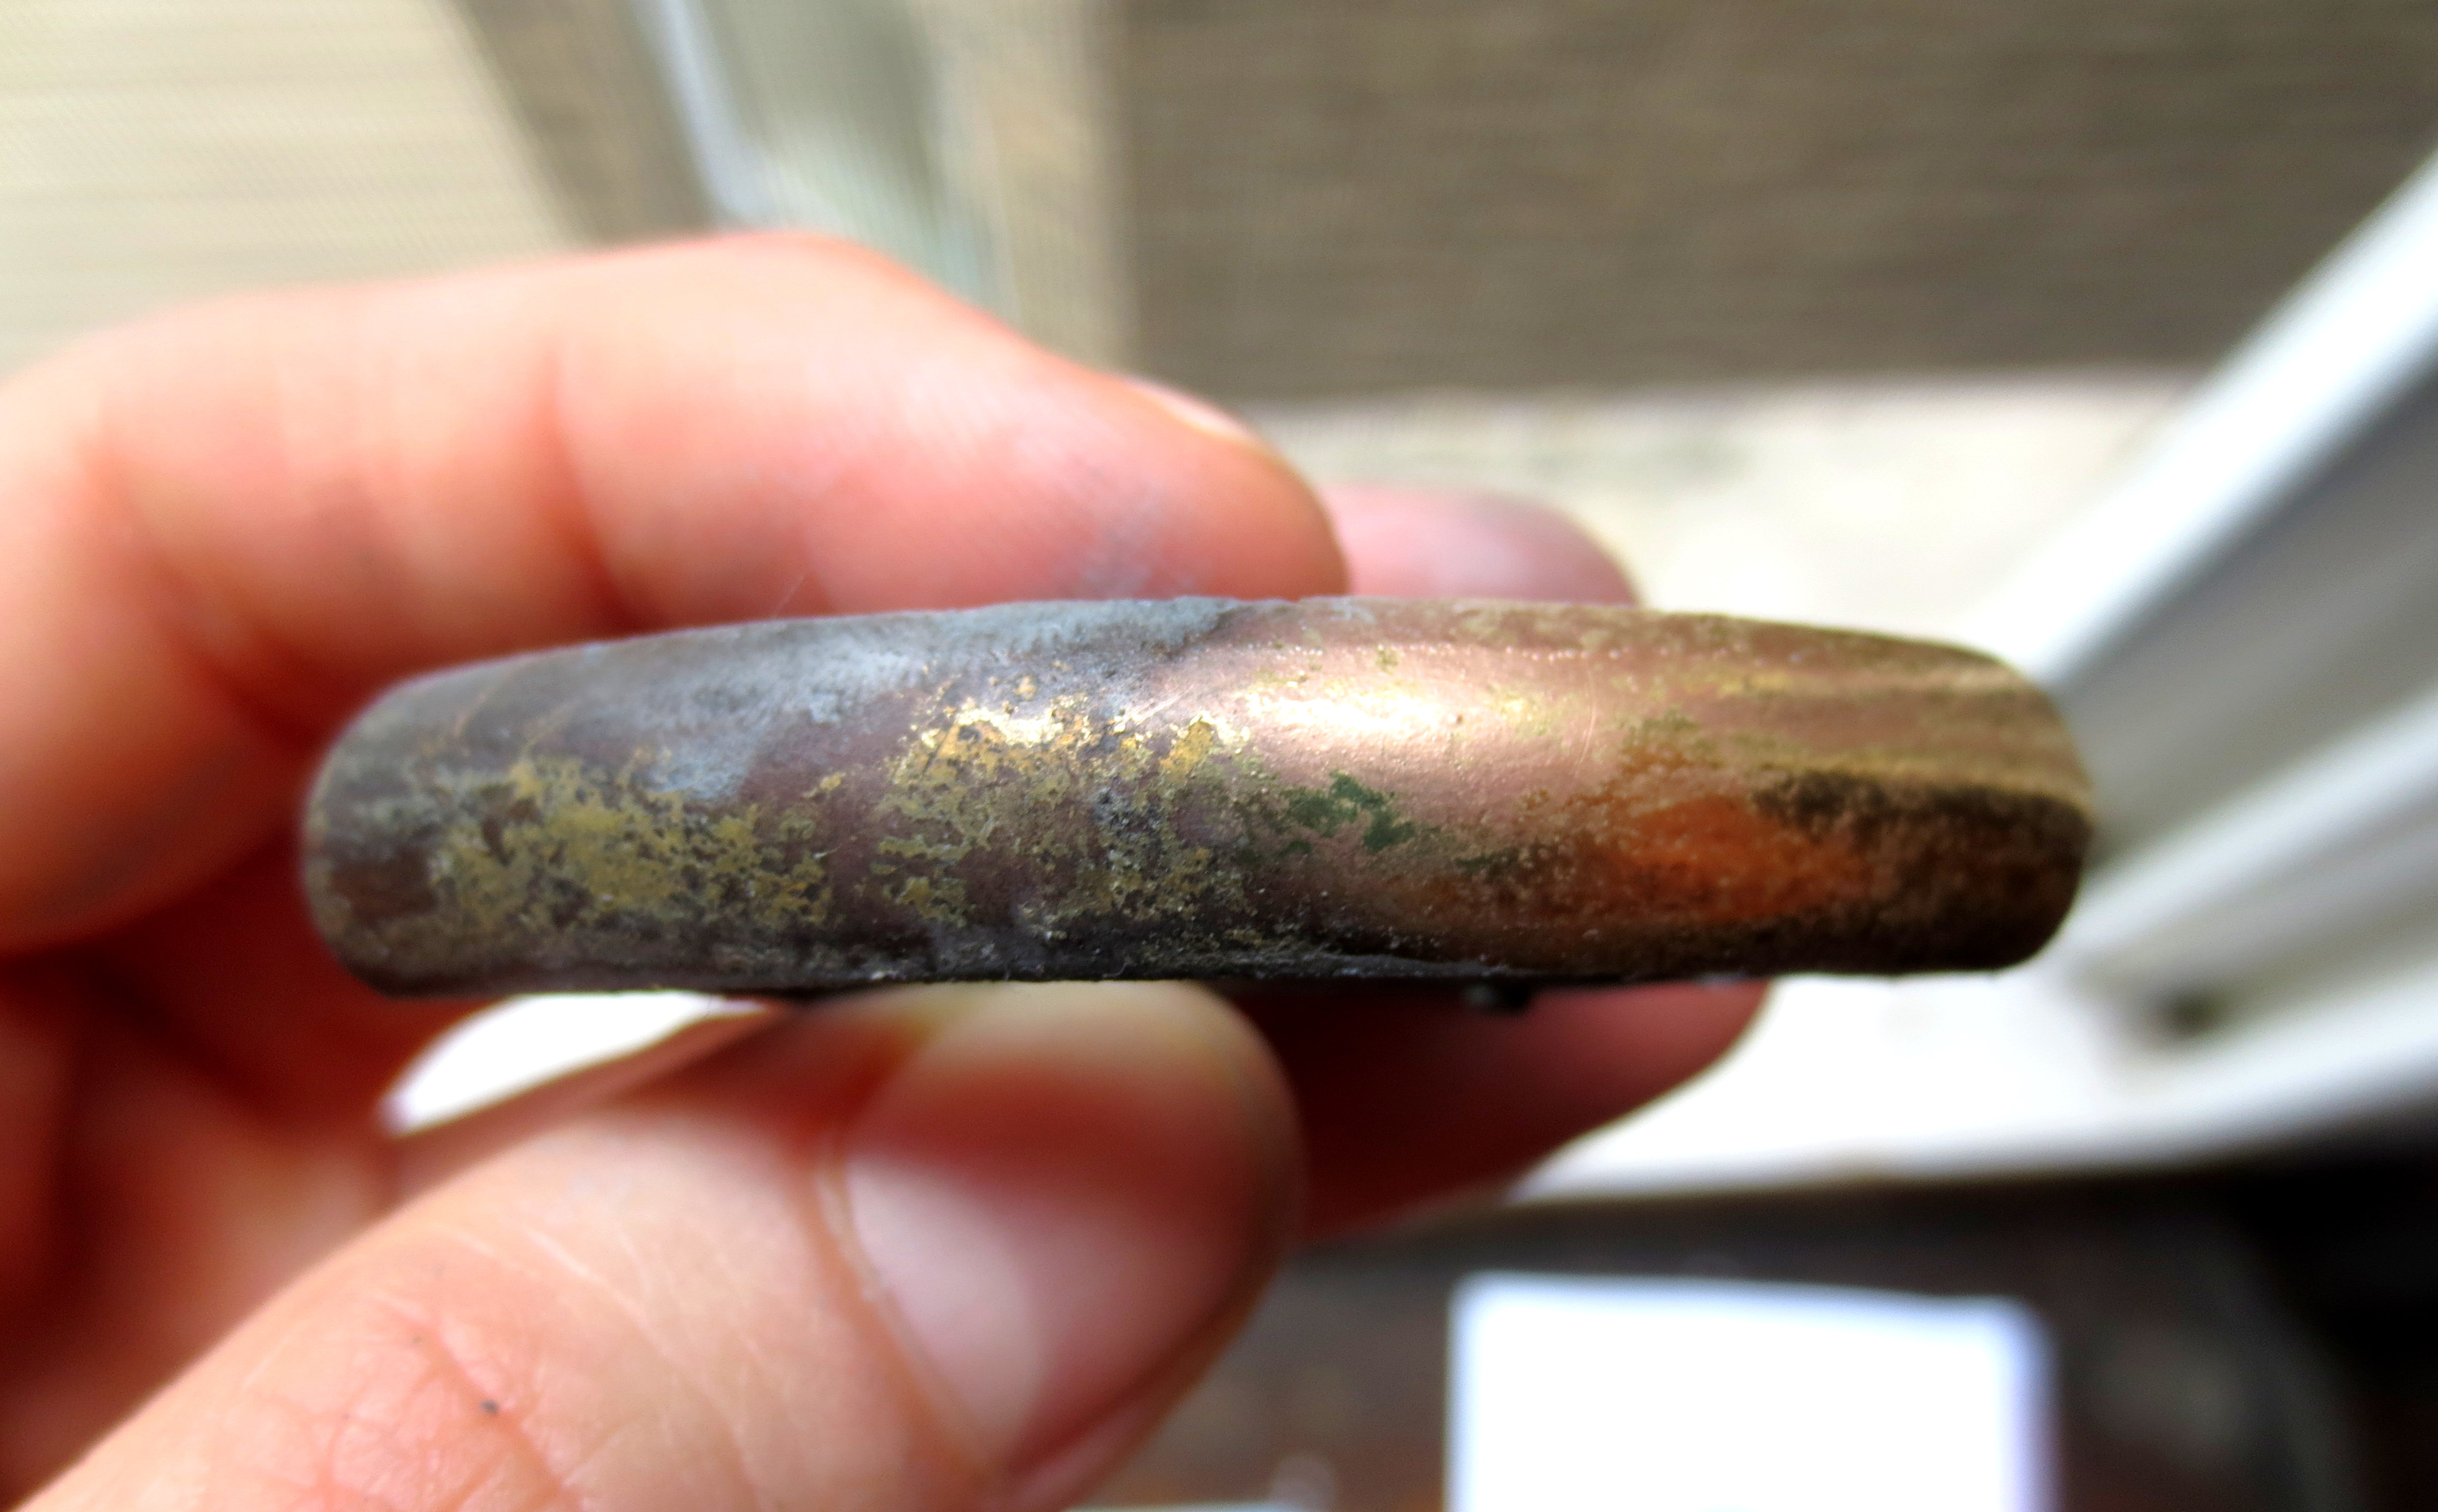
The pulls were nasty, but after a multi-day soak in a jar of vinegar and a little scrubbing, they were gleaming and ready for their new life. Before and after:
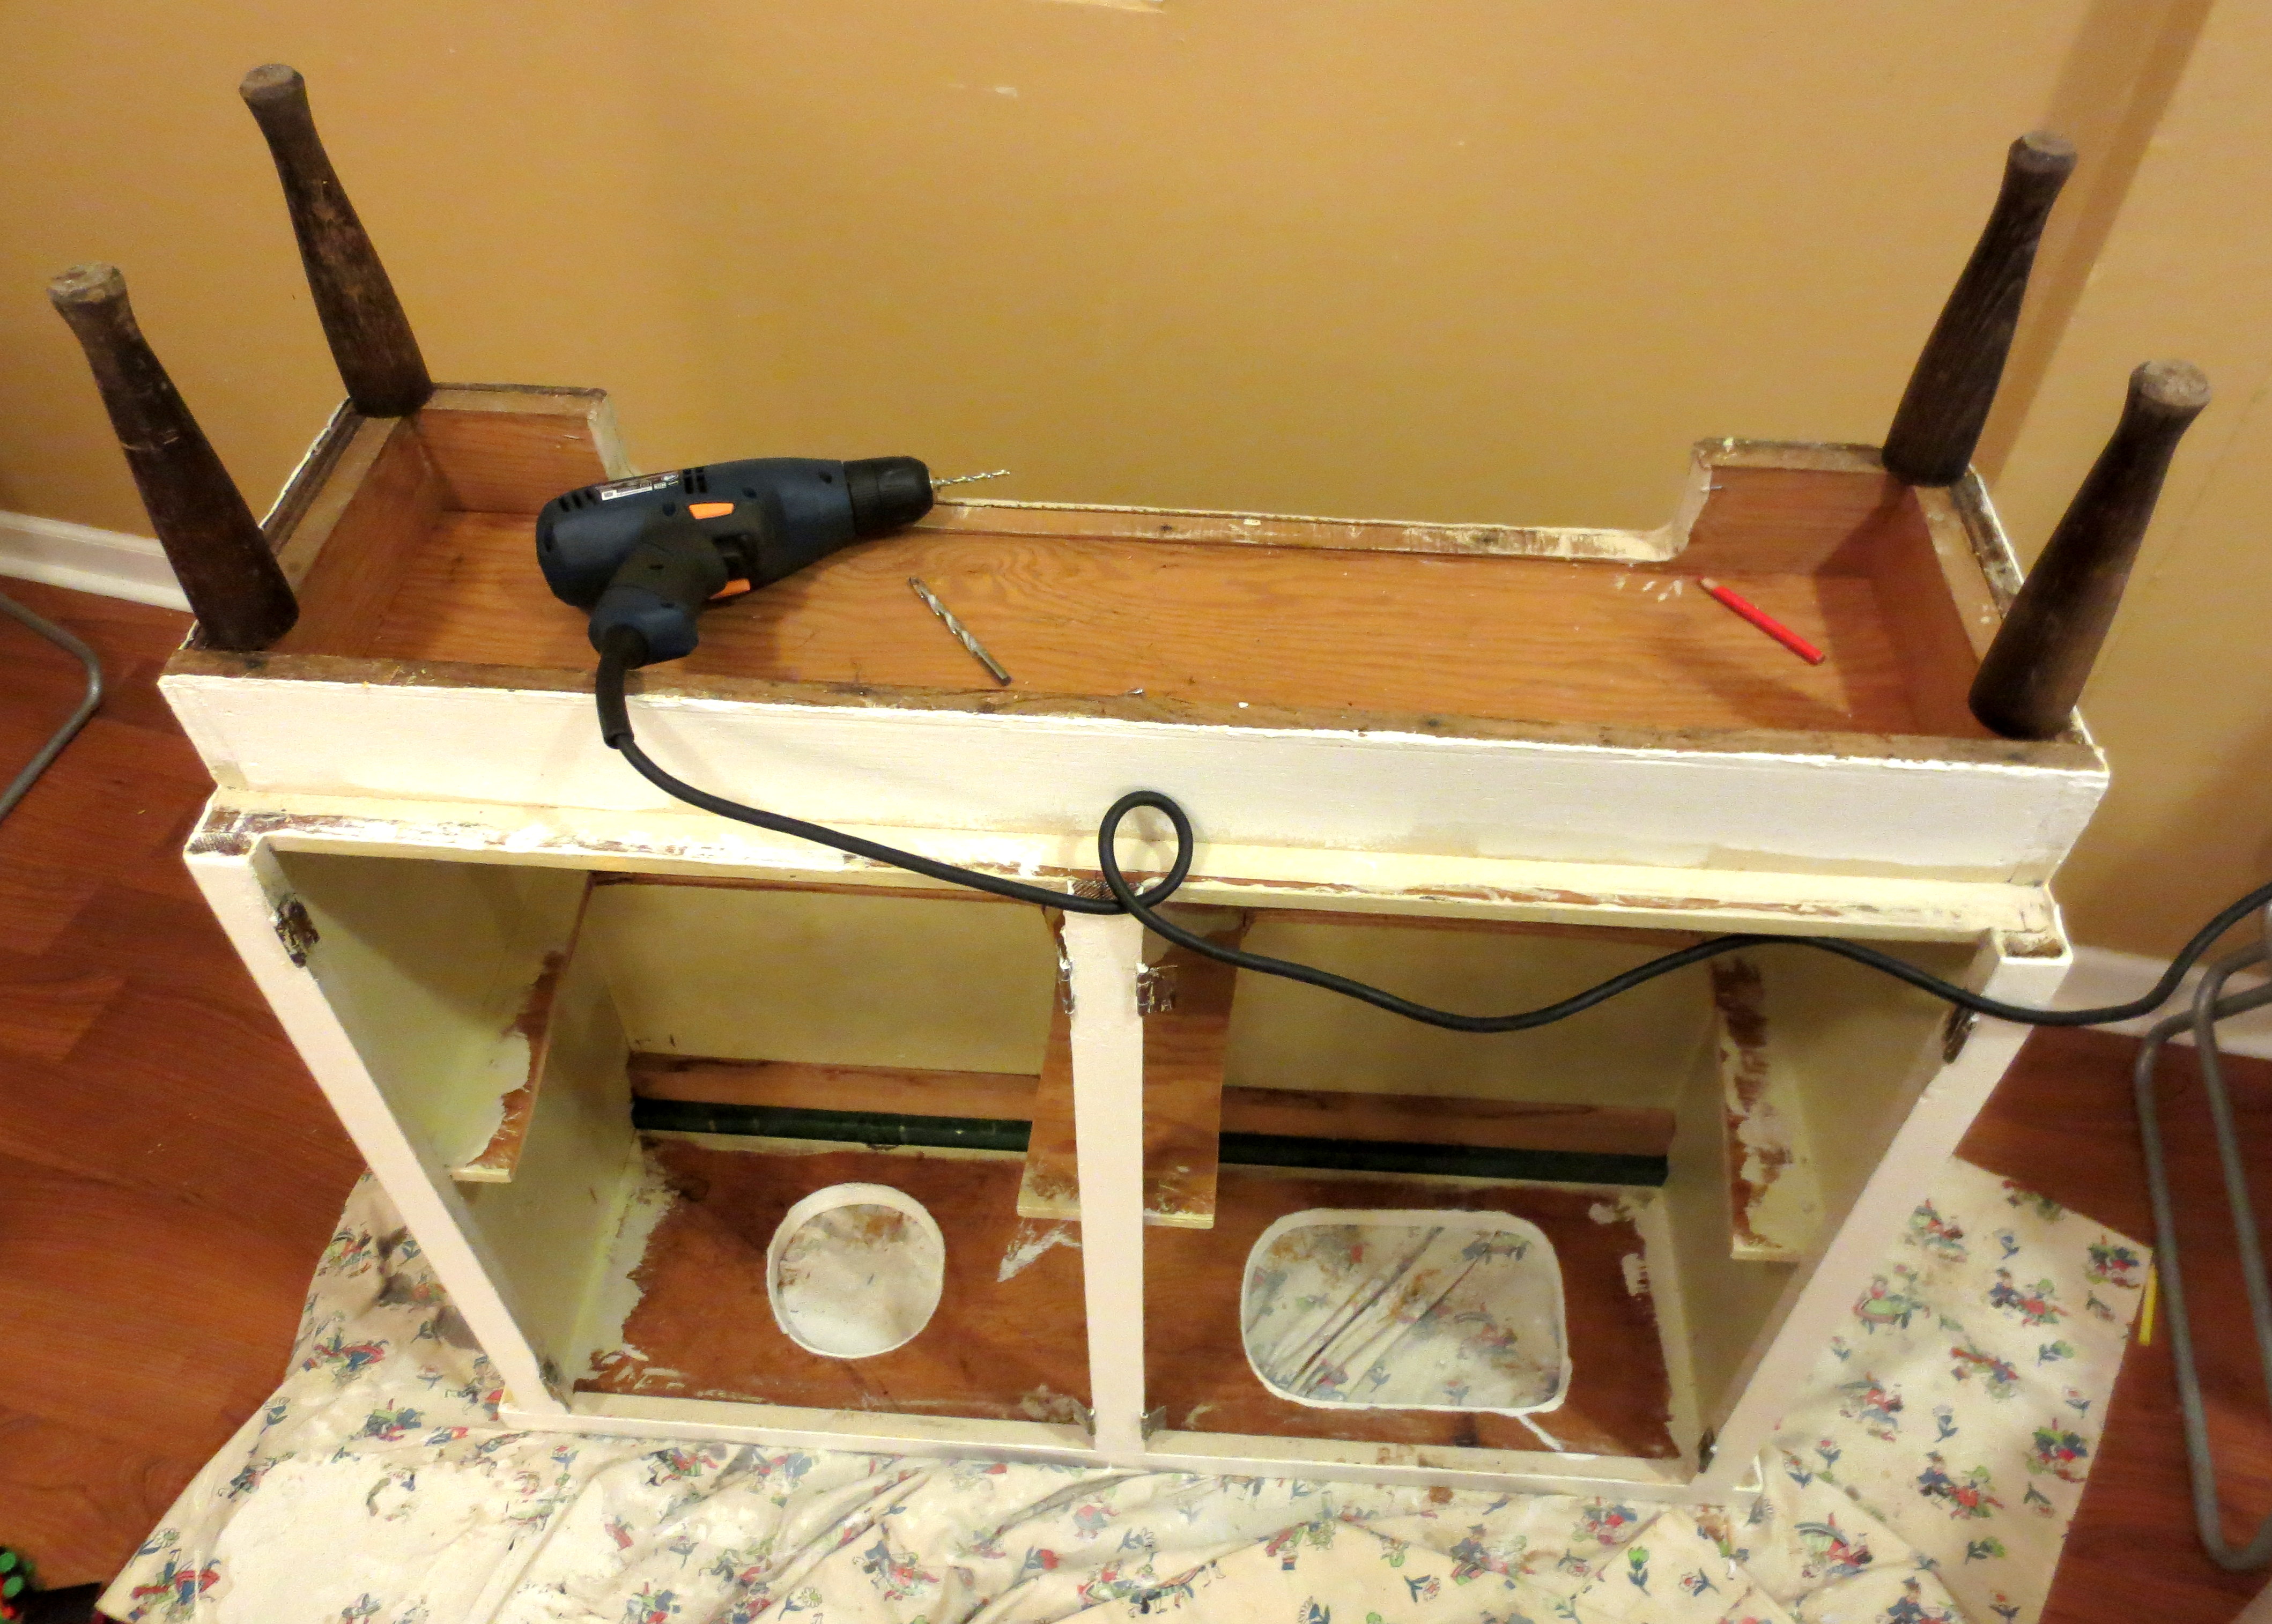
 I had to drill an extra hole in each door to accommodate them, but at this point, who’s counting?
STEP FIVE – LEGS: Even with fresh paint, my cabinet looks so heavy and downtrodden. A sulking, defeated beast lurking in a dark corner of my kitchen, dutifully devouring my milk cartons. However, if my superficial understanding of modern design is correct, the way to lighten the load, visually, is to PUT LEGS UNDER IT.
In another perfect twist of fate, I had recently sent Scott into a nearby alley to pick up what looked like a decent modern shelf hutch thing. He phoned to say it was D.O.A., but that he could pull the legs off for my “collection.” That boy knows how to please a woman! (but just between you and me, I think I could have saved it.)

 I drilled holes in the four corners and twisted the new legs in place.
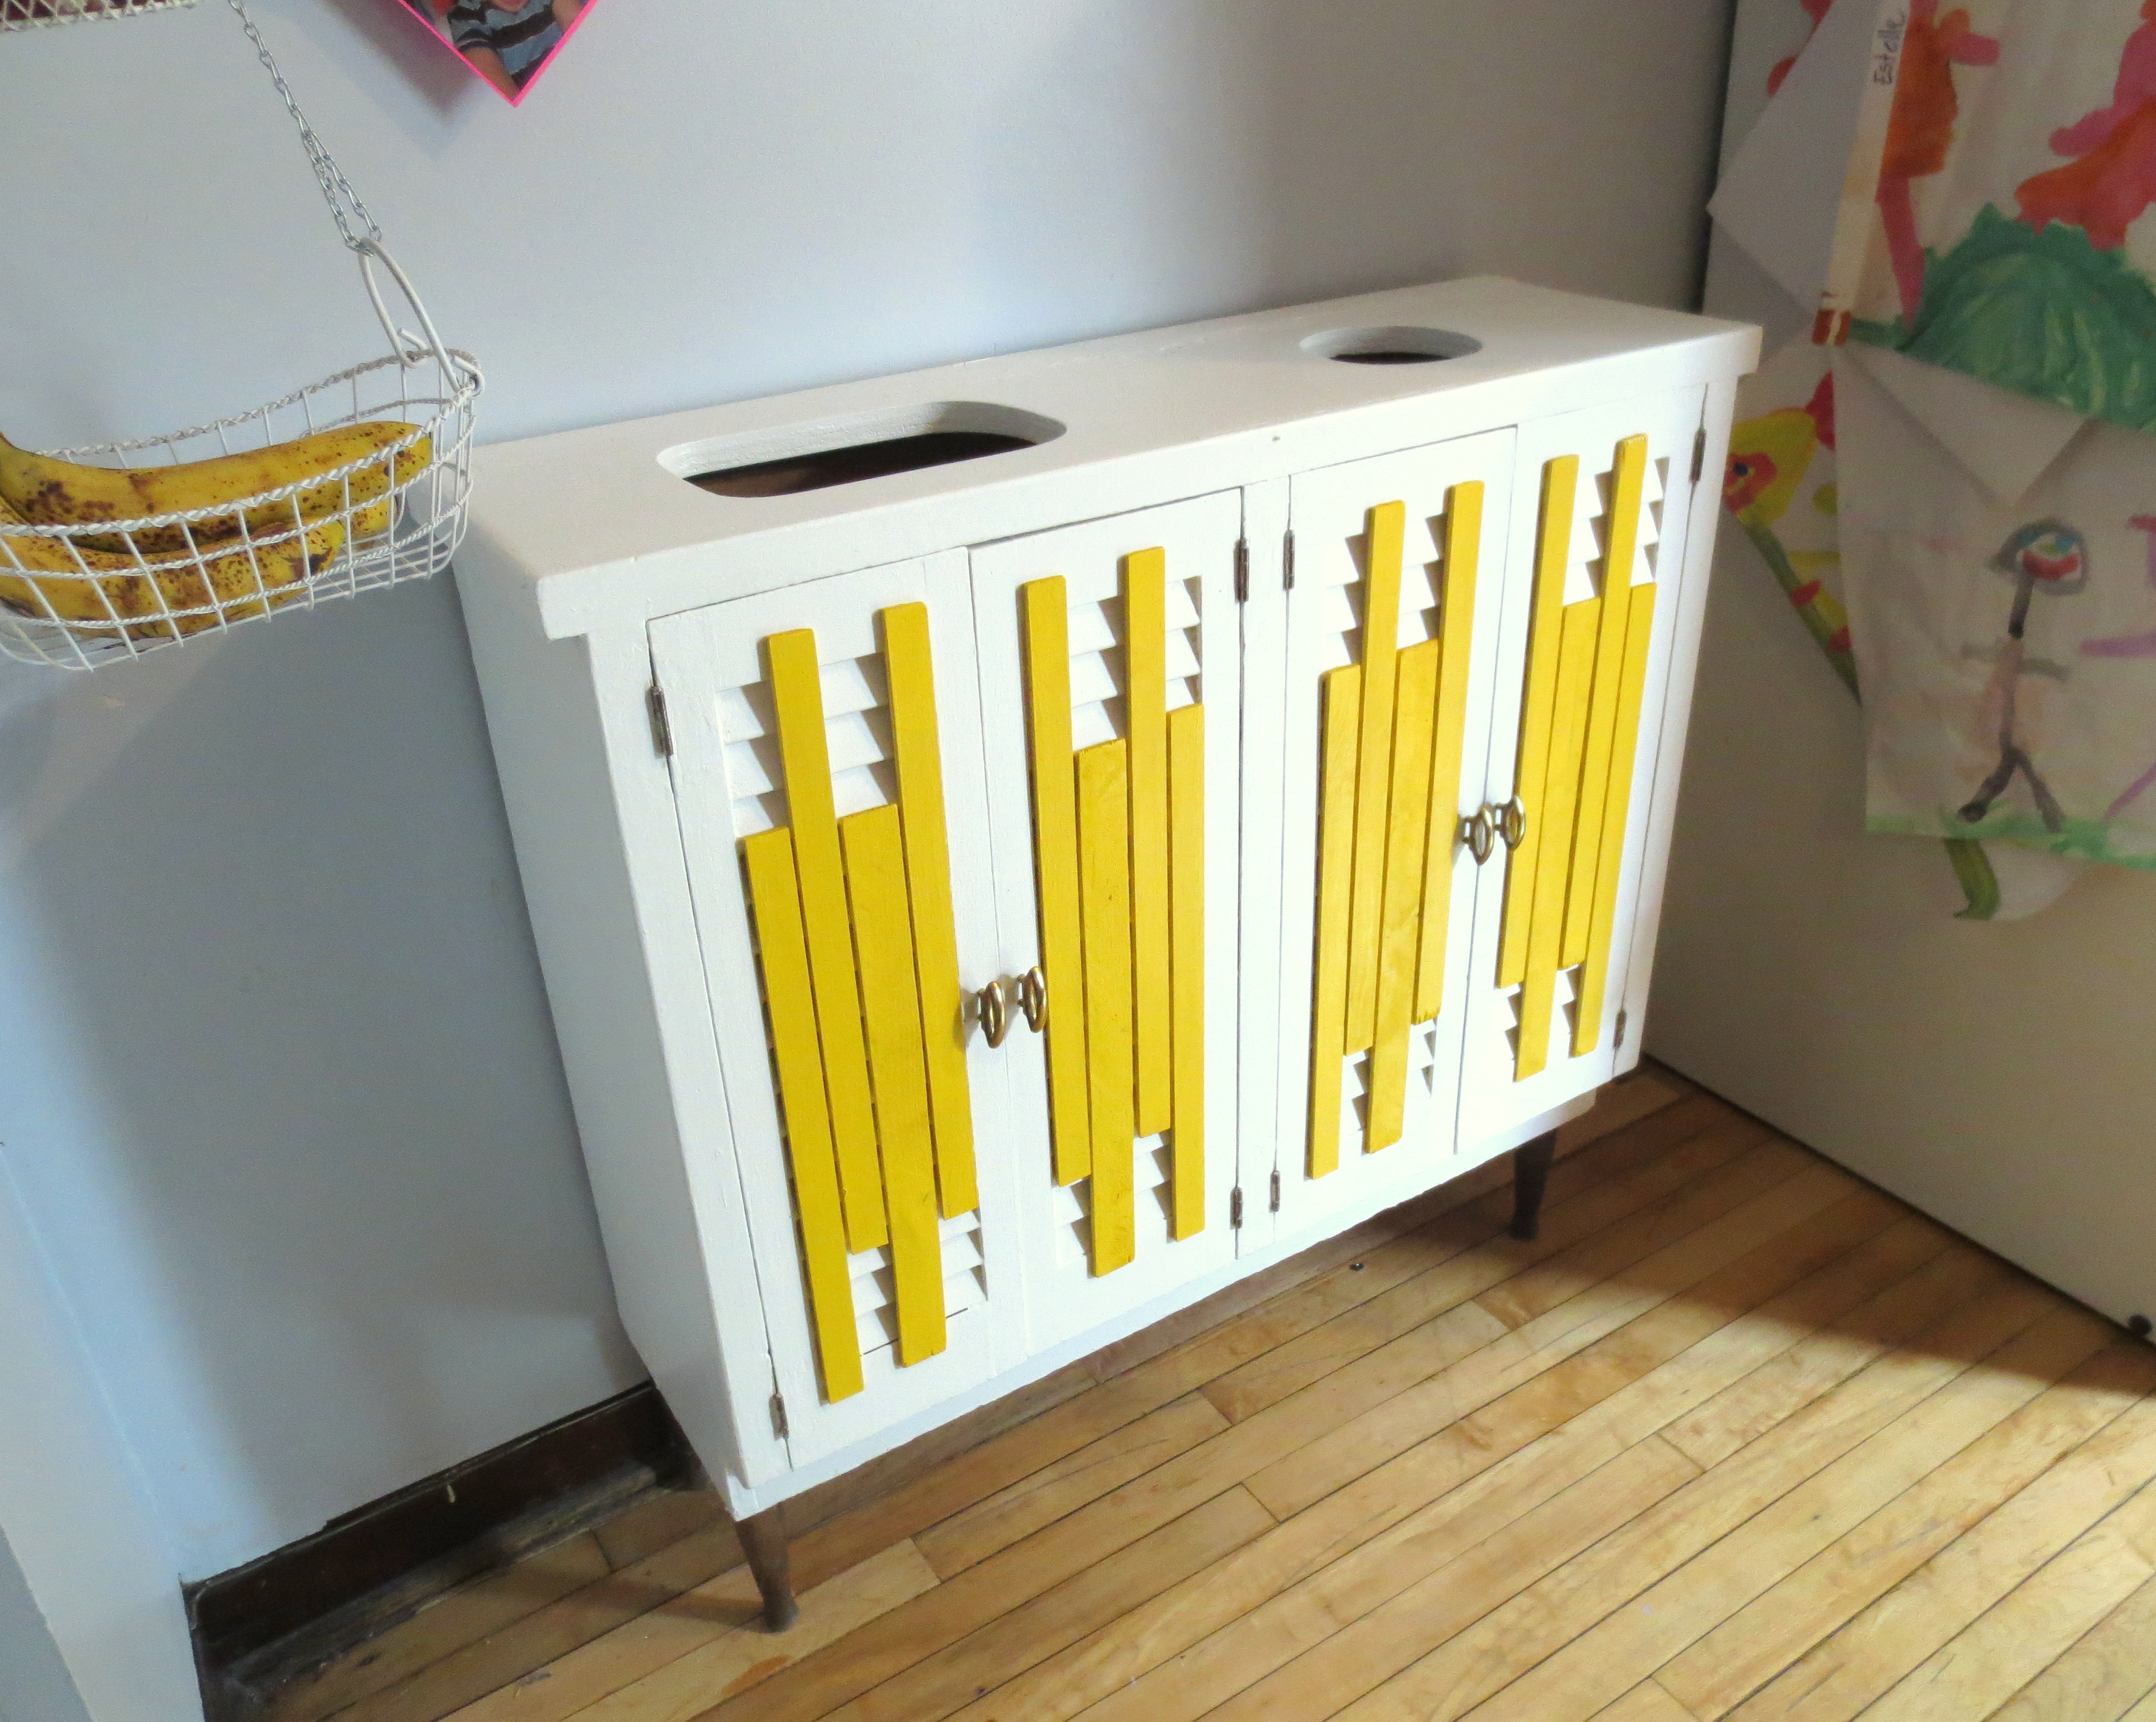
 Flip your cabinet over, screw on the doors, and insert the trash cans. It’s almost too pretty for garbage. Almost.


 Let’s see that sad corner of the kitchen now!
* How do you describe restaurant food that you take home in YOUR land? Take out? Take-away? Carry-out?
** I’m perfectly aware that I’m switching freely between past tense declarative and present tense imperative sentences.

What a beautiful cabinet for your trash! Lovely. Down here in Southwestern Ohio, we call food we bring home from a restaurant “carry out”. I love reading your posts.
LikeLike
Thanks! I seem to remember growing up in St. Louis we called it “carry-out” but in Chicago we call it take-out. I have not yet seen a map of America with the regional preferences, but soon enough the internet will produce one, I’m sure.
LikeLike
I think we say take-away, but it’s rare that people package up restaurant food and take some home. UK portion sizes are a LOT smaller than US ones – I had dinner in a restaurant in the Mid-West once and I was still eating the leftovers three days later. Here, you basically get one, admittedly large, portion. But nonetheless. It’d be take-away. That’s also the name of the food you order by phone and have delivered to your house.
LikeLike
I’m thinking of when you go to a restaurant (or call ahead) and get your entire meal to take home. We call that take-out. And a Doggie Bag for when you can’t finish your meal that you started at the restaurant. I suspect in more car-centric communities they would just call it “drive-thru.” Delivery is a whole other thing (but the containers are the same!).
LikeLike
Oh hmmm I don’t know if we even do that! Maybe some places do actually. We’d probably still call it take away though. Regardless, I love this project so much – it is both functional AND beautiful, William Morris would be proud.
LikeLike
Thank you, you have once again added to our vocabulary. Henceforth when we sand anything we will announce that we’re going to do some ‘light intimidation’…. I do like your cargo bike. I have a detachable cargo trailer for mine which folds down flat and the wheels come off
LikeLike
Cool! Saw’s intimidate me, since I’m paranoid I’m going to lose a limb, but I need to get over my fear so I can make cool stuff like this.
LikeLike
Lisa, this saw had a few design flaws which nearly cost me a finger. First of all, the trigger lever is right under the handle, so when you’re carrying it, there’s a strong likelihood you’ll also switch the motor on by accident (the blade is not protected). My other caveat is that when I was sawing out a circular shape and turned the saw 180 degrees, I almost cut right through the power cord, since it was laying right over the area I wanted to cut.
I got through it with all ten fingers and the power cord intact, but a couple of close calls. Still, I love it. Now a circular saw… that’s just crazy!
LikeLike
Fantastic opening shot and love the entire project. Kudos!
LikeLike
I’m so jealous of projects like this! I really need to exercise my brain to more fully see the potential in things.
LikeLike
It always amazes me at how you can take crap from the alley, that would make my skin crawl to touch let alone take home, and turn it into something beautiful! You have great creative vision!
LikeLike
You are lucky to live near such a great back alley, what a treasure trove at times. I love what you did to the cabinet, especially that you up-cycled what would have become landfill.
Looking at the interior photos, it gave me the idea that if you build a shelf under each trash can raising it up to the edge of the opening then you could put more recycling underneath the can such as newspapers.
Thanks for sharing. Keep up the great work!
LikeLike
Nice! (I agree, you could totally have saved that hutch!)
LikeLike
Hi Clare,
I love this tutorial and thought it would be perfect for a feature we’re doing on the website. Send me an e-mail so I can get in touch with you about the details.
Thanks,
Rachel
LikeLike
Pingback: DIY Recycling Bins - 5 You Can Make - Bob Vila
Pingback: A Bucket of Paint + a Trip to IKEA: Babushka Kitchen Gets a $200 Makeover | projectophile
Pingback: Five Easy Steps to Make your House Look Slightly Less Abandoned | projectophile
Pingback: Welcome to Babuskha Island: Your Oasis in a Sea of Not-Having-Counterspace | projectophile
Pingback: Trash Talk: Create a top-secret hiding space for your unsightly recyclables | projectophile
Pingback: 20 DIY Home Recycling Bins That Help You Organize Your Recyclables - DIY & Crafts
Pingback: 20 DIY Residence Recycling Bins That Assist You Manage Your Recyclables - Homefix DIY
Pingback: Behälter, die Ihnen helfen, Ihre Wertstoffe zu organisieren - Gesundes Leben
Pingback: 10 DIY Home Recycling Bins Hacks To Make Quickly | IKITODIYHACKS
Pingback: Recycling bins at home: What to do with your recyclables during a lockdown - Everyday Recycler
Pingback: 20 DIY Home Recycling Bins That Help You Organize Your Recyclables - 99newser