
Won’t you join me in a trip to an exotic, blissful place… where counter space is ample, and storage is plentiful? A magic place where I don’t have to dice onions over the sink, or suffer the humiliation of a Tupperware™ avalanche every time I slide open the cabinet door?
I’ve been dreaming of a Babushka Kitchen Island for at least a couple of months, to replace our “Babushka Cafe” – an old patio table and two chairs that the old lady left behind. It was fine for the kids’ breakfast or a romantic cup of coffee with Scott, but added nothing in the way of workspace or storage. 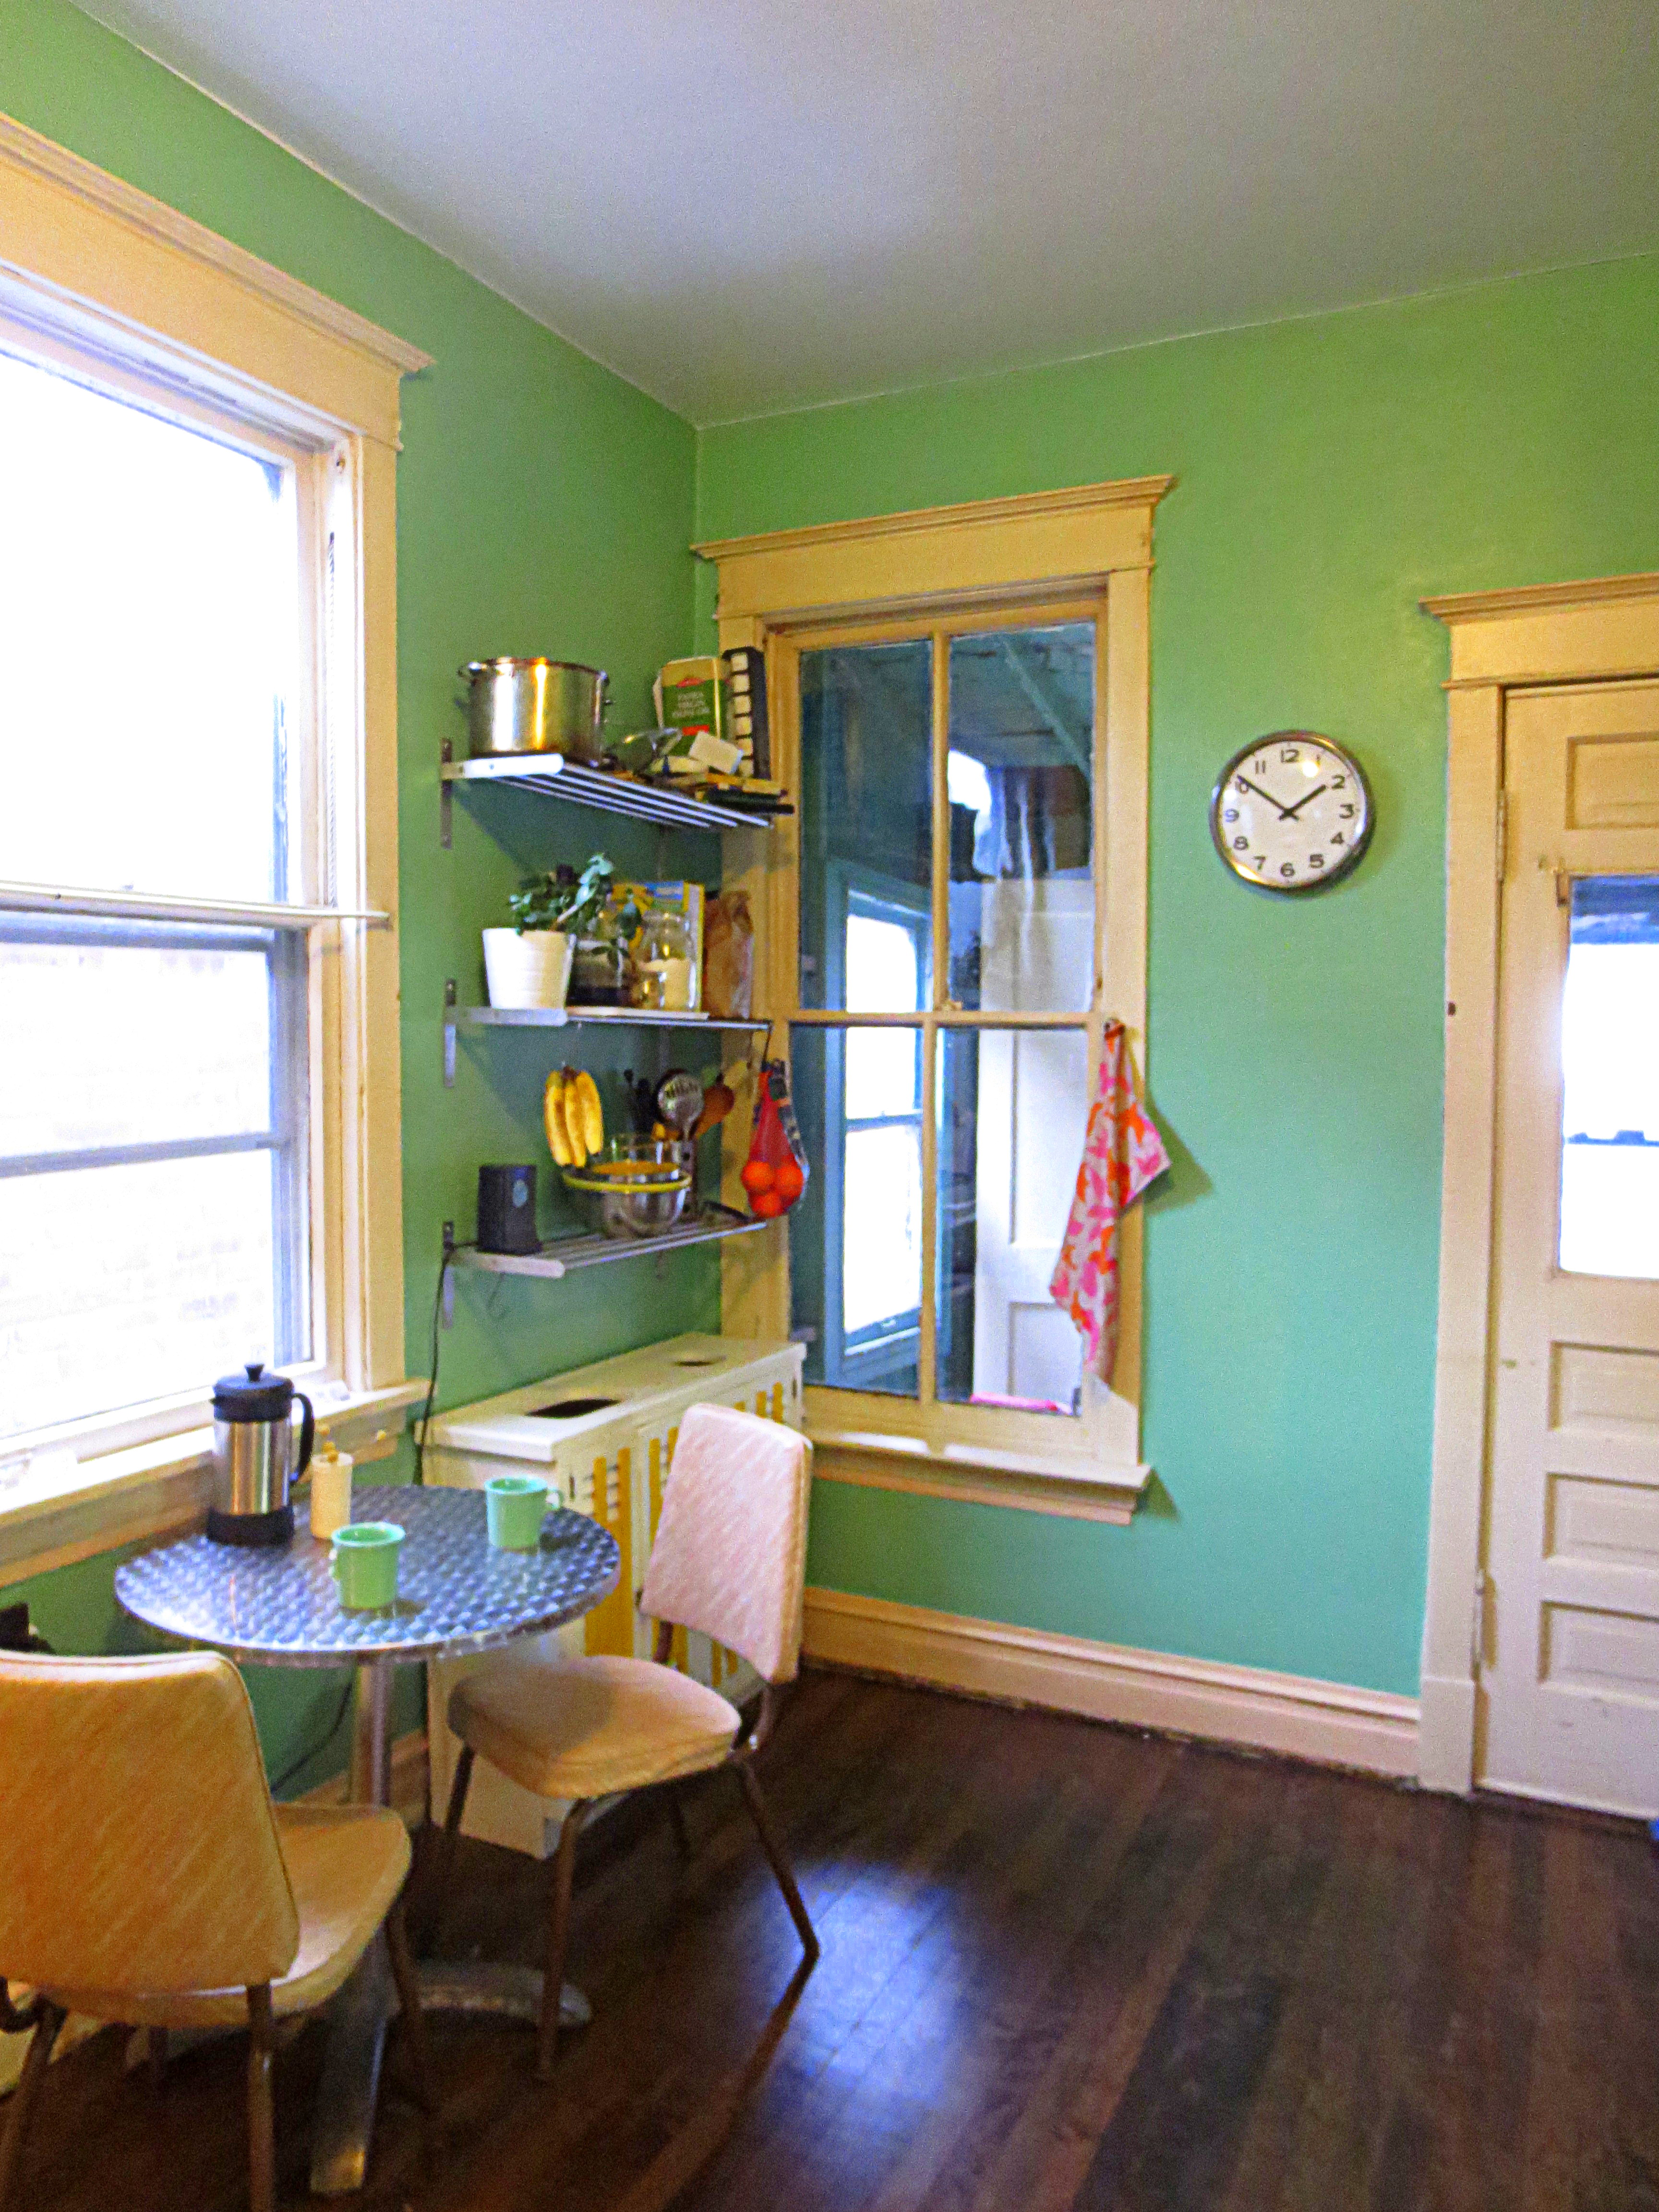 Last week, I finally revealed my Kitchen Island Idea to Scott, who I then had to shepherd through the Four stages of Project Acceptance:
Stage 1 – Balking: That’s a crazy idea and will never work and besides we don’t need it. Stage 2 – Curiosity + Intrigue: Maybe that will work. Go ahead and try; just don’t ask me to help.
Stage 3 – Grudging Acceptance: You’ve already gotten this far, you may as well finish.
Stage 4 – Enthusiastic Acceptance: Sometimes accompanied by Project Penance (This New Thing is life-changing and I’m sorry I ever doubted you) or even Project Idea Identity Theft (I’m so glad I thought of this and you finally got around to making it).
To move Scott from Stage 1 to 2, I set up this “prototype” with painters’ tape, milk crates and the lid of a cooler. I topped the whole setup with fresh baked cookies to create a positive, even Pavlovian, association with the island concept. 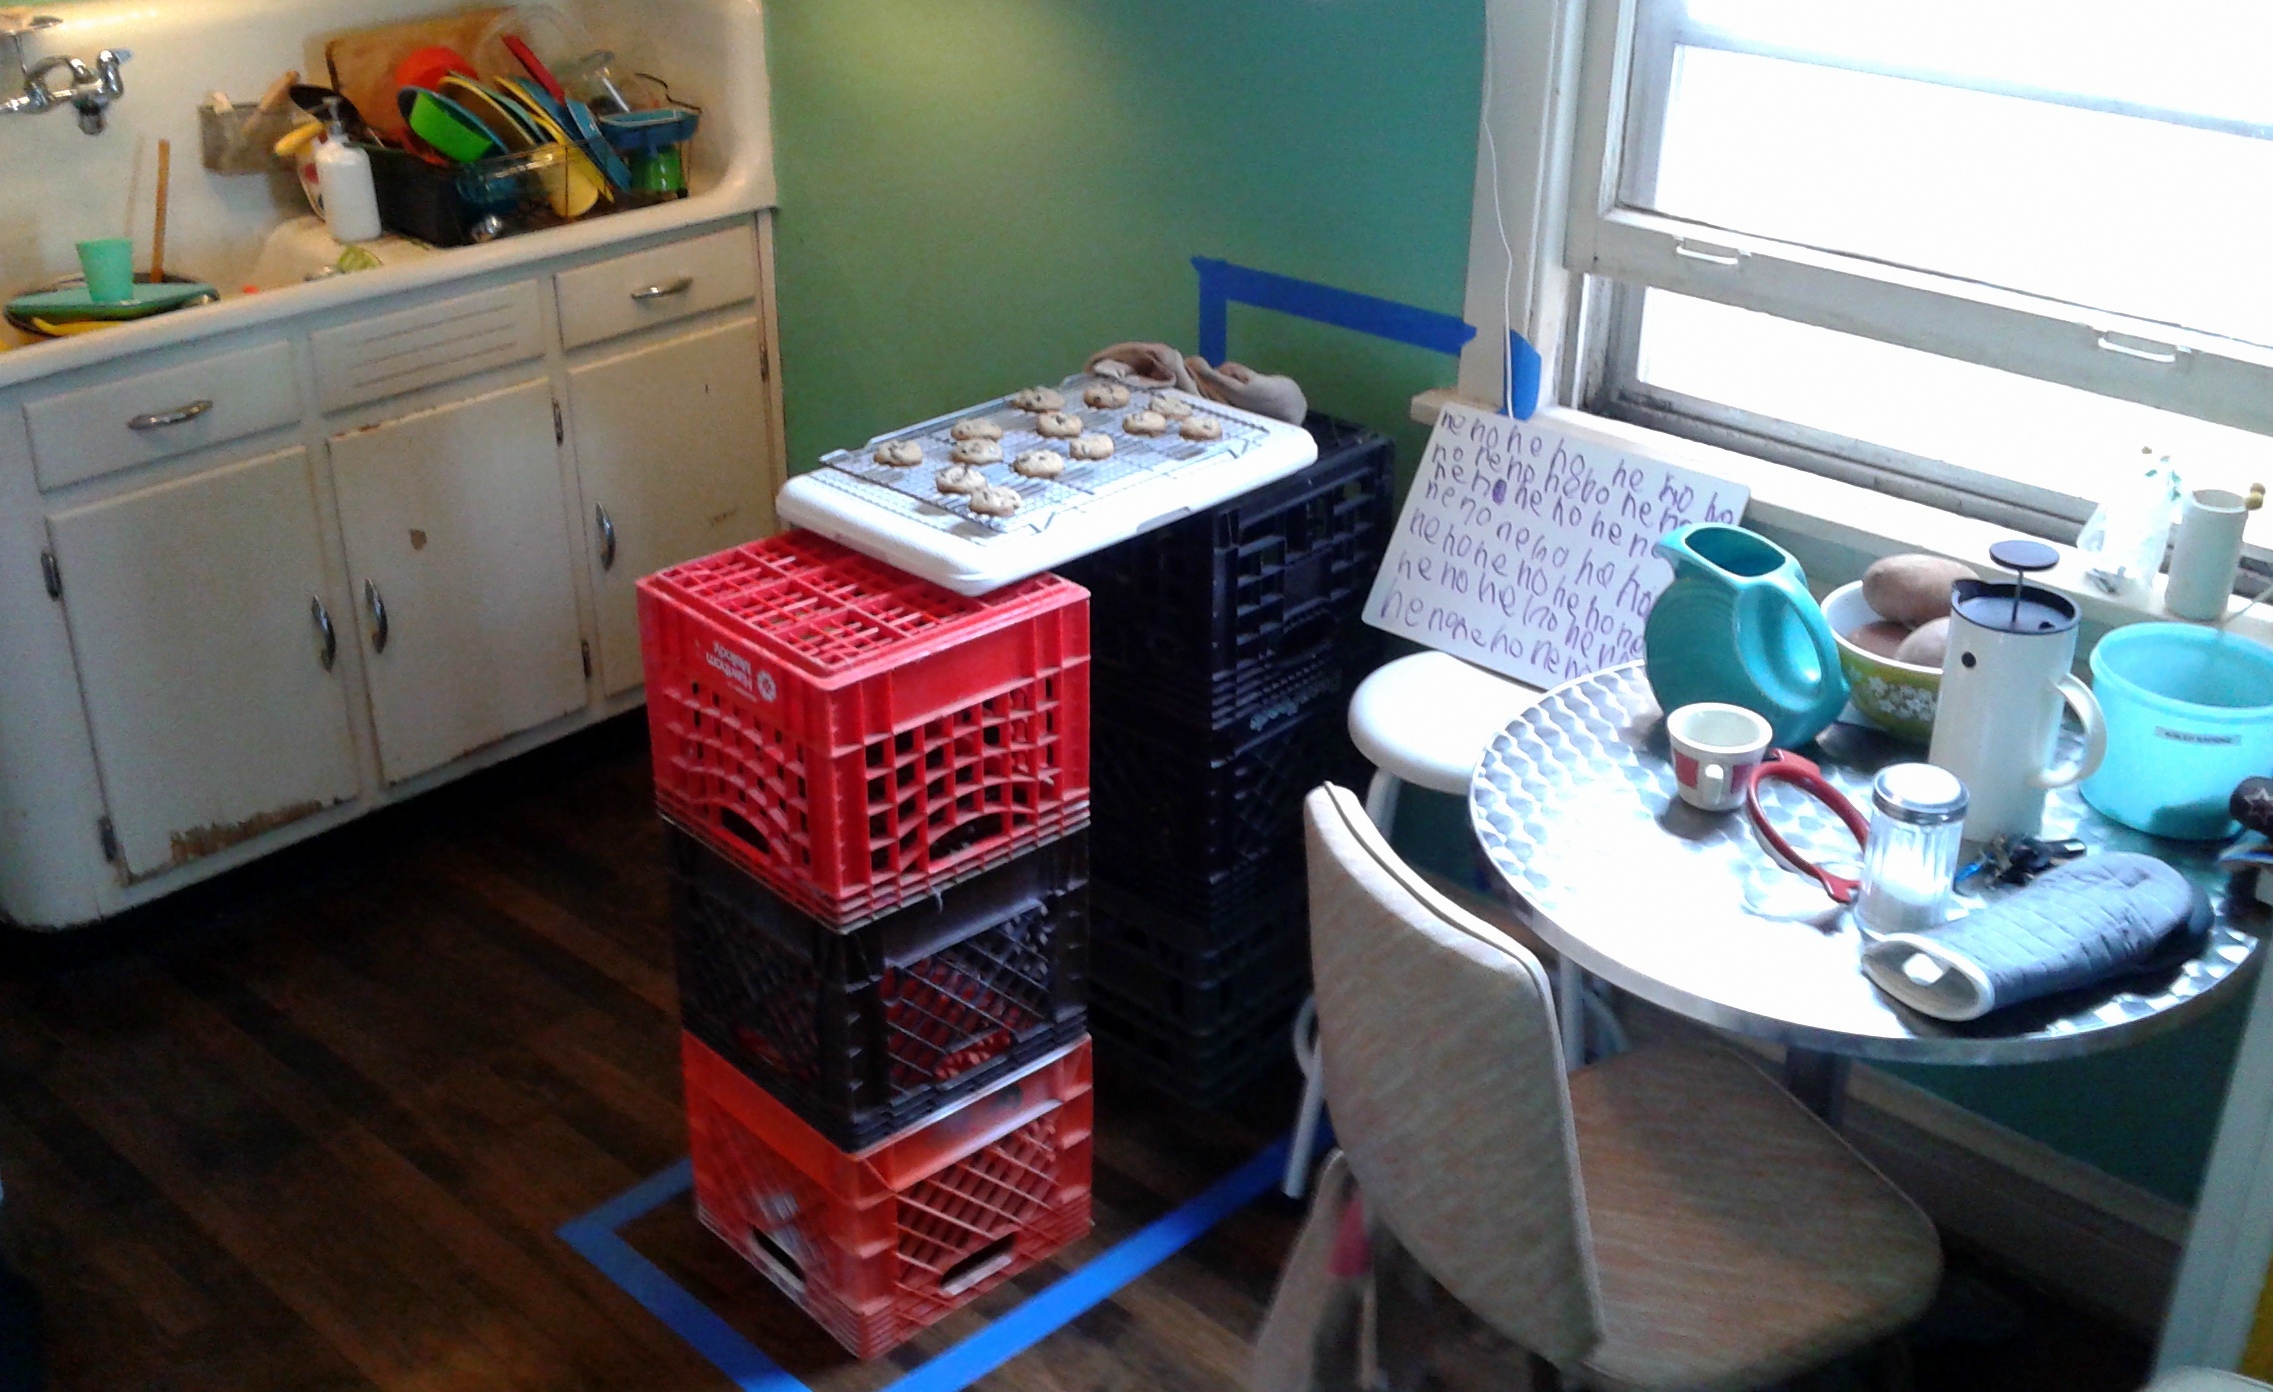 Once Scott made it to Stage 2.5 , I just scanned Craigslist for the perfect kitchen island. I learned the hard way that islands only come in two sizes: 1) tiny microwave cart, or 2) massive suburban-style beastie, a/k/a, the “aircraft carrier.”
  This Goldilocks couldn’t find one that was just right. So, as usual [dramatic sigh], I had to just make it my own damn self — by combining an old dresser, a new butcher block, and a little bit of dazzle. Here’s how I did it…
STEP ONE – Get a Dresser: Once I settled on the dimensions, I found the perfect dresser on Craigslist — a used IKEA Hemnes. The transaction was smooth enough, except the part where I watched this guy pull his underwear out of the drawers.* Dude had a whole dresser just for underwear! And later that day I discovered – a lot of spiders.  I needed this thing to be white. So I gave it a light sanding, and then one coat of oil-based primer.
  Before I painted it, I drilled extra holes in the drawers to accommodate the new chrome pulls I bought to match the sink and Hoosier cabinet.
  Next, everything got two coats of white latex paint, and then three coats of polycrylic.
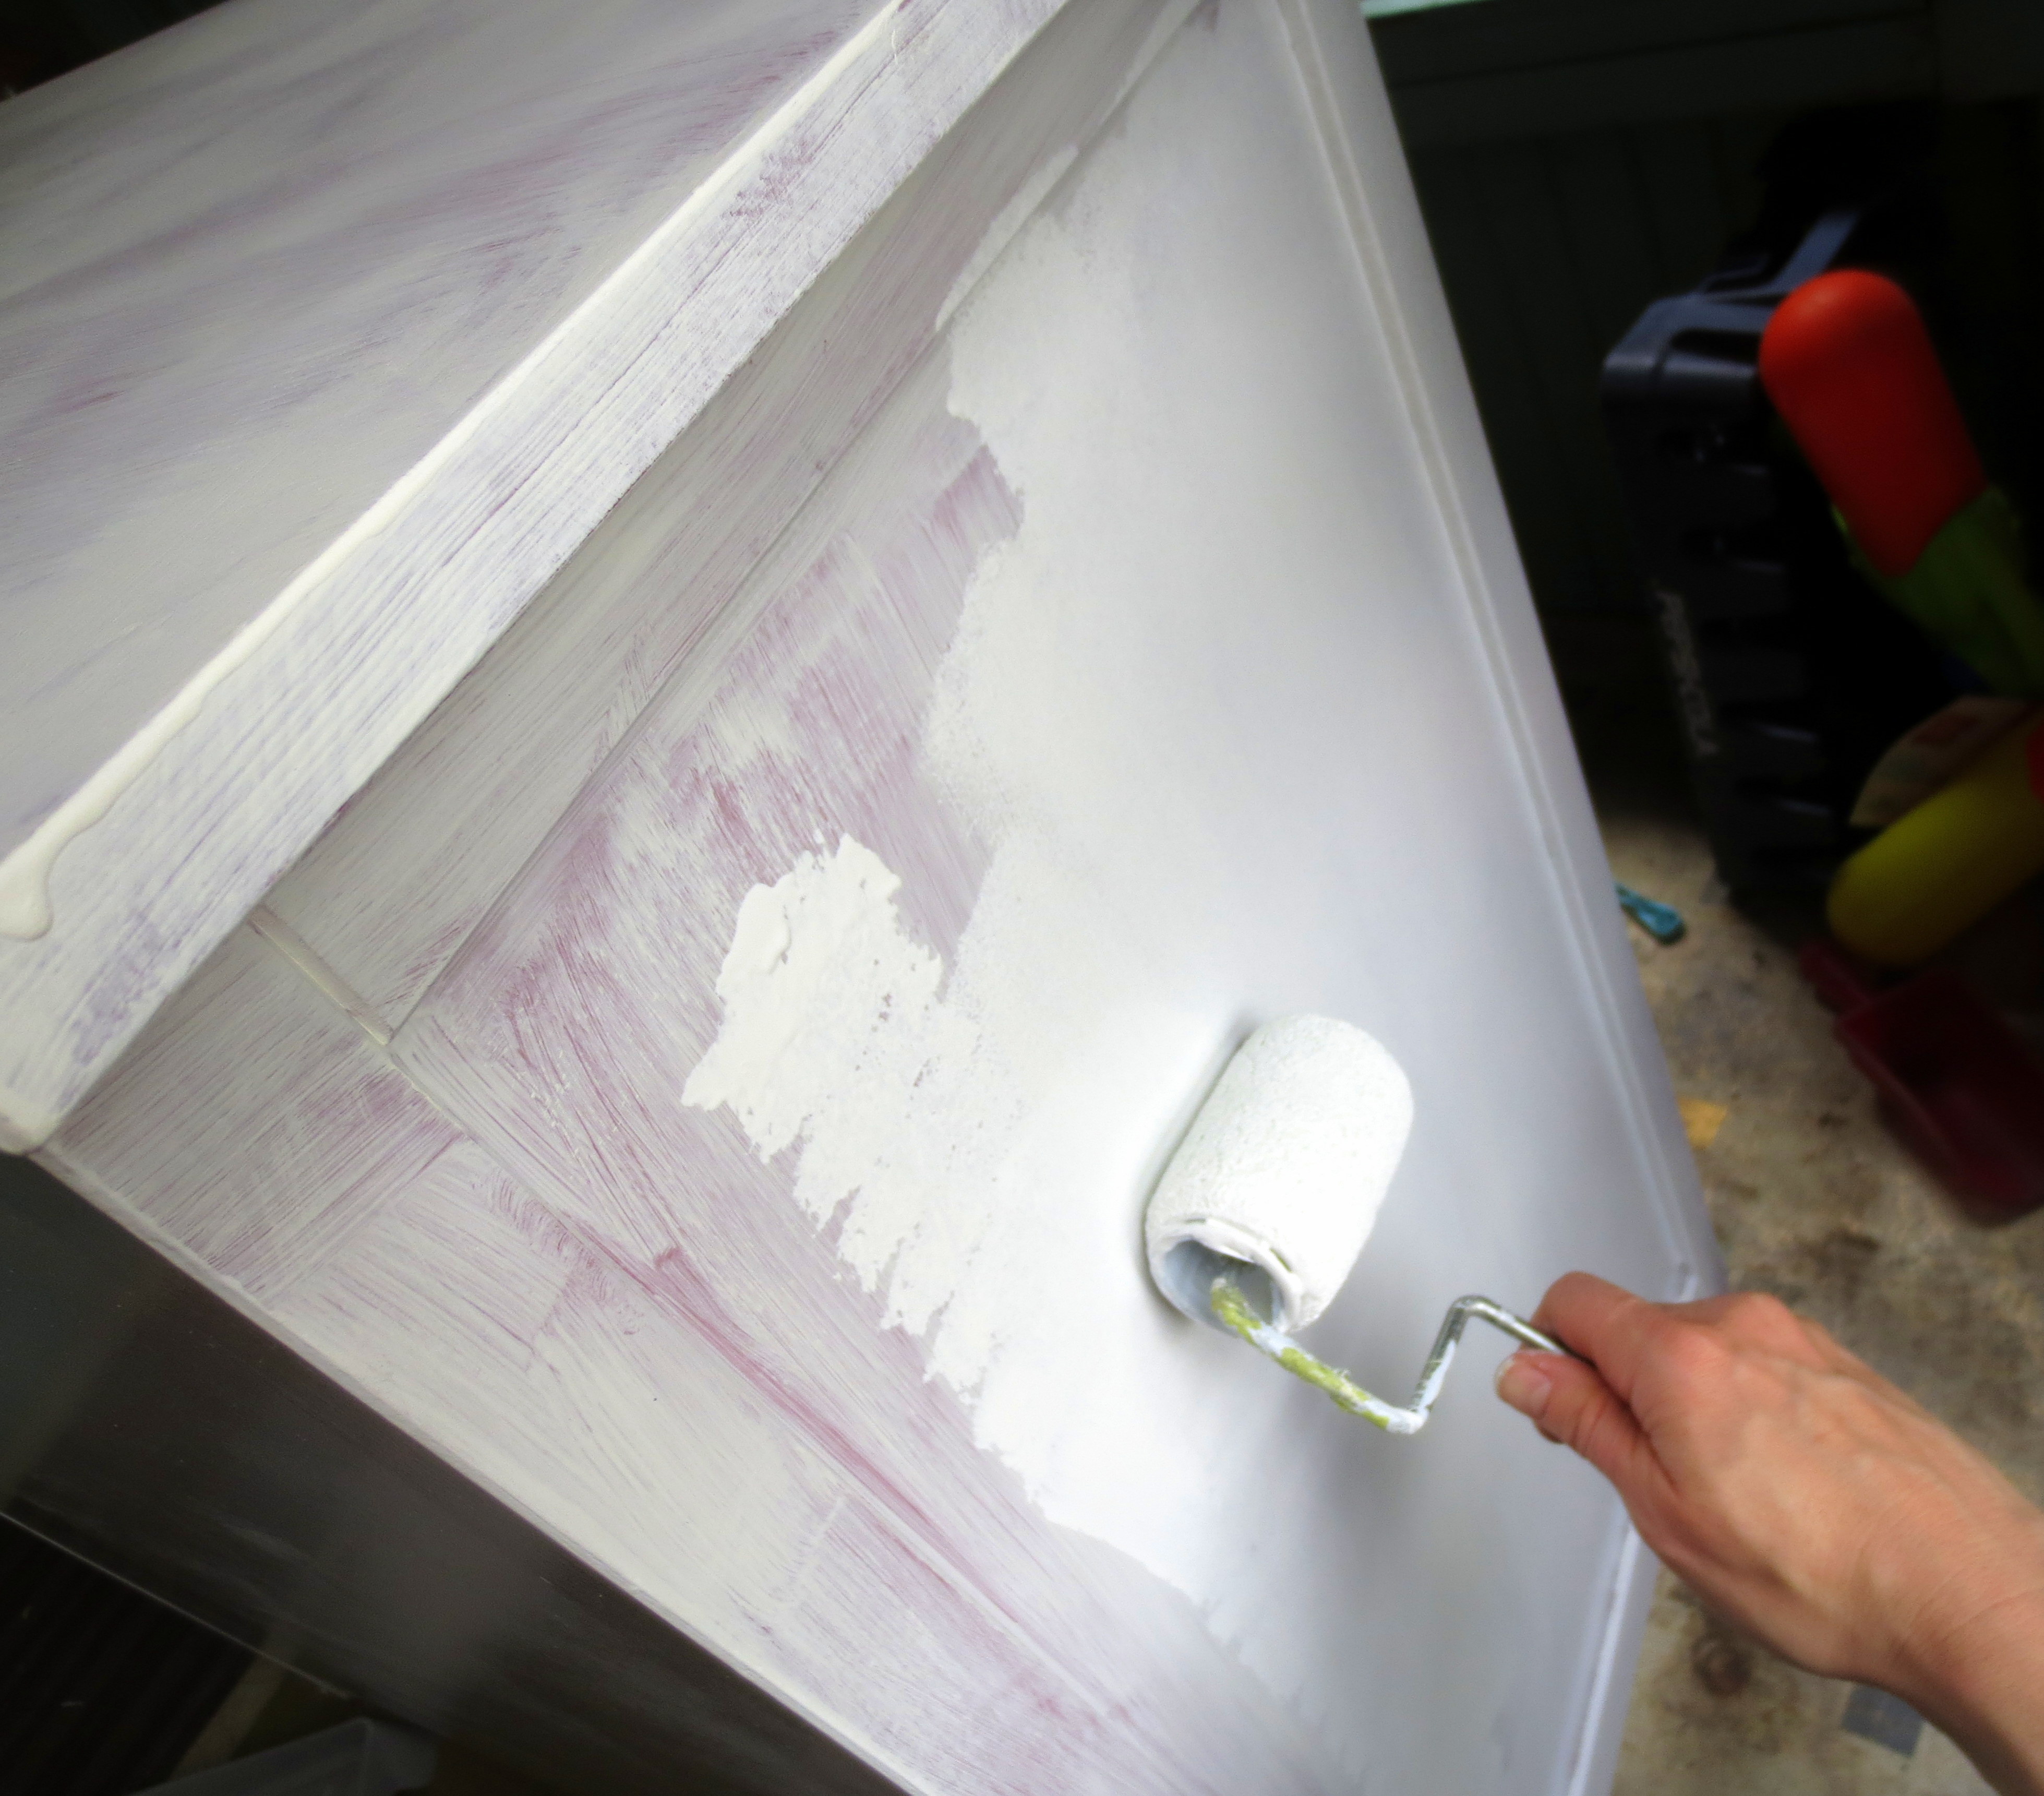
 STEP TWO – Bedazzle your Backside: Like a TV news anchor or post-modern architecture**, a clothes dresser was designed to only be seen from the front. This dresser’s backside was a pathetic, flimsy, MDF board afterthought. And since the backside was the new frontside, I had to make it both functional and delightful. I turned to the nearby Upcycled Recycling Center for inspiration:
  I bought a bunch of 1.5″ wide pine slats at the hardware store, and dipped into the same can of paint I used for the recycling center slats (and also the mail box and my hubcaps).
  I tipped the dresser on its side to arrange my slats in a pleasing manner over the crappy backside:
  Next, I secured the slats to the solid wood frame using a pneumatic nail gun that we borrowed from our friend Tamra so long ago I’m embarrassed to even mention it (Hi Tamra! Happy Birthday!)
 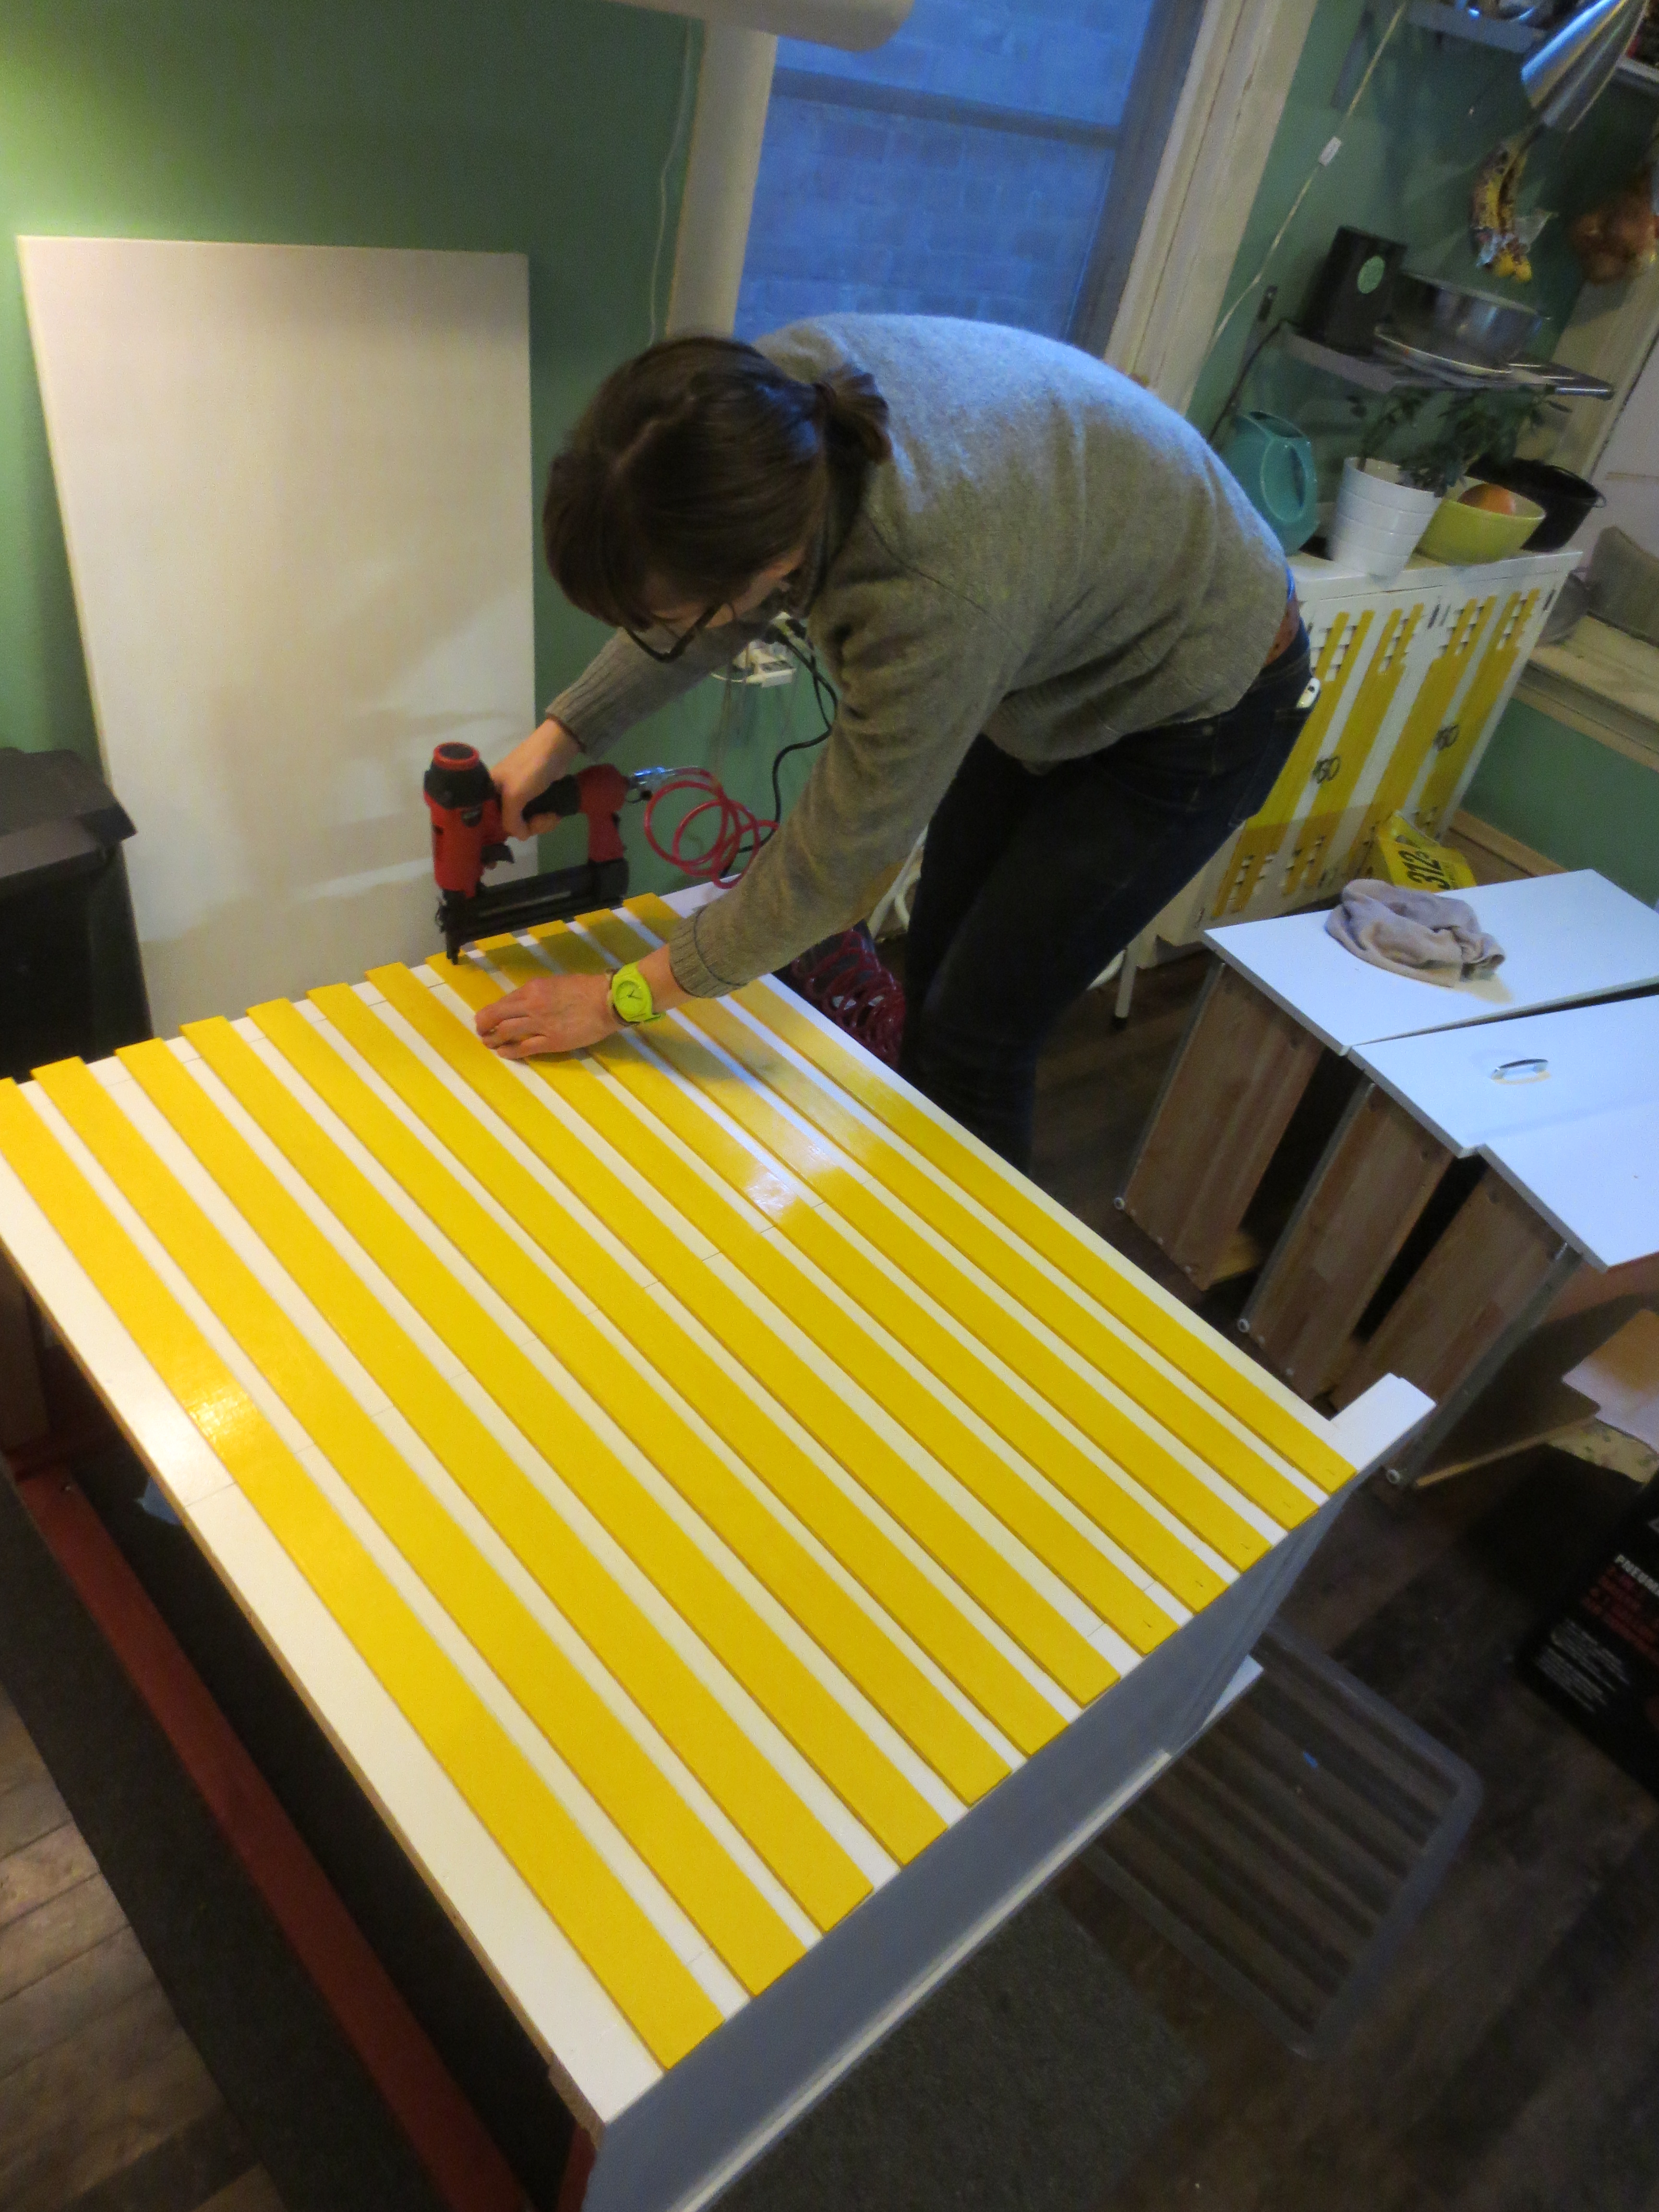 The nail gun shrank my nailing time by about 90%. Best of all, the compressor motor looks like a poodle!
  STEP THREE – Counter top: I needed a counter top that was heavy enough for kitchen duty, and big enough to provide knee room for casual breakfast-eaters and kitchen loiterers (you know who you are). I dreamed of making my own counter by joining together several perfect hardwood boards. I borrowed a biscuit joiner and headed to the hardware store to buy the lumber. And then my heart stopped when I saw this:
 ![]() A perfectly-sized, unfinished butcher block that was significantly cheaper than the boards! I called Scott in a panic, “Would you think less of me if I just bought this butcher block instead of making my own?!” His response was approximately, “What the *$&# do I care? Come home and eat lunch.”
A perfectly-sized, unfinished butcher block that was significantly cheaper than the boards! I called Scott in a panic, “Would you think less of me if I just bought this butcher block instead of making my own?!” His response was approximately, “What the *$&# do I care? Come home and eat lunch.”
Next I had to decide whether to finish the butcher block or keep it “raw,” which would require monthly oiling. I’m not nearly responsible enough for “monthly oiling,” so I decided to keep the lovely light wood color and seal it with five coats of polycrylic. Remember to give it a good sanding and wipe-down before you coat, and then lightly sand with 220-grit sandpaper between coats. And clear coat both sides so there’s no water absorption from spills. You know you’re finished when it looks like a bowling alley!  I unscrewed and removed the existing dresser top, and arranged the new butcher block in place – flush with the drawer side and the wall side, with ample overhang on the other “public” sides. I carefully marked the screw holes by jabbing them with a pencil.
  I drilled new screw holes on the underside of the butcher block, flipped it over and screwed back into place. Slide the drawers back in, and….
  Choose where to place your new Tupperware™ graveyard:
  … and drag a stool out of the alley to complete the look!
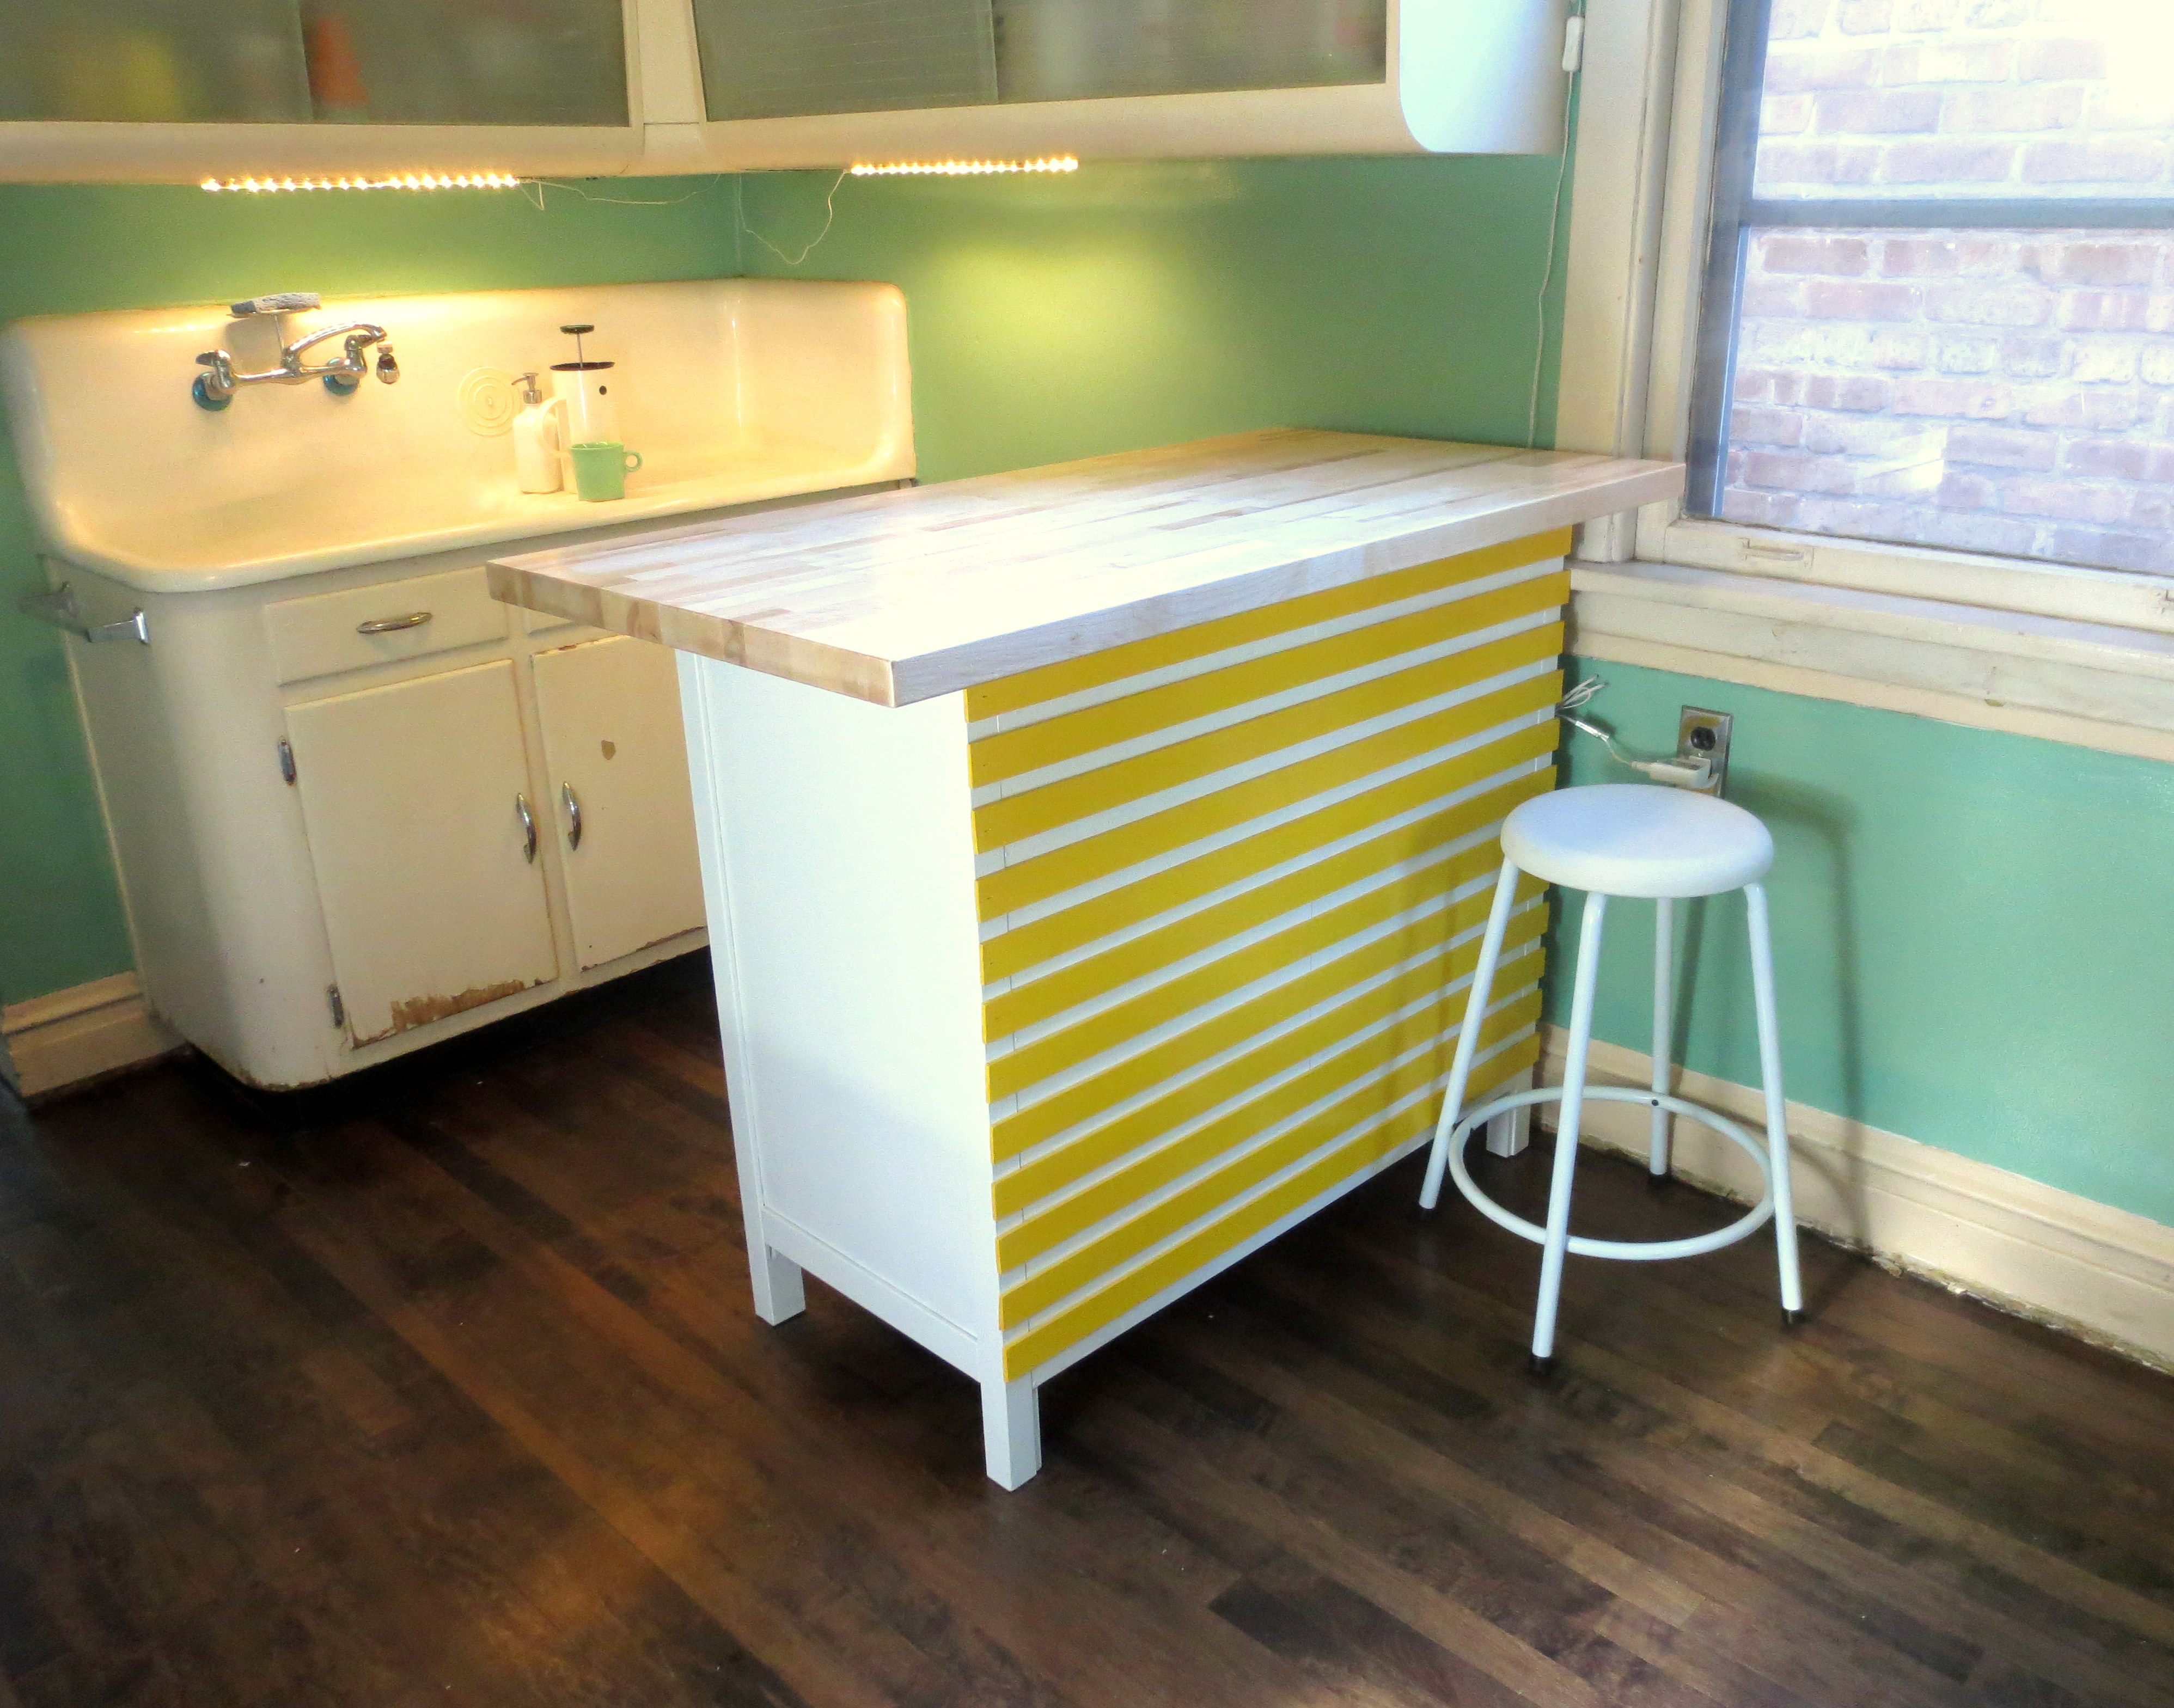
 Let’s just hope Babuskha Island gets along with its yellow-striped cousin Recycling Center:
 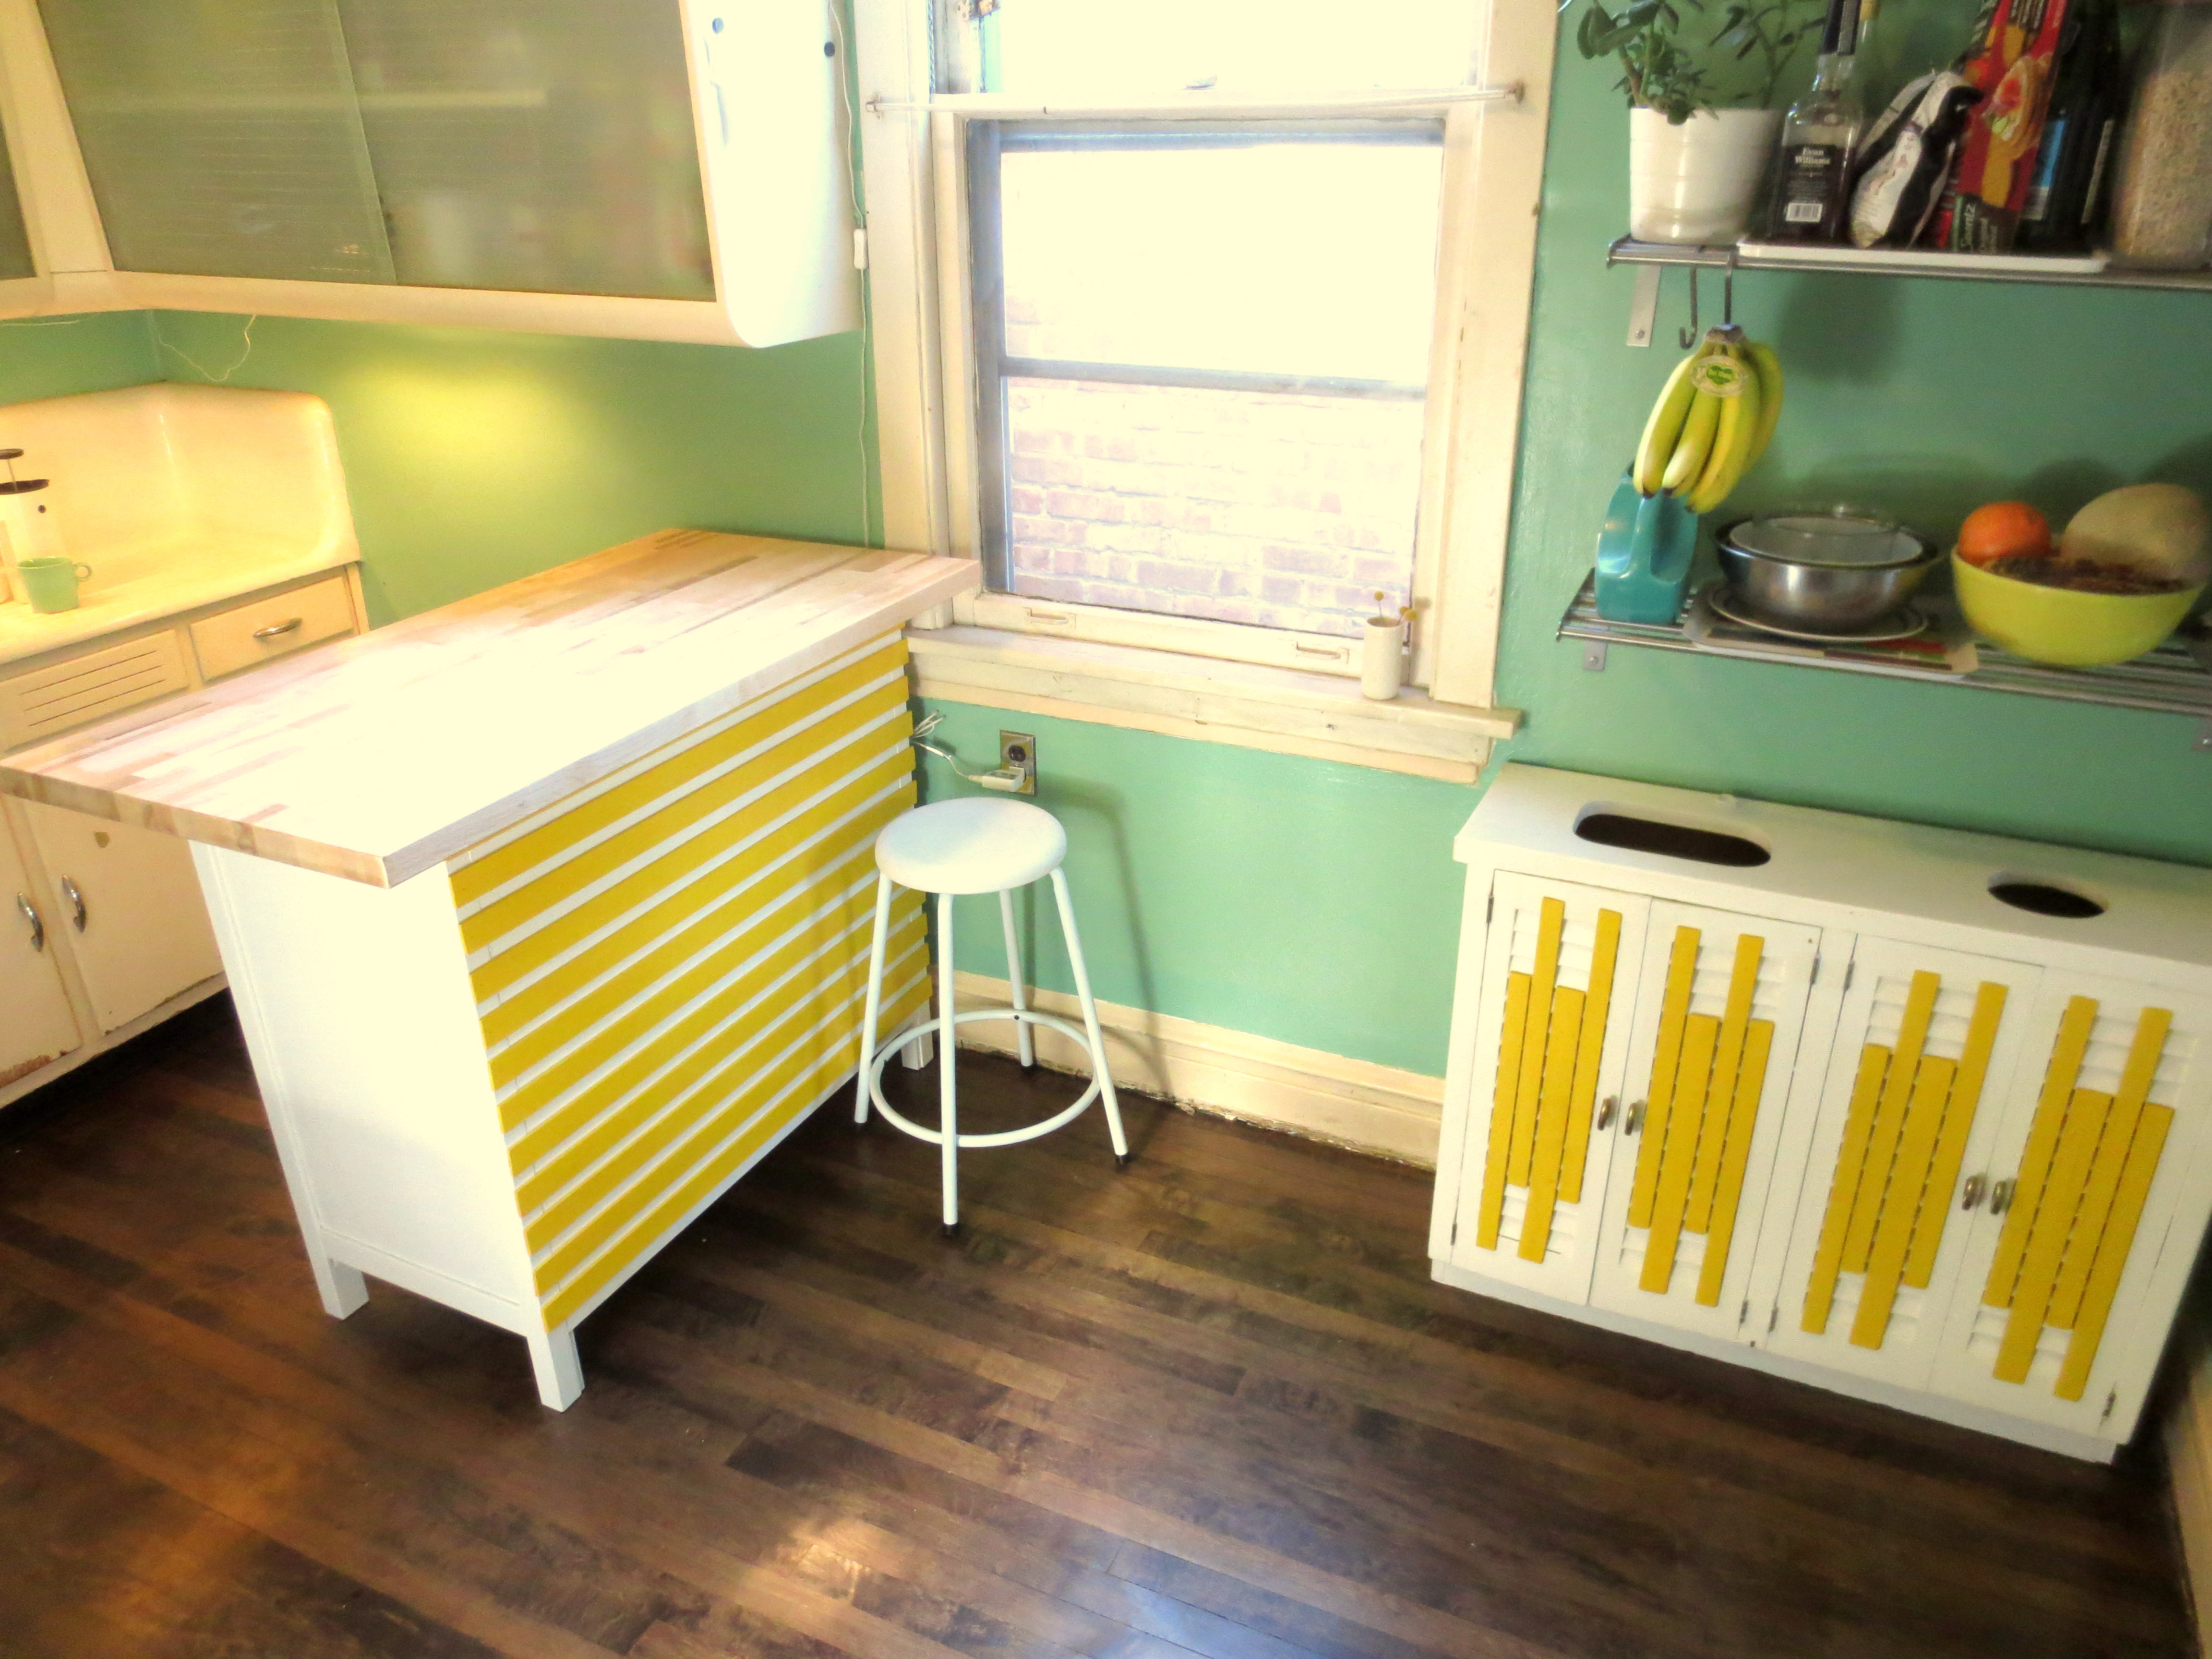 The first kid home from school today got to eat the inaugural snack (an over-ripe banana):
 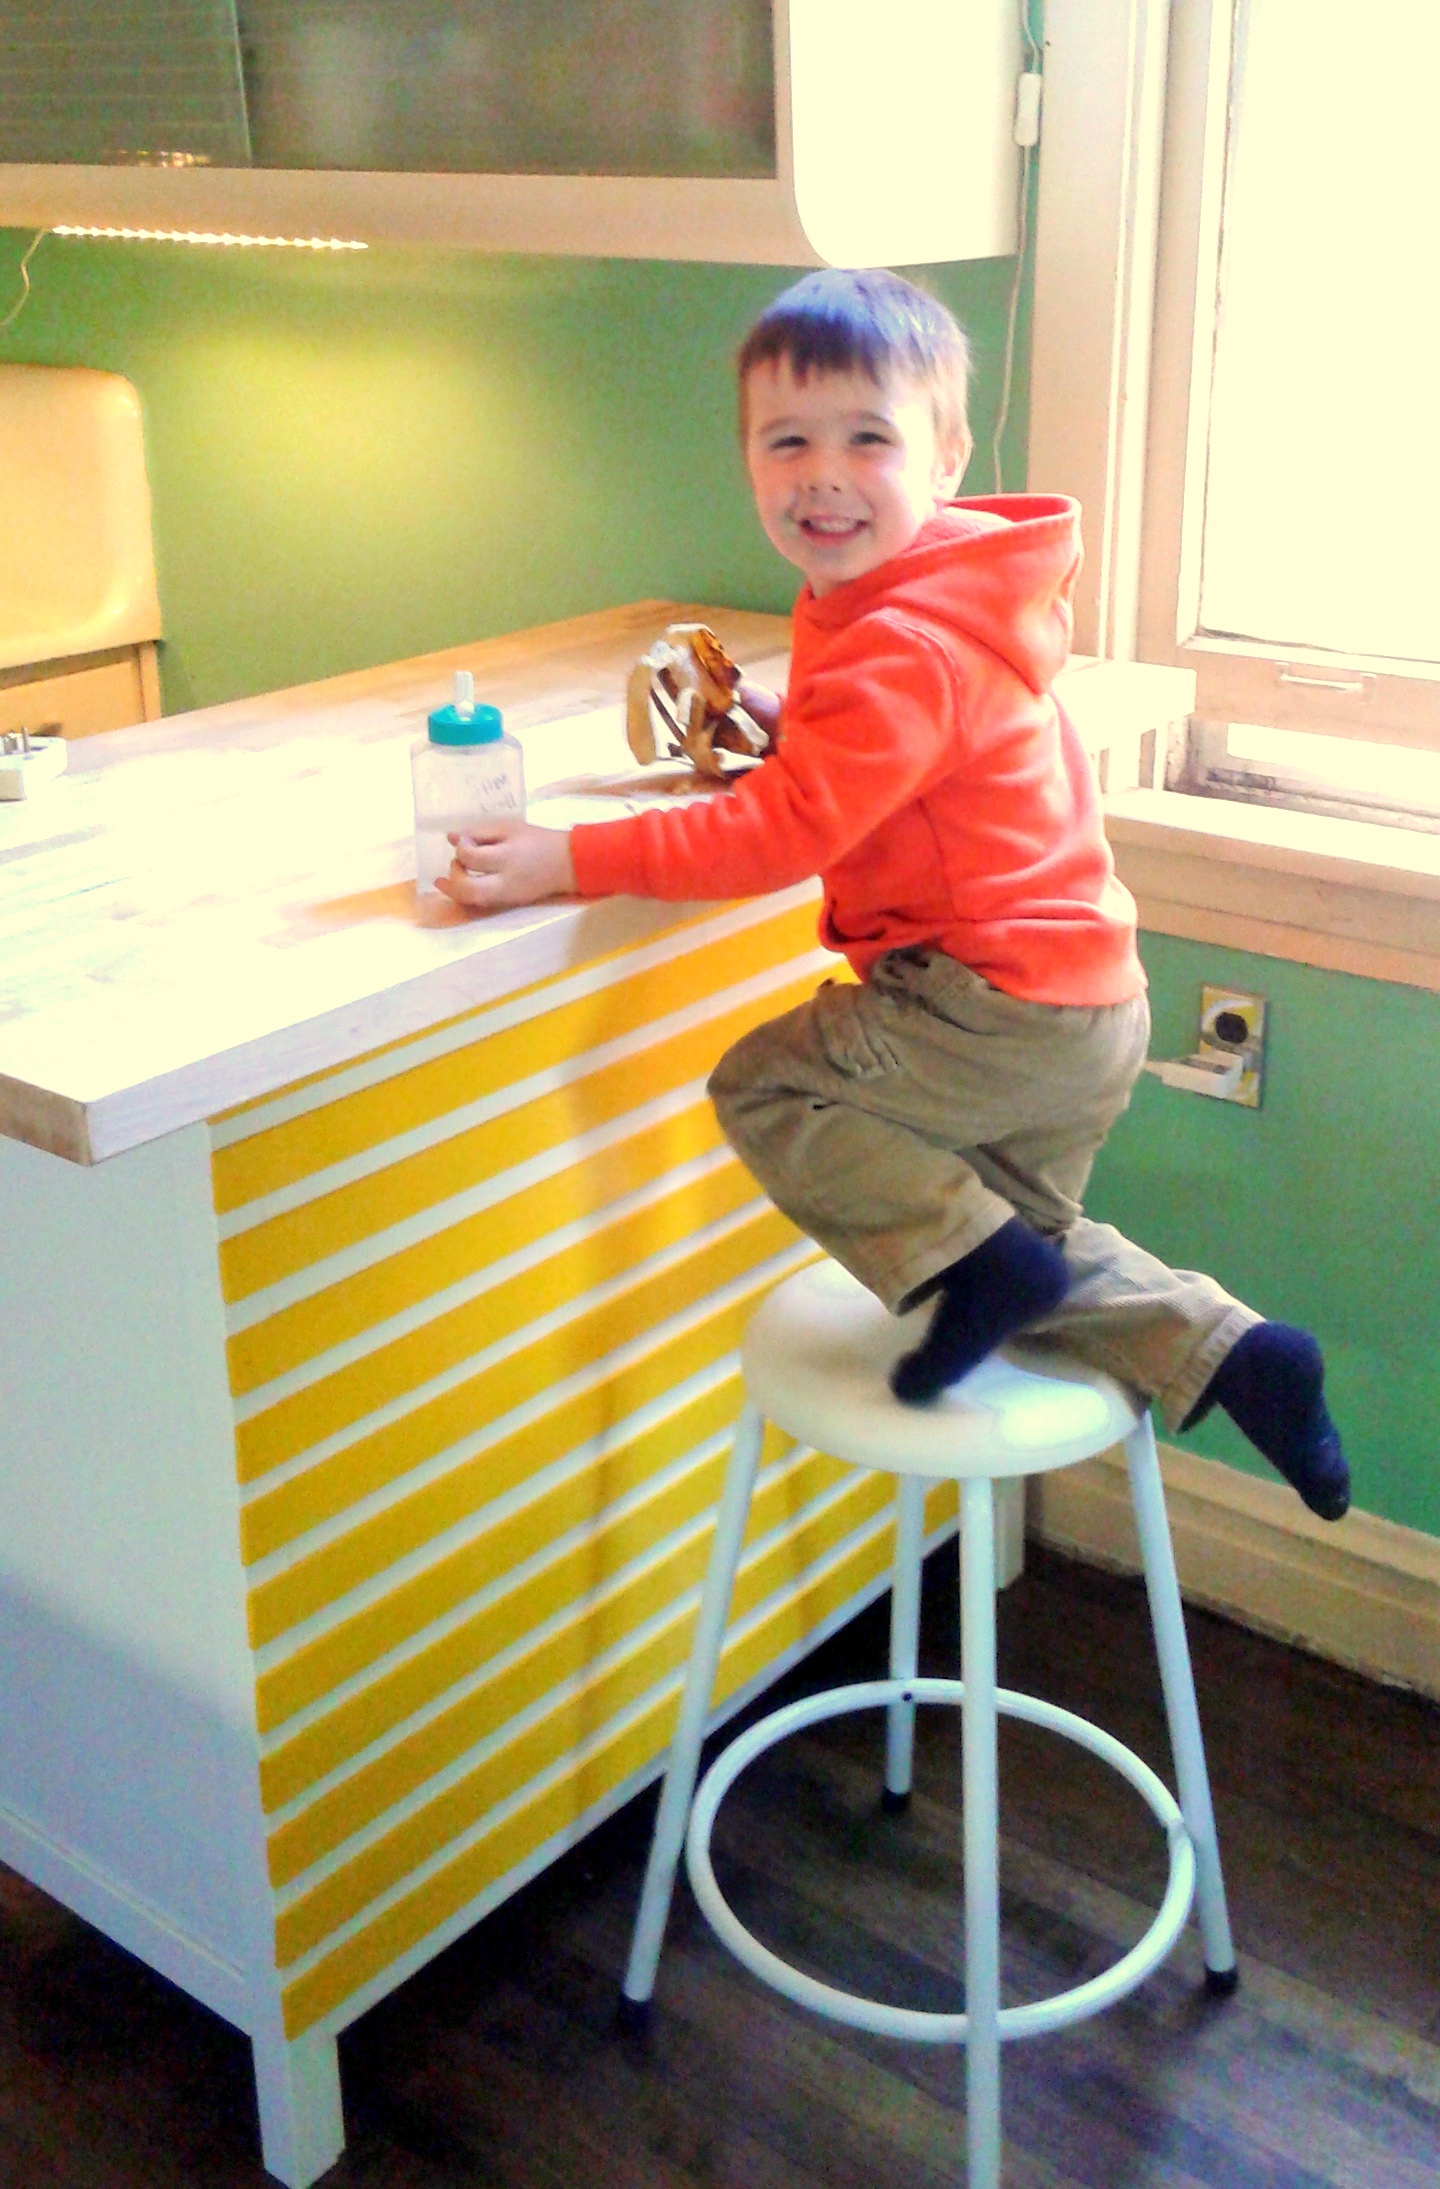 Who then asked… “Mama, why is the kitchen so clean?”————————————————————————————
* Free Craigslist Tip: Remove all your personal belongings from a storage item before the customer comes to see it. Especially if your belongings are tighty-whities with lots of cocoa stains.
** I’m looking at you, Harold Washington Library in Chicago.

Oh, I do love seeing one of your posts when I do my morning WordPress check. It means I know I’m going to get a healthy dose of laughing-till-I-cry, reading choice bits aloud to the Husband, who then makes me go back and read the whole thing to him, and just feeling a strong sense of nostalgia at how it was when I had no money and a whole house to do up… BTW, have you considered installing a 4-socket power board on the wall above the window end of the counter, which plugs into that wall socket I see beside the stool? I’ve put a couple of these in our kitchen, and it’s moderately life-changing to be able to use the mixer *where I want it* instead of over in the dark corner where the power is….
LikeLike
Kate– the weird thing is, I actually HAD a four-socket power strip in that exact same place! And then I took it out so the pictures would look nicer. It might still be in the pocket of my “work pants.” You might see it in some of the “before” photos which are clearly not staged in any way, judging by the massive piles of random junk and dirty dishes.
LikeLike
Whoah! Great minds think alike!
LikeLike
Hahaha! Oh, my! I laughed out loud multiple times with this one. Clare, it is perfect and beautiful. I covet your homemade island. I love the spacing of the butcher block: flush for chopping and storage side, flush to wall, overhanging on both decorative slat side and non-wall side for maximum seating and surface area use! Genius! Also, I think drawers are great for storage. I like them much better than cabinets as the ease of use and the ergonomics are better. Bravo! Well done! Good on you! And of course: keep it up!
LikeLike
So so funny – I hope you get piles of money from this post or something!
LikeLike
What a brilliant solution to the kitchen island dilemma! I searched for years and could only find stuff in the $500-$1500 range, which was way out of my league pricewise. I ended up balanced on my tiny butcher block on top of a cocktail cart on wheels. It was funny enough to read that “the compressor motor looks like a poodle!” but my laugh-out-loud moment came when I saw your photos of the compressor and the poodle, side by side. The neighbors probably thought I was choking to death.
I love your solution to the crappy backside of the chest, though I think I would’ve opted for vertical slats, for visual continuity with the recycling center slats. I also applaud your good design thinking in placing the overhang on the proper side. Word of warning on the poly-coated butcher block: well-meaning friends will come over and offer to make a salad, then proceed to use your butcher block like a cutting board, and put indelible knife marks in your perfectly smooth paint job. Unless polycrylic is somehow resistant to that, or knife marks are part of the charming appeal of a well-loved and well-used kitchen.
Thanks for sharing another brilliant solution with us!
LikeLike
Pingback: Compressing my Sadness: Good-Bye to a Friend | projectophile