A Washable Headboard? Try this Crib Sheet Hack

Featured

Sleep like a baby knowing you can remove and wash your headboard fabric

Let’s get warmed up with a confession: I haven’t washed our pillows or comforter since we moved back home a year ago.* And recently, our bedroom has increasingly smelled like … people (those people are probably, hopefully, us).

So last Monday, I yanked all the bedding off for a trip to the laundromat across the alley.

And then I saw it: The shadowy gray smear, like the bedroom wall had grown a 5-o’clock shadow. Like someone had frosted the wall with oily scalp icing and decorated it with dust sprinkles. I touched it — and it touched me back! The smear was sticky, like the bottom of an old frying pan, or a band-aid stuck to your nose.

I can’t believe I’m showing you this.

Publicly, I’ll blame the grease spot on my husband. At 47, Scott still boasts a tidal wave of salt-and-pepper hair, which he maintains like a vintage sports car (i.e., daily polishing and waxing, and occasional drives on the highway).** I’m not sure how he got his head grease all the way on MY side, but it’s further proof that him and his voluptuous mane are totally hogging the bed.

I needed to create a physical barrier between our his head and the wall. Like a board that we could rest our heads on.

Loyal readers will remember the fabric headboard we made for our last apartment. But given this epidemic of head goo, how could we clean the fabric while it was attached to the wall? We could use a wipeable fabric, like oilcloth or plastic. But that would cause instant flashbacks to the station wagons of my youth, tender flesh fusing to hot vinyl seats.

I needed to invent a headboard with a removable and washable cover. And it had to be the width of a double bed and the height of an adult torso, with an elastic fitted edge, and a range of adorable non-threatening patterns.

A crib sheet!

HOW TO: MAKE A HEADBOARD WITH A WASHABLE CRIB SHEET COVER

Full disclosure: The crib sheet hack only works with a full/double sized bed. If you are an emperor or a captain of industry with a king-sized bed, you should make two headboards and hang them side-by-side.***

MATERIALS:
– Plywood (mine was 15/32″ thick)
– High-density foam (I used 3-inch)
– Batting (or an old sheet)
– Hanging hardware
– Staple gun
– Crib sheets

1. Cut a piece of plywood that’s about the size of crib sheet (52″x 28″). Traditionally these can be found at the hardware store and cut to size, but the alley and your friend’s basement are also good sources.

2. Use a serrated bread knife to cut the high-density foam to fit over your plywood, with about a quarter inch overhang.


Most foam comes in a 24-inch width, so you’ll probably have to Frankenstein**** it together to get full coverage. Use duct tape to cover up the seams between the cut pieces.

3. Even though it’s totally unnecessary, let your husband and youngest son squirt crafting glue over the plywood.

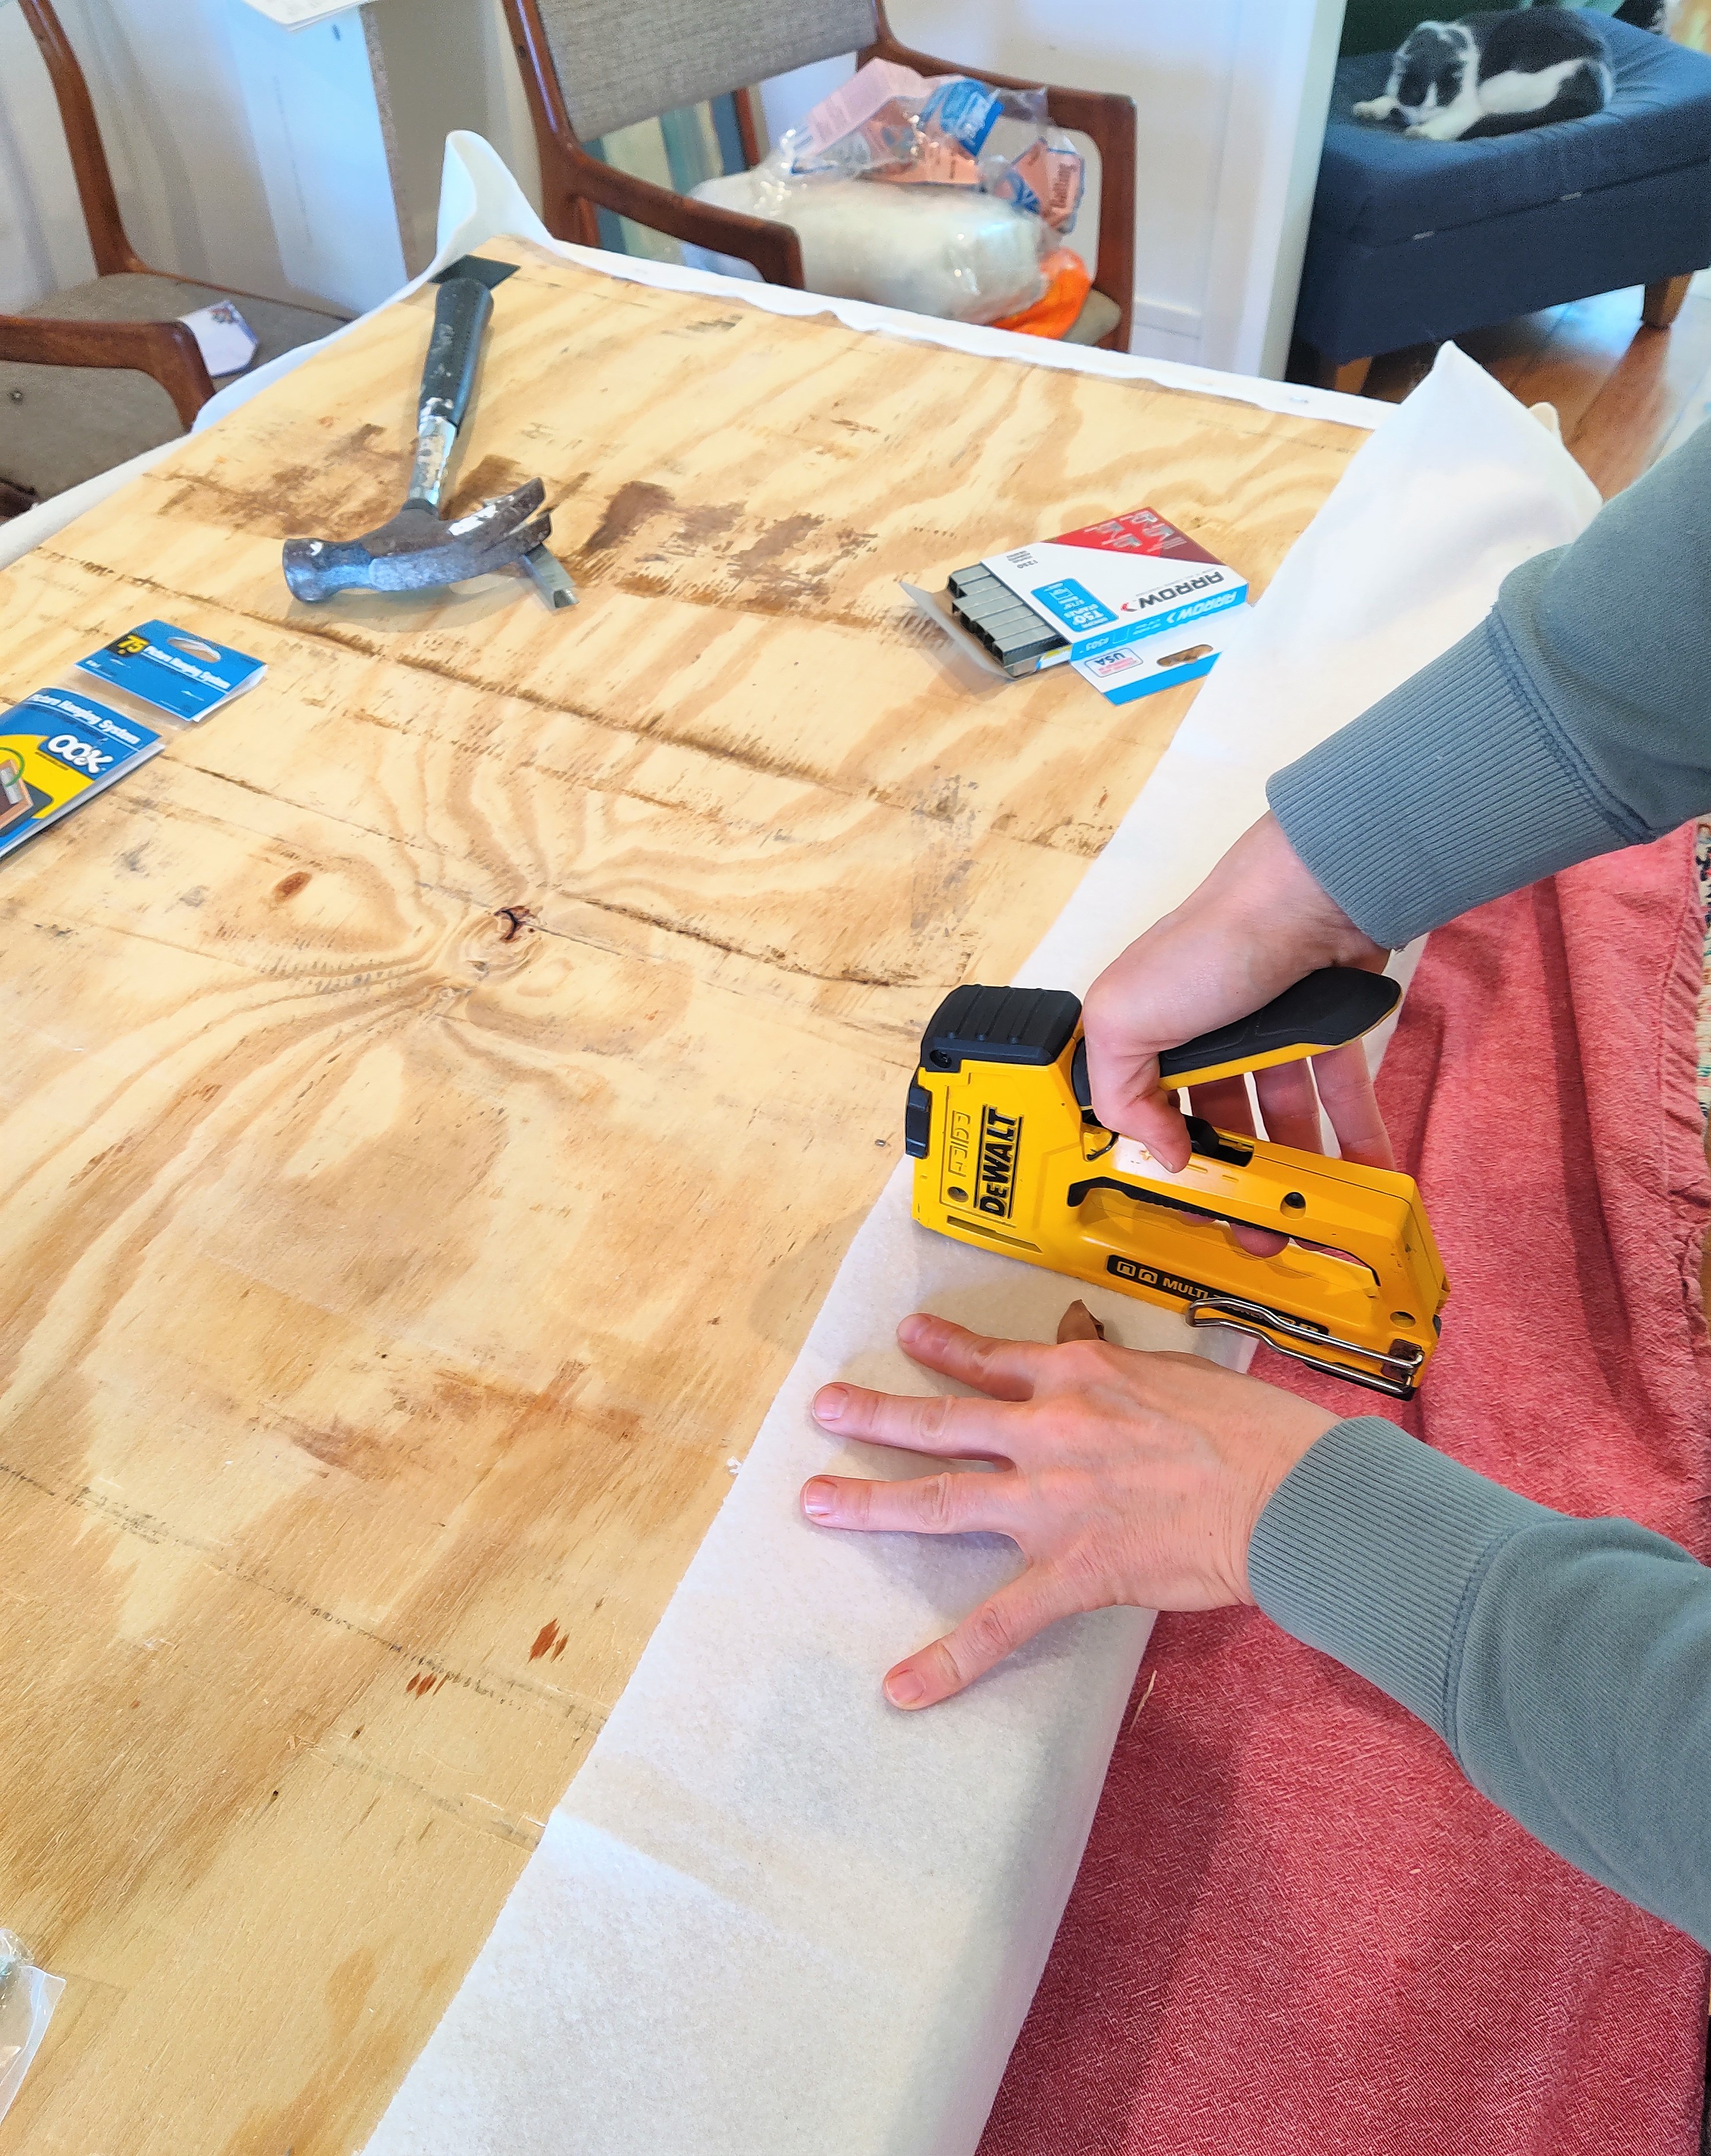
4. Place the foam back on the glued (LOL) plywood. Center the batting (or an old sheet) over the foam, so the fabric hangs about 4-6 inches over each side. Then carefully flip the whole mess over on its backside. Pull the batting or fabric tight and staple it to the back of the plywood, inserting the staples about 2 inches apart.


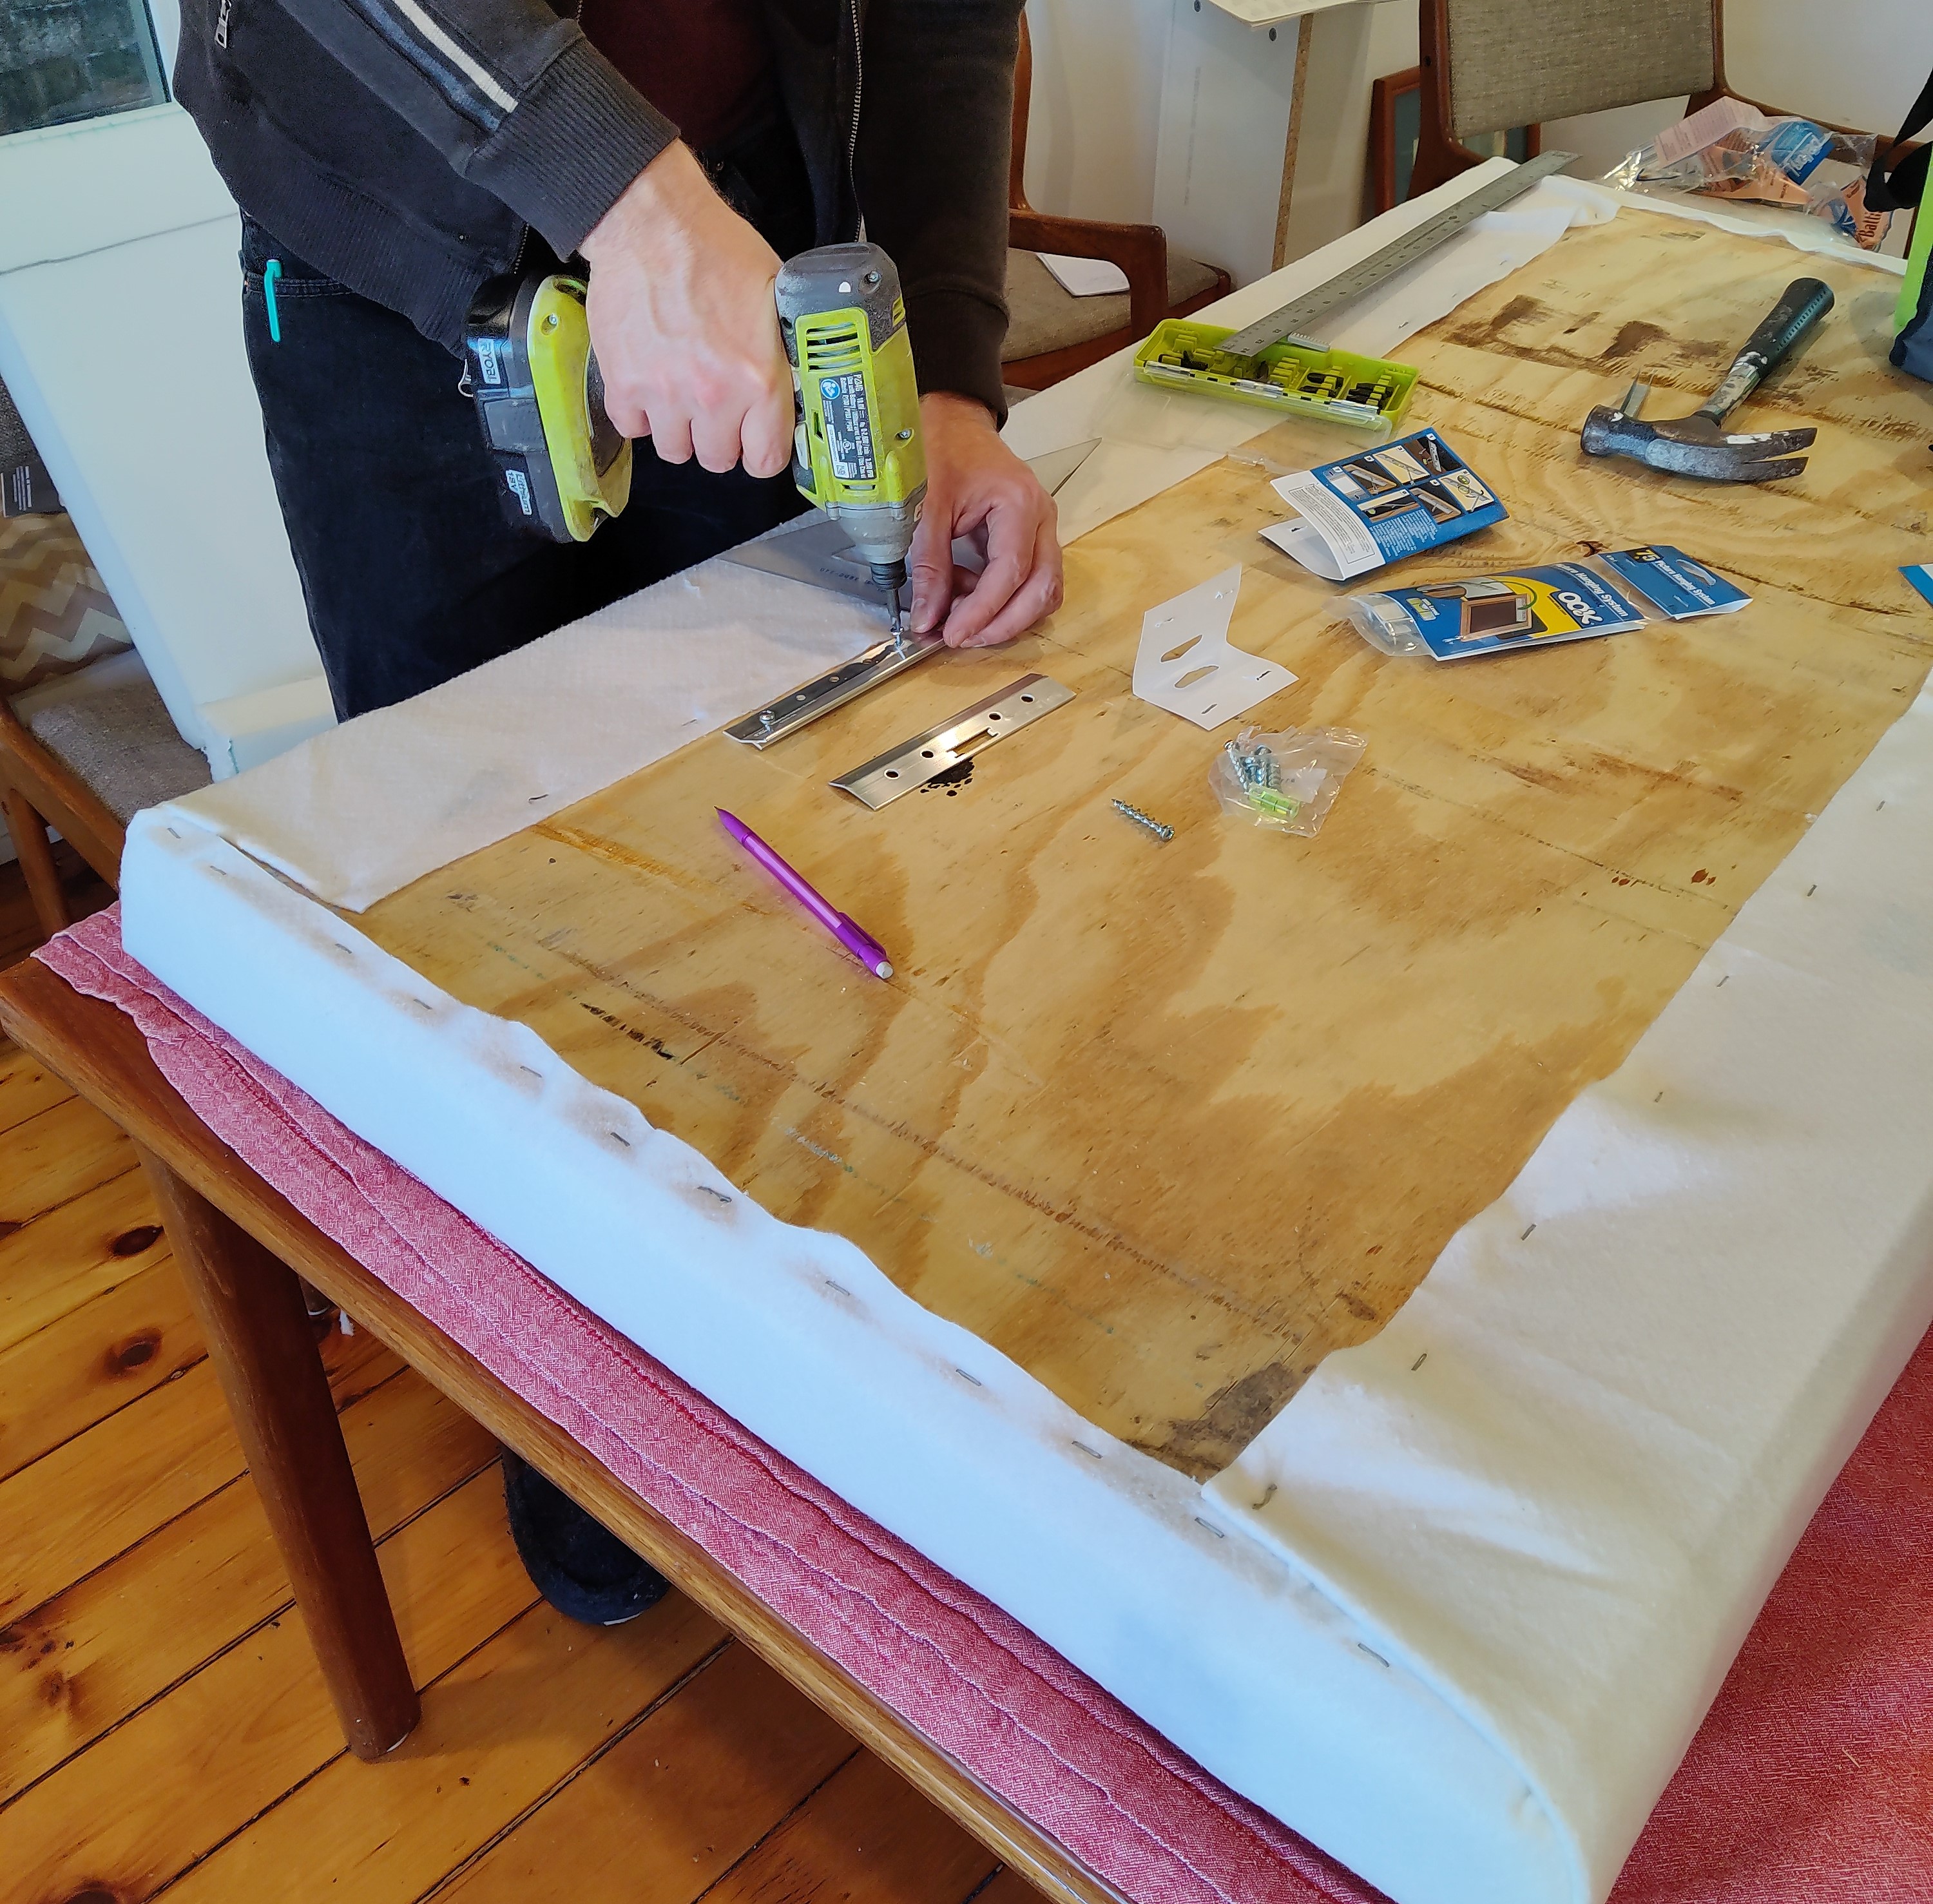
5. Attach the mounting hardware to both the wall and the back of the headboard. I strongly recommend a French cleat (a simple bracket made with interlocking 45 degree angles); it will allow you to pop the headboard on and off the wall. Remember that you will be frequently changing the cover to fit your mood and hair grease output.

Unlike other French inventions, the French cleat is not particularly sexy nor covered in syrup.

6. Now for the fun part! Go to Target or wherever they sell baby crap and buy a bunch of crib sheets. If you’re a mid-career parent like me, loudly complain about how much easier things are for new parents today. Back when I was making babies 10+ years ago, my breast pump was as big as a dorm fridge, and my baby carrier was an old potato sack strapped on with a couple of bungee cords.

PRO-TIP: Leave the package of crib sheets out where your kids can see them. Tell them the sheets are for their new baby sibling, and relish their limited understanding of the human reproductive system. “But that’s not possible,” they’ll say, “Daddy doesn’t have a penis anymore!” *****

7. Iron out the wrinkles, pull the crib sheet onto the batting-covered foam, and hang on the wall using your French clips.

Get bored of that pattern and try a new one:

Yes, I realize now that the whales are swimming vertically. Maybe that’s how I wanted it to be.

When your husband’s head grease stain reappears on the headboard, simply pull the crib sheet off and toss in the wash.

ENDNOTES:

* We had to move out of our house for almost a year after an attic fire. Long story, don’t ask.
** To be clear, I would rather Scott spend his time maintaining his hair than a vintage sports car.
*** If you are an emperor or captain of industry you are likely not making your own bedroom furniture, but you likely do appreciate my vintage sports car metaphors.
**** Yes, smarty pants, I know Frankenstein is the name of the scientist and not the monster. In this scenario, you are the mad scientist and the foam is the monster.
***** Scott had a vasectomy ten years ago which most observers agree was successful.

Pandemic Litter Scavenger Hunt (free and downloadable!)

You may have heard that we’re in the midst of a terrifying global pandemic that’s totally upended our way of life and will infect millions of people and cause unprecedented economic devastation.

But like, me, you may also just be trying to get through the day, perhaps with multiple children smearing peanut butter over both horizontal and vertical surfaces of your home.* 

These peanut butter-smeared children need fresh air and exercise, but our local playground was sealed off two weeks ago, and the stern and exhausted mayor of our very large city lives half a block away and can see the park from her back window. 

The streets and sidewalks and alleys are still open, but my kids refuse to just “go for a walk” unless there’s ice cream at the end. And the ice cream got sealed up, too. 

The one thing my kids DO love is garbage:  inspecting it, rolling around on it, secretly sliding it into their pockets or mouths. And thanks to the recent breakdown in social order, garbage is everywhere

So to trick the kids into taking a walk, I developed a scavenger hunt based on garbage I found within a one-mile radius of my home. I suspect the garbage is similar near your home, too. Different types of garbage are worth different points, because some garbage is simply more rare. Just print out this form (visual or text, based on your literacy levels), hand each kid a pair of rubber gloves and a trash bag,** and enjoy a few minutes of well earned me-time. 

COVID-19 PANDEMIC LITTER SCAVENGER HUNT
[non-literate version]

SCAV HUNT visual

[download a printable PDF HERE]


COVID-19 PANDEMIC LITTER SCAVENGER HUNT [printable checklist version]TEXT SCAV HUNG

[download a printable PDF HERE]


Just plain text version: 

50 points:
Street sign
Piece of transportation infrastructure (traffic light)
Identifiable piece of car (bumper, muffler)
Stuffed animal (especially sad if wet)

25 points:
Full or partial household item
Baby gear (shoe, pacifier)
Intact hubcap
Christmas decorations (February – October)

10 points:
Buttons (surprisingly rare, also tiny)
Knit hat
Winter gloves (not disposable, see 3 point section)
Identifiable non-processed food item (chicken bone, broccoli stalk)
Adult sock
Identifiable bike part (tire, lock, chain)
Full or partial electronic device
Reusable (non-disposable) cutlery or glassware

5 points:
Full-sized liquor bottle (pint or more)
Beer can or bottle
Full-sized chip bag
Candy wrapper of candy you’ve never personally eaten
Zip tie
Oral hygiene item (seriously, why are there are floss picks everywhere?)
Game piece or playing card
Plastic cutlery

3 points:
Latex glove
Face mask
Other disposable protective gear
Mini liquor bottle
Small chip bag
Receipt
Candy wrapper of candy you’ve eaten in your lifetime

1 point:
Rubber bands
Cigarettes
Bottle cap (double points for Corona brand)
Screws or nails
Baby wipe
Lottery ticket
Plastic bag
Coffee cup or lid

* We do have walls that run at a 45-degree angle, and those are covered in peanut butter, too.
** Some people may not like the idea of their kids picking trash off the street, which I respect. Just give the kids a pen and let them cross off each item as they find it. They will absolutely cheat.

Low-tech appliance hack! Customize your microwave to reflect your weird habits

Like all other appliances, I’ve only bought microwave ovens in a flash of desperation.* This past fall, I was reheating my morning cup of coffee for the seventh time when our microwave started growling and hissing, then popping and throwing sparks. And not those little purring sizzles, like when you microwave an AOL startup disc “just to see what happens.” This was serious microwave lightning, like the mighty Zeus himself was fighting his way out of a Hot Pocket.

Since electricity is the only element that I both fear and respect, I hustled to the nearest big box store to buy the third-cheapest replacement microwave in stock.

Pssst … the only difference between a cheap and expensive appliance is the volume of pre-programmed Dummy Buttons. One of my fondest childhood memories was squeezing a can of frozen orange juice into the family blender, and methodically pushing each button to discover its purpose. To my horror, I saw that grind, shred, mash, liquefy, chop, mix, whip, puree and aerate were simply just synonyms for blend. And coincidentally, the names of some sweet dance moves. 

If you need to name a dance move, look no further than your kitchen counter.

When it comes to making smoothies or hitting the dance floor, Americans like to think we have choices. And the only thing better than having choices is getting to name them. 

So when I unpacked my new microwave, I was horrified that the Dummy Buttons didn’t reflect my family’s lifestyle at all. How dare Black and/or Decker assume we like popcorn, potato, pizza, or dinner plates? How do they know I eat dinner off a plate, and not out of, say, a martini glass, an ashtray, a flower pot, a satellite dish, or old paint can? 

It was finally time to reclaim my microwave buttons, and reheat leftovers on my own terms. Here’s how to do it:

1. DATA COLLECTION: First you need to examine your lifestyle. Keep a diary of everything you microwave for two weeks. Hang a list next to the appliance to encourage compliance. To protect the integrity of the data, the whole family must participate, and you must include drunk, late night, or secret eating. The microwave doesn’t judge. You can do that later. 

An fun way to ignore unpaid medical bills and school forms you neglected for so long they are no longer age-appropriate.

2. DATA ANALYSIS: Enter your data into a spreadsheet to identify your most frequent microwave needs. A colorful chart makes it more official. Require mandatory participation in a slide show presentation at dinner to discuss the results. 

3. CREATE CUSTOM BUTTONS: Count the number of Dummy Buttons on your microwave (we have six). Identify your top six (or whatever) most microwaved food items. Ours were COFFEE (34%), BEANS (17%), WATER (13%), PEANUT BUTTER (13%), BUTTER (4%) and CHOCOLATE CHIPS (4%).

HEALTH TIP less words

Buy or borrow a label-maker. Print a label for each of your new lifestyle buttons (lived or aspirational).

20200126_115422

BONUS STEP! Before you embark on your own microwave customization journey, try it out on unsuspecting pals: Not the kind of friends who make you wash your hands before you touch their dog; I mean the kind of friends who buy bras at the thrift store or let their kids eat Pop Tarts they found on the playground. I tested the Dummy Button Hack on our dear friends Cherubim and Seraphim (not their real names). After a casual Friday night dinner at their house, I offered to clear the table but instead of cleaning anything, I stuck new labels to their microwave. They didn’t notice until the next morning and haven’t disowned me yet.

MA text message crop

After successfully testing the concept on other people, it’s time to reclaim your microwave. Wipe the Dummy Buttons clean, apply your custom labels, then sit back and relax with a cup of steaming hot butter. 

* Studies show microwaves are the most common appliance bought after a breakup, which is why the boxes are plastered with photos of attractive single people having fun with dangerously hot liquids.

Trash Talk: Create a top-secret hiding space for your unsightly recyclables

What kind of trash can best represents your personality? Take this free, totally-not-affiliated-with-the-NSA quiz!


Is your trash can personality a stainless steel, solar-powered, internet-of-things-enabled bullet with a trash-motion-sensor that automatically yawns open at the detection of an incoming banana peel or poopy diaper? Or maybe, like me, you’re just an old wicker laundry hamper with a plastic bag in it?

Our actual kitchen trash can is a wicker laundry basket with a plastic bag in it. 

Even though my garbage cans* fall on the bucolic end of the style spectrum, I quietly envy friends who tuck their slim bins neatly under the sink, their shame masked behind cabinet doors.

The pinnacle of success in life: When your guests, guided by neither sight nor smell, have to ask you, “Where’s the trash can?”

We have a small kitchen, by contemporary (read = obese) American standards, and a disturbing percentage of our floor space (not even counting our mouthspace) is devoted to waste collection.**

In our last apartment, I built this freestanding two-bin recycling center from an alley-scavenged cabinet, which I improved with fresh paint, decorative yellow slats, and fun-shaped holes in the top.*** It’s found a cozy nook in an otherwise barren back corner of the Babushka House kitchen.

Unfortunately, this quiet corner is about as far as you can get from the sink, definitely beyond reasonable “tossing distance” from where many of our recyclables—especially the shattering ones—are processed. Then one day, this mysterious silver bin appeared next to the sink, ready to accept our dripping wet cans of beans and Old Style until they could be transported to the alley.

Seriously, where did this trash can come from?

Problem solved, sort of. Except one day I just couldn’t look at an open bin of half-cleaned**** sardine tins and pickle jars ***** next to the sink anymore. I’d come too far in life for such humiliation. But where could we hide this bin within easy sink-tossing****** distance?  Oh look here, this cabinet isn’t doing anything except storing this 400-pound (181.437 kg) stand mixer which could probably live on the back porch with the leaky roof and lead paint.

Our mysterious silver bin fits perfectly!  But we don’t want to have to OPEN and CLOSE the cabinet door EVERY SINGLE TIME we need to toss a jelly jar.  What if we just took the door off?

Ooof, even uglier than before. If reading this blog has taught you anything, it’s that the solution to at least 18% of household problems is to cut a hole in something.

PRO-TIP: If your can doesn’t fit in your cabinet, just walk out to the alley (or wherever people abandon perfectly good stuff in your society) and grab another one. Seriously, I’ve never actually bought a trash can new at the store; once you start looking for plastic bins you’ll notice them everywhere, like Birkenstocks™ or squirrels or mobile phone stores. Here’s a photo I snapped two nights ago in “poo alley,”******* a name we’ve affectionately given to the alley we cut through to get to the subway station. 

And the next day I found another free trash can, inside an even bigger trash can! This shiny blue fellow comes with a set of golf clubs and a mostly-full cannister of Amplified Wheybolic Extreme 60™ Muscle Powder.  Wow, the neighborhood really is changing.

Back to the cabinet. Since I still don’t have a proper workshop in this house, I set up a wobbly and completely unsafe work “table” out of a stool and a milk crate, which can be easily harvested from the alley at a moment’s notice.

After clamping the door to the milk crate, use a round object like a bowl or lid to draw a circle. Make sure the outline is slightly bigger than the biggest recylable you plan to shove through it. Open your fridge and really be honest with yourself and your three-gallon jar of pickles.

Drill a pilot hole at the top of your circle (you get to decide what the “top” is) big enough to insert a jigsaw blade.


See if you can remember how to use your jigsaw without looking at the instructions again. Add some scrap wood and a couple of bricks as ballast to the end of the door, insert the jigsaw blade in the pilot hole, and cut your circle.

Obviously I can’t take a selfie while safely handling a jigsaw, though that would be pretty sweet.

Next, sand the inner hole smooth and give the whole door a fresh coat of white spray paint, paying extra attention to the inside of your new hole.


Place the freshly-punctured door back on its hinges with the trash can still inside. Take a green permanent marker (yes, it has to be green) and trace the outline of the hole onto your trash can.

Grab a hacksaw, assume a comfortable “power” position and chew a hole into the side of the trash can, roughly following your outline.

I’m living proof that you don’t have to be smooth or pretty to be useful, and in the case of this can, nobody can see it anyway.

Triumphantly place the bin into the cabinet, step back, and notice that the freshly-painted door is 37% whiter than the other two.

It’s important to include your kids in the project by letting them drop the inaugural can of diced tomatoes.

Creating lasting family memories.

If there are young boys in the house between 3 and 4 feet tall, gently remind them that—despite its tempting height and size—this hole is not for peeing into, because human urine is not recyclable and we wouldn’t want to contaminate the stream. 

Of course, it wouldn’t be the internet without a before and after, for dramatic effect:

life changing.


endnotes:
* For my friends in the Commonwealth, this is a “dust bin,” which always seemed a rather dainty euphemism for what really goes in there, in the same family of euphemisms as Feminine Napkin, Personal Freshener or Foundation Garment.
** After waste storage, the next largest use of kitchen space is our collection of exotic cooking oils that double as hair products.
***  The Upcycled Recycling Center was featured on the website of Bob Vila, who is the Martha Stewart of Home Improvement, minus the brand empire and felony conviction, plus a cozy beard.
**** Since I’m an optimist, I like to say that the sardine can is half-clean instead of half-dirty. Or if we’re being totally honest, ¾ dirty.
***** I’m living proof that sodium is good for you. Really, I’ve got the blood pressure of a cheetah, which I assume is the gold standard of mammal blood pressure because cheetahs are famous for their cardiovascular health.
****** I’ve watched enough episodes of the BBC smash hit Doc Martin to know what a “tosser” is. It’s sort of like a wanker. Now if someone can explain to me what a wanker is, we’ll be all set.
******* I won’t tell you why we call it Poo Alley, but if you’re lucky, some day after a couple of Old Styles, Scott will tell you about what happened to that aquarium that froze over last winter in Poo Alley.

Makeover Your Bathroom Like an Elite British Cycling Team

I recently heard a podcast* about the use of incrementalism in British professional bike racing. Rather than blowing up the racers’ routine with colossal change—like mandating an all-goo diet, celibacy or transfusions of ibek* blood before a mountain race—this coach credits his success to dozens of small tweaks. For example, when the team travels, the coach brings the racers’ favorite pillows along for better sleep. He reduces colds by disinfecting doorknobs before the team’s arrival at a hotel. I assume he also wipes preschooler boogers on the doorknobs of the opposing team…

mini-team-sky-launch-cropped

Team SKY and their secret team of child snot-wipers.

You’re probably thinking, “Great idea! But how can I apply the magic of incrementalism to my ugly upstairs bathroom?”

Perhaps, like me, you’ve inherited a bathroom this is perfectly functional for human waste disposal and hygiene maintenance, but drowns you in melancholy each time you plop down on the pink-brown toilet:

img_5129

Or bathe in your matching brown-pink tub:

img_5131Or splatter toothpaste on your pink-brown sink on top of an orangey-brown cabinet surrounded by brown-pink tile:

dsc_0326Combined with the jaundice-beige walls, you feel as though you’re trapped in a can of expired salmon, or working third shift at the Band-Aid™ factory. Perhaps you don’t have money to spend on an upgrade, because in three years you’ll have one kid in college and another kid in braces and a third kid in… uhhh…Somewhere.***  But there is hope in small changes.

Welcome to our Incremental Babushka Bathroom Makeover (I-Ba-Ba-Mo!)

skylight-illustratorAs Supreme Court Justice Louis Brandeis**** famously said, “Sunlight is the best of disinfectants.” And while I know he wasn’t telling me literally not to clean my toilet, Justice Brandeis understood that dark bathrooms are a total bummer. So when we had our roof replaced right after moving in the Babushka house, we splurged on a skylight directly above the toilet.*****

Next, we replaced the beige toilet seat with a white one. Not just for the color contrast, but because our 3-year-old (yup, third child) kept falling into the toilet.

We suffered in our 90% pink-brown bathroom for another two years. And then one chilly January night, I needed an excuse not to play board games (I call them “bored” games) with my family. So I slithered up to the bathroom with a bucket of TSP cleaner and my big orange sponge. After a nice scrub-down, I patched up the plaster pockmarks with joint compound. Finally it was time for a refreshing coat of white primer on the walls and ceiling. Feeling better already!

dsc_0321

After priming, I applied two coats of high-gloss white paint. I can’t stress enough how important the second coat is to any paint job, regardless of primer. I’ve been working on  a catchy, Illinois-Department-of-Transportation-inspired rhyme for my Advice to Paint it Twice: Be cool like ice and paint it twice. Don’t roll the dice, paint it twice. If you don’t paint twice, you’ll pay the price.” Too threatening?

With the walls and ceiling neutralized, I pointed my paintbrush at the hideous orange wood sink cabinet. I was positively paralyzed in choosing a paint color when I glanced over my shoulder at the blue painter’s tape on the wall. I delighted at the contrast between the prawn-toned tile, cool blue tape and freshly-white walls.  At the paint store, I ordered up a can of oil-based “masking tape” blue paint.******

First, I gave the cabinet, door and drawers a light sanding and then a single coat of white oil-based primer:

dsc_0334

The next day, I anxiously applied the first coat of blue paint.  As it dried, I spun into a vortex of panic and regret. It looked terrible. Like a toddler’s finger painting, or something listed on Craigslist as “shabby chic.”*******

dsc_0340

And since this was finicky oil paint, I had to wait a whole day to recoat. The second coat was an improvement, but it wasn’t until the third coat that I allowed my family to see what I had done to our bathroom. Luckily, personal hygiene isn’t a priority in this house.

dsc_0344

Waiting for the paint to dry is a great time to take stock of your toiletries. Dump everything on your bed and gather the family to reminisce about health problems. Try a game called “Match the Family Member to the Ailment.” Lice shampoo AND pinworm drops? Somebody here likes hosting parasites! Which of you had excessive earwax? Does somebody still get constipated while traveling? Is Jock Itch even a real medical condition or just a backdoor brag?

dsc_0340-2

Please don’t google pinworms.

With the sink cabinet painted, I turned my attention to the ugly dollar-store basket full of towels that is usually shoved between the sink and the window.

dsc_0352Since Babushka House was built before the invention of closets, we had no dedicated towel storage area.  Always defending his title of World’s Most Multi-Tasking Dad, Scott installed a lightweight IKEA Grundtal shelf over the bathroom door while the kids took a bath. This may remind you of the old Rodney Dangerfield joke: I could tell my parents hated me—my bath toys were a toaster and a radio. Rest assured, he used a cordless drill. Safety first!

dsc_0346-2


dsc_0352

No need to adjust the settings on your device. Our bathroom really is that lopsided.

The remaining piece of the Incrementalist I-Ba-Ba-Mo Puzzle was Babushka’s Louis XIV French Baroque Medicine Cabinet. The golden swirls and twirls of the frame are perfect for catching toothpaste splatters, beard hairs and baby fingernails, and was clearly not designed by anyone who has ever cleaned a bathroom in his life, such as Louis XIV:

dsc_0329

By this point, my only goal was to replace the cracked and yellowed light diffuser.  At Menard’s, a friendly fellow who blurted the words okee-dokee and fiddlesticks in the same sentence walked me to the light panels section, where I grudgingly purchased a 2 feet x 4 feet-wide “Cracked Ice” acrylic light panel; the kind that normally live in the drop ceilings of dentist waiting rooms:

dsc_0358

I cut the panel down to size and gave it a light misting of white spray paint to reduce the incidence of Nighttime Medicine Cabinet Blindness. It doesn’t quite fit into the original curved slot, but this is nothing that the average self-absorbed eyebrow plucker would even notice.

dsc_0342

I must now confess my tendency towards faulermutterzerkleinerer, which is the German word that I just made up for avoiding a task for days or weeks, even though the task takes two minutes to complete. In this case, I faulermutterzerkleinerered replacing the battery in the clock on the bathroom wall, because the bathroom is on the second floor and the batteries are on the first floor and it was easier to just leave a note on the clock to alert my family to the situation:

dsc_0357

Two months later, with the battery in the clock, our I-Ba-Ba-Mo is complete!

dsc_0344

dsc_0339dsc_0348As the great Chicago architect Daniel Burnham once said: Make ONLY little plans. They are the only ones that will actually be completed eventually. 

ENDNOTES———————————————————
*  When I say podcast, what I really mean is this is what I heard on NPR while doing dishes. Saying I heard it on a podcast makes me seem fresh and relevant.
** I assume IBEK is the singular form of IBEX.
*** The third child always gets the shaft. Trust me, I’m a third child. I married a third child. I’d like to starting a dating site exclusively for third children called DATEATHIRDCHILD.com, which is, by the way, a totally normal name for an internet dating site.
**** Ironically, Justice Brandeis is famous for establishing the legal notion of an individual’s Right to Privacy. If you’ve ever tried using the bathroom with small children in the house, you know that the concept is tenuous at best.
***** It’s quite likely that our neighbors can see us do our funny business, but somehow it’s never come up in conversation.
****** OK, the real name for this paint color is Sherwin William’s “Loyal Blue.” Our second choice was of course, “Backstabbing Blue.”
******* “Shabby Chic” is French for Intentionally Terrible. A style popular among economically comfortable people who want that “Grapes of Wrath” look in their bedroom.

Inaugural Ball: How to Make Donald Trump’s Head of Cheese

Each February, Scott and I host a party called the Super Bowl of Snacks. It started so innocently back in 2013 as an ACTUAL, LITERAL Super Bowl Party; the kind where the TV screams into an empty living room while friends huddle tightly in the kitchen, forming a human wall around the Cheetos™ and chicken wings. The next year we threw the same party, but quietly eliminated the football. Like slipping the binky* out of a sleeping baby’s mouth, nobody noticed.  Just the snacks, ma’am.

However, this being America, we couldn’t simply share snacks in a quiet, cooperative and mutually beneficial manner. This isn’t Sweden. We have to compete. There must be winners and losers.

So we made the Snack Party a contest, with five categories of Snack Achievement. Last year, the coveted prize was “Most Orange Snack.” But given the seriousness of our political situation, this year we replaced it with “Snack Most Resembling Donald Trump.”

As you may have guessed, the easiest way to represent the new Leader of the Free World is with Orange Cheese.  Don’t assume this is an act of disrespect.** Some of our most inspiring leaders have been immortalized in cheese form:

cheese-sculpture-collage

I mean, there’s even a brand of Brie called “President.” Though I’m certain Donald Trump wouldn’t care to be associated with a cheese that is soft, French, spreadable, and popular among people who drink wine from boxes and eat meals sitting on a blanket with bugs really nearby.

In terms of raw materials, my launching point was the Classic American Cheeseball,*** which is based on a two-to-one ratio of cream cheese to “regular” cheese. Regular like Cheddar. Not hard like parmesan or soft like Camembert. You know, NORMAL.

dsc_0339

While you wait for the cream cheese to soften to room temperature, Make America Grate Again by shredding the “regular” cheese. A perfect job for little hands:

dsc_0340Blend the cream cheese and shredded “regular” cheese in a food processor until smooth, dropping some paprika in for extra color.

dsc_0358Your cheese blend will be fairly bland. Spice things up with a couple tablespoons each of lemon juice, diced green onions and Worcestershire sauce.  Wait, you don’t own any W-shire sauce because it took you four years to finish the last bottle. Send that cheese-grating kid to the neighbors to borrow some.

beggomg-illustrator-version

It takes a village to make a cheese ball.

If things are getting crowded in the food processor, finish the job in the mixer.

dsc_0359

Drop the whole blob onto a sheet of plastic wrap, roll into a ball and chill for several hours (you AND the ball).

dsc_0365

I can see the resemblance already!

Full disclosure: We did not chill the blob nearly long enough. Your ball should have the consistency of Play-Doh, not toothpaste. But the party starts in one hour, and the Real Donald Trump’s face is goopy anyway, so let’s get on with it.

Dip your hands in ice water – they should be wet and cold to avoid sticking to and warming the Ball as you sculpt. Shape the ball into an oval, and then push your thumbs into the middle to make eye holes. Then sort of pull and push until you get a nose.  Is it sufficiently terrifying? Then you’re on the right track!

dsc_0369

Squeeze some leftover cream cheese into the eye sockets to give the illusion of humanity.  Next, slice a small stick of beef jerky in half to make pouty, whiny lips. Save a couple of bits of jerky for the eyes, although raisins, chocolate chips, Xanax, red hots or cranberries could work well–use your imagination!

dsc_0370

At this point you’re probably thinking, “This could be any Orange Man—John Boehner, or even Silvio Berlusconi.” Don’t panic. The secret’s in the hair, my proprietary blend of potato chips.

dsc_0373Arrange several sweet potato chips whimsically, allowing the chips to fly fancifully off the head. Next, fill in the “highlights” with salt-and-vinegar chips:

dsc_0374

Once the hair has been properly vetted, use a wet finger to smooth over any bumps in the skin. Actually, just leave those on. It’s more realistic.

It’s party time!  Garnish the Cheese-Ball-in-Chief with choice crudité, like wilted celery and watery baby carrots that nobody will actually eat. 16427776_10154324538083733_1726697221301339768_n

Despite its lack of resemblance to any sort of human being (even the terrible kind) and despite the fact that nobody actually ate it, our Donald Trump Cheeseball won first place in the “Snack Resembling Donald Trump” category. Estelle proudly shows off the prize: A Certificate of Achievement to a Tremendous American signed by The Donald, along with a bottle of “Zero to Sexy” Brand self-tanning oil.

february-04-2017-sb-snack-2017-february-04-2017-sbsnacks2017-dsc_3951

It’s easy to win the game when you write the rules! 


endnotes:
* Binky is a American/Canadian term for pacifier, but I have a bad feeling it means something else in other cultures. Please accept my apologies for any distress this may have caused.
** But if you did assume that, you’d be 100% correct.
*** The First Known Cheese Ball was created by Elder John Leland of Cheshire, Massachusetts in the early 1800s, to express his patriotism and support of religious liberty (of course). This inaugural Ball weighed in at 1,235 pounds/560 kilograms, draining the milk of 900 cows, who presumably also shared Elder Leland’s passion for freedom. Leland transported his ball down the east coast via horse-drawn wagon, then rolled it across the White House lawn to serve it to President Thomas Jefferson. This “Freedom Ball” (my term)  was displayed at the White House for two(!) years and continuously served at Republican party functions before being tossed into the Potomac River. I’m hoping this scene makes it into the all-dairy version of Hamilton the Musical.

One Night Stand in the Alley

We recently celebrated [i.e., refinanced] the two-year anniversary of Buying the Babushka House. I’ve learned so much from owning a neglected Victorian-era Workers’ Cottage. Now I know the difference between a flange and a flapper, and that they are not 1920s dress styles but, in fact, parts of a toilet. I’ve even discovered actual sink parts called the Ball Cock and the Escutcheon Nipple. Oh my.

Don’t let all this House Learning fool you. My first Project Love, my raison d’être, will always be Fixing Up Junk I Find In The Alley (FUJIFITA).

Sadly, the Babushka House is somehow smaller than our last apartment, so we have no room for new FUJIFITA furniture projects. Thus, when I stumble across some mouth-watering alley junk, I simply alert my network of Fellow Scavengers (all human). Here’s a scrapbook I created to remember those I left behind: *

alley-find-collage2Then one magical day in May, I found something I could actually take home. I was riding our cargo bike back from – ironically** – a decluttering drop-off event.  I detected some choice items placed carefully next to an apartment building dumpster.***  I carefully strapped this dingy, but very sturdy, Mid-Century Modern style night stand to my bike:

before2

Why did it not end up in the Album of Forgotten Alley Finds?  Because a perfect FUJIFITA scheme was already brewing in our bedroom!  It starts with our existing bedroom set: A dresser and [ONE SINGLE] night stand:

dresser-nighstand-collage

Yes, the dresser doubles as the temporary location of my standing (on a stool) desk. Your safety concerns have been noted.

Like socks, feral cats and peanut butter cups, night stands work bettter as matching pairs; the solo yellow fellow on Scott’s side of the bed**** is forced to share night-standing duties with a dark-walnut side table. The whole room is out of balance, visually and emotionally.

notmatching

Enter my dingy alley find.  The perfect size and shape, all it needed was a quick dye job to join the Bedroom Set Family and claim its rightful place on My Side of the Bed.

STEP ONE: EXFOLIATE
Like a bad sunburn, my nightstand was molting a layer of laquer that needed to come off before I could even think about repainting.

before3

I gave the whole piece a firm, but light (150+ grit) sanding, enough to rough it up but not destroy it.

dsc_0320

I wiped the dust off with a damp sponge and microwaved some spaghetti for lunch.

STEP TWO:  PRIME + PAINT + POLYCRYLIC
Since I would be dipping into an old can of oil-based “sunburst yellow” paint for the drawers, I had to give them two coats of oil-based white primer. Then, I applied two coats of white latex primer to the cabinet. A cleansing prime always feels so good:

dsc_0325

As I waited for the primer to dry, I did a minute of internet research on the night stand’s provenance. Who is Harvey Probber and why is his name plaqued inside my drawer? dsc_0306-2

Wow. Turns out Harvey Probber was an influential, prolific and suuuuper laid back mid-century furniture designer.

harvey_probber

Most of his signature pieces could best be described as “Orgy Ready.”  Are you really surprised, with a name like Harvey Probber?

There's $20,000 worth of cocaine hidden in those velvety crevices.

There’s $20,000 worth of cocaine hidden in those velvety crevices.

harvey-probber-sofaprobber-sofa-orange

And then I discovered a pair of Harvey Probber night stands – identical to mine – selling for $7,400.  Seven thousand four hundred American dollars.

harvy-probber-night-stands-for-sale-screengrab-wtf-arrowI got to experience my very own “It’s a Wonderful Life” feeling telling Scott that I just painted over a piece of furniture that may be worth more than our new roof.  And then I feel like Uncle Billy all over again as this “sponsored post” follows me around the internet:*****

dsc_0316-2
Ahem. Anyway, after the primer dried, I dug around in our Paint Archives and applied two coats from a can labeled “kitchen ceiling.” Then I applied three coats of “sunburst yellow” paint to the drawer fronts.

dsc_0307-2

Since the top of this nightstand is sure to get a lot of wear-and-tear — think bumpy library books and a leaky humidifier — I applied three coats of clear, glossy polycrylic, with a light, high-grade sanding between coats.

STEP THREE: SCAVENGE THE HARDWARE
Since this thing was sitting dormant on my back porch for six months, I honestly don’t remember what happened to the original drawer pulls.  No worries, I’ve developed a useful habit of pulling the legs and hardware off of everything that I find in the alley that I can’t take home:

dsc_0315-2I could have drilled two more holes in each drawer so that the pulls matched the “original” bedroom night stand, but I figured the new guy had already been through enough. These shiny chrome saucers will do just fine:

dsc_0312-3A perfect fit!dsc_0314-3


dsc_0305

It wouldn’t be the internet without a before-and-after, so let’s see how far we’ve come in two years:

bedroom-before-and-after-final

Welcome to the family, little night stand! I think we’ll call you Harvey.

endnotes ——————————————————
* My kids are skilled at spotting good stuff in the alley. They alert me by saying, “Mommy, don’t look over there! There’s nothing good next to that dumpster! Please let’s keep going!”
** Yes, this is an appropriate use of the term ironic.
*** The Scavenger Code says that items placed INSIDE a dumpster are not fit for re-use. Items placed carefully NEXT to the dumpster, facing out, are asking to be taken home by you.
****  MARRIAGE TIP: To keep things caliente, Scott and I like to switch sides of the bed every six months.  This also helps equalize bed lumps, since he’s got about 30 pounds on me. It’s simpler than rotating the matress.
***** I will admit that the ad for those $7,400 Harvey Probber night stands is a refreshing change from the “Period Panties” that have been trailing me online for the past year. Shoo Period Panties! Go on now, get lost!

Track Your Tool Mooching with a Basement Borrow Board

SETTING: A SUNDAY AFTERNOON IN THE BABUSHKA BASEMENT. HUSBAND AND WIFE, SLIGHTLY AGITATED, EXAMINE A MESSY SHELF OF TOOLS. THEY HAVE SPENT TOO MUCH TIME TOGETHER THIS WEEKEND.

HIM: So, where are we at with the kitchen door project?*
HER:  It’s almost done, but I still need to sand it.
HIM: OK, then finish sanding it.
HER: Fine. Bring me the sander.
HIM: I can’t find it.
HER: Didn’t somebody just borrow it? I think Matt and Megan. For their kitchen. I’ll text them.
(5 MINUTES LATER)
HER: Nope, they gave it back to us a month ago.
HIM: What about Tamra?
HER: Couldn’t be. Tamra moved in July. Besides, she gave it to Mindy. And then Mindy gave it back, like, a million years ago.
(15 MINUTES STARING AT PILES OF JUNK HOPING THE SANDER WILL SUDDENLY APPEAR)
HIM: MICHAEL! Michael borrowed it to redo their picnic bench.
HER: Whew! Guess I’m not finishing the door today. Who wants a snack?

          (END OF SCENE)

Home ownership requires lots of tools.  Tools for the yard. Tools for the toilet. Tools for breaking plaster, and then fixing plaster. Tools for painting, thinning paint, drying paint, stirring paint and stripping paint…

img_4661Scott and I are lucky. Sure, we impulsively bought a house that’s barely standing. But so did many of our neighborhood friends, and they did it years before us, and thus already bought all the tools.

Most of our friends could be described as resourceful, know-it-all socialists: folks who proudly wear thrift store underwear, but wouldn’t be caught dead letting their friends BUY a post hole digger to just to build a fence, when they’ve got a perfectly good one in their basement.

But like other popular forms of swapping (i.e., cookies, interest rates, spouses and credit defaults) it can get complicated, possibly igniting a global economic meltdown. Just look at this corner of our basement! Whose stuff is this, anyway?!

basement-corderANSWER KEY:
1)  Gin and Michael’s iron rebar spike and sledge hammer
2)  Matt’s child seat rack attachment
3)  David’s post hole digger
4)  David’s porch-scrubbing kit

Who could possibly keep track of all that stuff borrowed and loaned? To assist in preserving your official Tool Borrowing and Lending Score (ToBALS), I’ve developed this patented two-column accounting system, The Borrow Board. 

DIY CHALK BORROW BOARD

STEP ONE: Scrounge around for some type of paintable board – scrap wood, MDF or wood paneling that fell off the ceiling of your basement.**

dsc_0252 If you found some water-stained, irregularly shaped MDF board in your basement, go ahead and cut the rotten end off with your (probably borrowed) circular saw.

dsc_0253

Wipe off the spider webs, paying special attention to the egg sacs, because spiders get really mad when you mess with their baby sacs.  Apply one coat of latex primer, or two if your board is especially moldy or if you just made a spider egg omelette.

dsc_0256

For those of you just skimming this blog post or only reading the captions, note that we are not painting our board with Organic Plain Whole Milk Yogurt. Though if you did, that’s what you get for not paying attention.

STEP TWO: Generously slather on at least two coats of chalkboard paint, which is available at most hardware and paint stores.

dsc_0258Now there are plenty of cutesy Pinterest™ types who may “inspire” you to make your own chalk paint by adding a chalky substance – such as tile grout, wig powder, volcanic ash or pulverized goat hooves – to regular paint.  Personally, I never question the recommendation of the American Paint Manufacturers Association™ to never tamper with their products, because they probably know what’s best for me.  Also, I’m lazy.

STEP THREE: Create T-shaped grid-lines by laying down some masking tape in a more-or-less straight line. Then fill in the negative space with an oil-based white paint.

dsc_0263

Next, count the letters in “BORROW BOARD”, including the space, to locate the precise middle point of the phrase, and mark that on the top of your board. Grab one of your kid’s junky paintbrushes and paint the word “BOARD” first, since your letters will inevitably get bigger as you go so you may as well start at the end. Refer to one of your kid’s homemade birthday cards if you don’t believe me about the letters getting bigger.

dsc_0265Then paint “BORROW,” starting with the W and then the B and working your way towards the two “R”s so you don’t squish all the letters together. Don’t be discouraged if your sign resembles something held up by a conspiracy theorist on the the side of the highway, or that guy in front of Old Navy who told me I was going to hell for smoking cigarettes.***

dsc_0271

Hopefully, you’ve been lending out tools as well as borrowing them, so create titles for each column to reflect the spirit of your bottomless generosity.

dsc_0274

STEP FOUR: Wait three days for the chalk paint to fully “cure.”  Before you can write, you must then “condition” the chalkboard so that it becomes accustomed to the smell and feel of chalk and won’t reject it like a baby bird that’s been touched by curious human children with Flamin’ Hot Cheeto® dust on their fingers.  Simply rub the board with the side of the chalk, and then wipe off with an eraser.

dsc_0256-2

Survey your possessions and write down whatever doesn’t belong to you, along with the name of its owner, if you still remember.  Try to recall everything you’ve borrowed out**** to others, which hopefully looks balanced.
dsc_0261

Hang your finished borrow board in a discreet place in your basement, so visitors won’t see how much of a mooch you are, or be reminded that you still haven’t given back that sledge hammer even though you finished building the fence more than a year ago.

dsc_0265-2

By the way, do any of you have my copy of “Confederacy of Dunces”?

———endnotes———
* In our house, we are not allowed to use the question beloved by ineffective middle managers worldwide: “Sooooo… Where are we at with ___?”  Because by “WE,” you mean “ME,” otherwise you wouldn’t be asking ME, would you, Brad?
** OK, maybe that MDF panel didn’t actually “fall off” the basement ceiling. Maybe I pried it off because I couldn’t stand not knowing what was under it.
*** In his defense, that’s actually what it says on cigarette boxes in Canada. Also, I don’t even smoke.
**** In our family, we use the verb “borrow” both ways; you can borrow something FROM others or TO others.  While not grammatically correct, it’s easier than remembering the past tense of LOAN.  Loaned? Lent? Loan’t? Loanded? Leaned?

A Ladies’ Guide to Stripping

Every now and then, usually during an awkward lull in conversation, a friend will ask for blogging tips. My fifth piece of advice, after “never blog about blogging”* is “Never write about why you haven’t written in a while.” Nobody pays that much attention to your life, much less your blogging schedule, to notice. Besides, do you really need to draw attention to your lack of discipline and productivity? In blogging, as in life, it’s best to keep expectations low. Then nobody is ever disappointed.

Today, I’m breaking all the rules to announce I haven’t posted any finished projects all summer** because I’ve discovered an exciting new project that I am unlikely to finish in my own lifetime. The upside is that I’ve learned enough to slather you with some pro-tips about: Stripping Paint!

You see, the Babushka House is held together with acres of Charming Original Woodwork (ChOW), or, more accurately, Original Unchanged Character-building Hardwood (OUCH). While the doors, trim, and door & window frames are almost certainly original to the house, and thus hopelessly charming, all this OUCH was more recently slathered in a coat (or six) of off-white*** paint.

dsc_0252-2

During Babushka’s 50-year reign, the policy was to paint directly over shiny-slick lacquer, which is like trying to glue a squirrel to an ice cube.  So now those miles of painted wood – in every single room of the house – are molting quicker than an adolescent rattlesnake with a rat in its belly.

Not only am I horrified by the so-called “shabby chic” look of chipping paint, I am also skeptical of the American Paint Manufacturers Association™ recommendation that children consume 3 tablespoons of paint chips per day.  So early this spring, I decided to finally tackle the flaky elephant in the room**** and strip off all that old paint.

It wasn’t yet open-window weather in Chicago, so I tried the more “natural,” low-odor type stripper.  I couldn’t be bothered to conduct actual research on brands, so I bought one that smells like orange peels, and another that smells like baby powder and waged a Stripper Battle in my living room.  Here they are, side-by-side, soon after application:

baseboard1

If my deodorant is any guide, I know that NATURAL = WEAK. These dainty chemicals must sit for 12 HOURS before anything even remotely cool or destructive happens. The next morning, I sprang out of bed for the Inaugural Scrape:

dsc_0131

OK. Well, that got a little bit off. Apply again, wait another 12 hours, put on a slightly different green hoodie, then scrape:
dsc_0136And again…. and again. It took four applications, plus a final scrub down with mineral spirits, to get to bare wood. By then I had completely lost track of which brand worked better. But probably the one on the left. dsc_0148The first properly warm day, I opened the windows and bought a can of Real Stripper. Real Stripper doesn’t smell nice like lemons or baby butts; it smells mean and terrible like war or a chemical plant explosion. As for paint-melting power, it’s the difference between a Crock-Pot® and a deep fryer, which is also a good metaphor for the pain it inflicts on bare skin.

dsc_0252

Stripper Family Photo: Mom, Dad and Junior.

Despite the smell, the mess and the likely brain damage, stripping paint has become one of my favorite DIY activities. Do you enjoy picking scabs, peeling labels off sweaty beer bottles, biting your fingernails and popping zits? If you are anxious and slightly destructive, then stripping paint may be right for you.

Let’s review the basic process for stripping paint: 

  1. Put on thick rubber gloves that make your hands sweat. If your hands aren’t sweating, the gloves aren’t thick enough. If you’re working on a thing that you can take outside, take it outside.
  2. Unscrew the Mother Can of Stripper, let it burp a few times, and pour several ounces of stripper into a can or jar. Be sure to eat whatever was originally in the jar first. Put the Mother Can in a place where you won’t knock her over. Don’t drink your iced coffee out of jar that looks juts like the jar of stripper, dummy.

  3.  Grab a disposable brush that you don’t mind ruining.  Brush the stripper on THICK. Imagine you’re a mom in a peanut butter commercial and the wood trim is your child’s toast. Pay special attention to the nooks and crannies.

    skippy

  4. Wait about 10 minutes for the chemicals to work. Be sure to have another activity planned to fill those empty minutes, such as mowing the lawn or taking a pregnancy test: Something to distract you, but not for too long.
  5. Now for the fun part, when you get to scrape the paint off in big, satisfying strips and feel like you finally have power over some small part of your life:

    big-scrape…but then discover four more coats of paint underneath. Repeat this step as necessary.

  6. After stripping and scraping down to almost-bare wood, scrub everything with steel wool soaked in mineral spirits in order to wash off the stripper residue and loosen those last stubborn bits of paint.img_6609

Those are the basic rules of stripping. But what about the SECRET TIPS that only seasoned amateurs like me can tell you?

KEEP IT TOASTY: Stripper loves heat. Remember the last time you ordered waffles at a diner and tried to spread those frozen rectangles of butter?***** Like butter on waffles, stripper wants to be room temperature.  On a chilly day, keep a space heater blazing nearby so you can open the windows.

BUT DON’T STRIP IN DIRECT SUNLIGHT:  Strong sunlight will make your stripper pop and sizzle, which may sound like the stripper is working extra hard. But really, the stripper is just evaporating more quickly. And when stripper evaporates, it leaves behind a stiff, rubbery, tarlike slop, like the stuff the dinosaurs got stuck in when they went extinct. Scary, right? Here’s a meta-pro-tip for a hot, breezy day: Place cling wrap over your stripper to let it work without evaporation:
img_6603USE THE BUCKET METHOD: Speaking of sticky messes, do you have an end game for the wads of rubbery goo that you scrape?  Maybe you’ll just flick it into the air or wipe it on your husband’s shirt? NOPE. Grab one of your kid’s beach buckets and line it with a plastic bag. You can wipe the stripped paint off on the side of the bucket, and then dispose of the bag in your neighbor’s trash when you finish up for the day.

20160801_101420

WEAR CLOTHES:  Have you ever been splattered with hot oil, or stung by bees plural, or forced to get a home perm when you were 12?  That’s what stripper feels like.  Respect it and cover up as much skin as you can. Neil Armstrong didn’t land on the moon in a tank top and hot pants, and neither should you.

PROTECT THE INNOCENT: If you must strip inside because the thing you’re stripping is part of your house, then make like you’re potty-training or carving pumpkins – newspaper everywhere.  You may  be tempted to lay down your Good “Forever” Tarp, but you’ll quickly regret it after you turn your dining room into a Superfund site. If plastic makes you feel better, cut a plastic trash bag in half and slide it under the paper.

KEEP KLEENEX HANDY: Paint stripper makes my nose run. Which is probably a symptom of my brain dissolving. And without a tissue handy, you will reflexively wipe your nose with the back of your hand, which is itself covered in stripper, thus smearing stripper into your nostrils, which provides a shortcut to your already dissolving brain.

VISIT THE DENTIST SUPPLY STORE:  As you get into smaller crevices, you will need finer tools, which happen to be directly related to dental hygiene. Ask friends and neighbors for their used toothbrushes.  Save up toothpicks. Go to the dentist and discreetly pocket the tarter scrapers and periodontal scalers at your next checkup.

20160801_101307

EAT MORE FAST FOOD: You’re going to quickly destroy any tools you use to strip. Next time you grab a burger, stash the plastic utensils for later scraping. The knife, spoon, and fork all have wonderful serrated edges and tines that are perfect for picking at stubborn bits of paint. Don’t be afraid to try new foods in your quest for tools: Chopsticks, toothpicks, sporks, chorks and trongs all work great!

dsc_0257

Only a fraction of what you will need to strip paint of a Victorian-era kitchen door.

Wherever your stripping journey takes you, be sure not to lose interest in it after a few weeks and leave half your dining room covered in masking tape.  But if you do, just hang some decorative BEFORE and AFTER signs and your husband will totally understand.

dsc_0254

——ENDNOTES————!
* As a rule, I avoid matching verbs and gerunds in my creative life, and thus would never write about writing, dance about dancing, or cook about cooking. But I will often dance about cooking or sing about sleeping or run about sewing.
**  The bigger blow to my creativity this summer was perhaps working a part time job with no child care.  I haven’t finished a sentence in nearly three months.
*** My favorite shades of off-white paint include: Expired Sunscreen, Yesterday’s Brie, Musty Latte, Elderly Schmear, Afternoon Potato Salad, Pimple Squirts, Grandpa’s Toenails, Marlboro Molars, Jaundiced Norwegian and Forgotten Bathtub.
**** Normally, I don’t recommend tackling elephants, regardless of their skin’s moisture levels.
***** PRO-TIP: Ask for the butter as soon as you order your waffles. Then place the frozen packets in your armpits while you wait. By the time the waffles arrive, the butter will be wonderfully warm and spreadable and your armpits perfectly refreshed for dinner!

World’s Slowest Before-and-After: Micro-Bathroom Makeover, PART 2

(YES, YOU CAN PAINT OVER TILE)

When we left our bathroom remodeling heroes, they had fixed the toilet, tore out the floor, installed a new floor, and then stepped out to get cigarettes.*

DIRT GOES HERE

The bathroom was now officially “functional,” and cleaning was a breeze because they could just sweep dirt into the ½-inch gap between the floor and wall. But there was still the case of the Missing Ceiling: Local toilet-goers could gaze upon the underbelly of the upstairs bath tub, imagining themselves in their favorite Steampunk novel; a fine mist of rotting house dust drifting down on them with every upstairs bump and stomp.

Our Heroes (now downgraded to Protagonists) left the open sore of the ceiling exposed for more than a year. They were trapped in the awkward adolescence of fixing-upping: Things functioned well enough to sustain life, but they weren’t exactly nice. Why couldn’t they just have one single room that was finished?

And since a “ROOM” is generally defined as having a floor and a ceiling,** they started by mending the ceiling wound with a fresh sheet of drywall, handily scavenged out of the neighbor’s garage:

DSC_0187

While waiting for the spackle to dry, I pulled out that funky trapezoid cabinet over the toilet – both to give our toilet passengers some extra breathing room, and to give our kitchen some much-needed Secondary Bean Storage.

With the cabinet down and the new ceiling up, the bathroom was flush with light!  But just like when the tavern lights flicker on at closing time, that new brightness revealed walls that had yellowed to a shade of nicotine-stained teeth.***

That margarine yellow couldn’t be scrubbed away, even with a strong dose of TSP solution. So after a light sanding, I reached for my industrial-sized bucket of white primer. Putting a layer between me and the Bathroom of Babushka Past provided instant relief, and reinforced the decision to paint the walls a crisp, clean white (also, we had half a can of white paint leftover from whitewashing the bedroom).

DSC_0219

Painting the walls and ceiling white was the easy part. But what to do about that nasty tile and its grid-work of yellowing grout?

Since most problems can be solved with procrastination, I pivoted to this rusty gold toilet paper roll holder. I’d briefly considered pulling it out of the wall to install a new one, but Scott warned me in an appropriately low and spooky voice, “We don’t know what lies behind that toilet paper holder.” So I painted it silver, dipping into my stash of Rust-Oleum’s Liquid Mercury™ Line of extra-toxic finishes, recycled from old thermometers.

toilet paper holder before and after

When my vision returned to normal, I turned back to the tile, and learned the hard way that tile can’t be simply popped off the wall like a dried up booger (can’t you kids just wipe it on your shirt like normal people?).  We either had to live with the haggard old tiles forever, or tear out the walls and start fresh. Like Scott said, who knows what lies behind those walls?

Like most of life’s problems, there’s usually a shortcut. No, shortcuts are lazy. Let’s call it a compromise. And today’s shortcut compromise is: PAINTING THE TILE.

My local paint store carries a special kind of super-charged EXTREME BOND****  primer made especially for “problem” surfaces like tile, which I’m sure resents being called a “problem” surface:

DSC_0226

Let the Extreme Bonding begin!

DSC_0228

Another coat, just to show that problem surface who’s boss:

DSC_0232

No need to adjust the settings on your device: The light in the bathroom really is that bad.

PRO-TIP:  Though I would normally advise you to sand any surface before you prime and paint, I skipped this step. The glaze on the tile is so slick and shiny, it would be like trying to sand Jell-O. Like trying to sand… something just out of reach, like a quickly evaporating dream first thing in the morning, or like this sentence. Like trying to sand post-modernism, which is already so slippery. Also, my friend Megan just painted her kitchen tile and tried sanding it first and sanding achieved absolutely nothing, so the real tip is: Just Wait for Megan to Do It First and then Copy Whatever She Did.

Next, I slathered on two generous coats of high-gloss latex paint, a cool shade of grey that roughly matched the color of the floor grout, which makes it seem like we actually planned all this out ahead of time: DSC_0235

DSC_0254

Finally, there was the issue of that pesky gap between the floor and the wall. I could have thrown down some bland wood trim (also scavenged out of the neighbors’ garage), but now I say: No more shortcuts compromises! Wood trim would have been like wearing a burlap cummerbund over a sequined tuxedo (yes, I did just watch that biopic about Liberace).

I found a deal on some glossy white ceramic trim at my local Big Box Store. But since our bathroom was designed by a Victorian-era madman, we had to cut the trim to accommodate FIVE corners. I dropped more money on a new diamond-wheel attachment for our Dremmel than I did on the actual tile.

DSC_0242

Liberace exclusively used diamond-encrusted tools as well!

DSC_0240 We secured the trim to both the wall and floor with a stinky construction adhesive called Liquid Nails, and filled in the weird gaps with plain white caulk.

Since bathroom guests could no longer stare up at the ceiling entrails for amusement, I gave them something new to contemplate while doing their private business. This print by my friend The Book Designer and Collage Artist Matt Avery added a pop both of color AND social justice theme to our two-toned water closet:

DSC_0259

With the finishing touches in place, Scott and I both exclaimed, “It looks like a bathroom in a restaurant!” But, you know… a nice restaurant; not those restaurants that have cold bathrooms that you can only access by walking through the kitchen and that have weird puddles of liquid in unnerving locations and ashtrays on the toilet. No, a nice restaurant bathroom.

DSC_0253

DSC_0260DSC_0270


DSC_0271

——endnotes———
 * Don’t worry, it’s just a metaphor – Scott and I don’t actually smoke. But when we were kids, “running out for a pack of smokes” was a euphemism for when a grownup casually walked out the front door and never came back, or came back a week later with a mustache, a bad sunburn, and – if you were lucky– a puppy.
** Each of you define “room” differently, and I honor that journey. Your room doesn’t have to have four walls and a floor and a ceiling. I’m not the Room Police (though they do bring me in for questioning from time to time).
*** I’m sending some pretty negative messages about tobacco use in this blog post. However, I still maintain that smoking on the toilet is hopelessly glamorous, and 90% safer than smoking in bed.
**** This is also a new style of attachment parenting, as seen in the classic children’s book, “Love You Forever.